參照教程:https://www.bilibili.com/video/BV19K4y1L7MT
springboot搭建web,Rest風格支持(使用HTTP請求方式動詞來表示對資源的操作)
用法: 表單method=post,隱藏域 _method=put
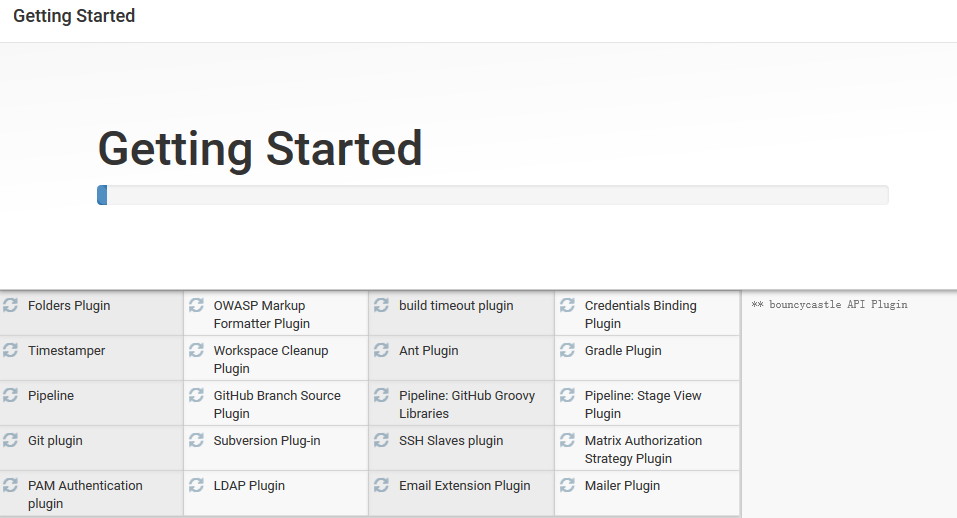
springboot web項目、SpringBoot中手動開啟
spring:mvc:hiddenmethod:filter:enabled: true
Controller:
@RestController
public class HelloController {@GetMapping("/user")public String getUser(){return "GET-張三";}@PostMapping("/user")public String saveUser(){return "POST-張三";}@PutMapping("/user")public String putUser(){return "PUT-張三";}@DeleteMapping("/user")public String deleteUser(){return "DELETE-張三";}}
springboot開發網站,測試頁面:
<!DOCTYPE html>
<html lang="en">
<head><meta charset="UTF-8"><title>測試</title>
</head>
<body>
<h1>測試REST風格</h1>
<form method="post" action="/user"><input type="submit" value="POST"></form>
<form method="get" action="/user"><input type="submit" value="GET"></form>
<form method="post" action="/user"><input type="hidden" name="_method" value="put"><input type="submit" value="PUT">
</form>
<form method="post" action="/user"><input type="hidden" name="_method" value="delete"><input type="submit" value="DELETE">
</form>
</body>
</html>
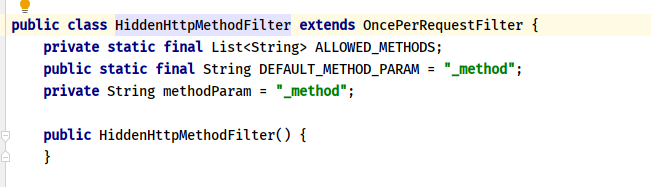
自定義把_method 這個名字換成我們自己喜歡的:自定義HiddenHttpMethodFilter
@Configuration
public class WebConfiguration {@Beanpublic HiddenHttpMethodFilter hiddenHttpMethodFilter(){HiddenHttpMethodFilter hiddenHttpMethodFilter = new HiddenHttpMethodFilter();hiddenHttpMethodFilter.setMethodParam("_m");return hiddenHttpMethodFilter;}
}
Rest原理(表單提交要使用REST的時候)
表單提交會帶上**_method=PUT**
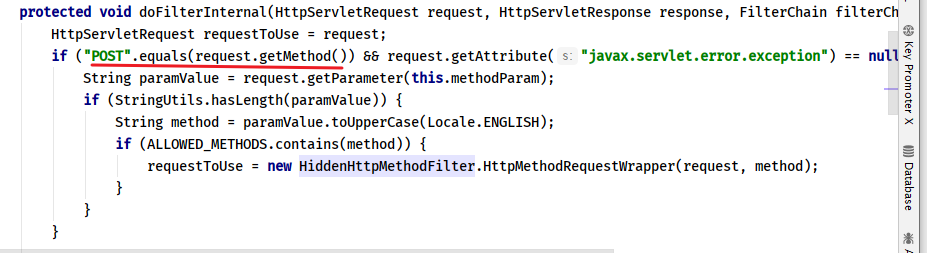
請求過來被HiddenHttpMethodFilter攔截
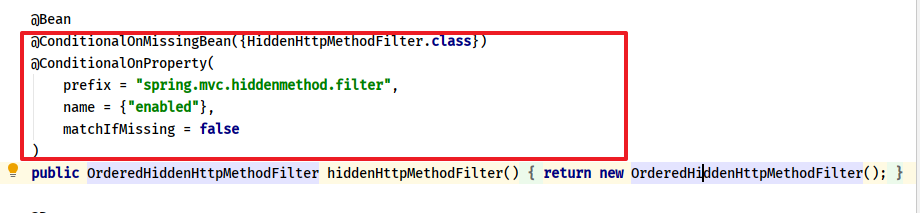
為什么需要手動開啟,以及可以自己配置HiddenHttpMethodFilter?
為什么攔截的是_method?
為什么表單請求方式需要是POST?
Rest使用客戶端工具,
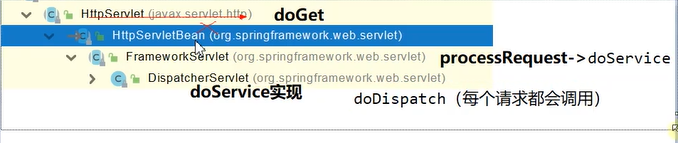
FrameworkServlet繼承HttpServlet并重寫了doGet()方法:
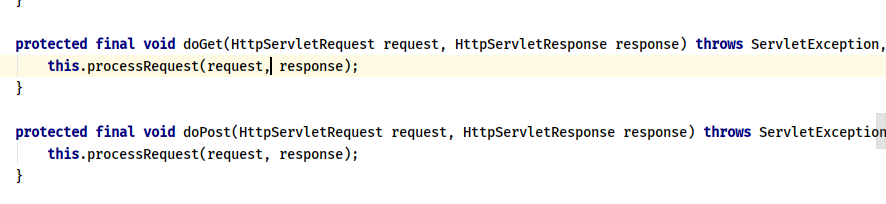
而doGet()最終還是要執行processRequest()這個方法,而processRequest()內部的核心方法是doService():
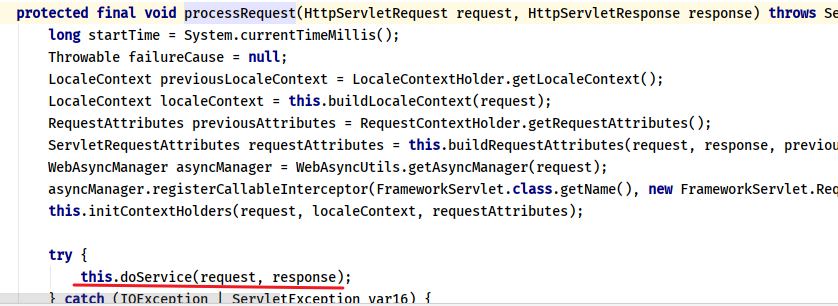
doService()是一個抽象方法:
protected abstract void doService(HttpServletRequest var1, HttpServletResponse var2) throws Exception;
在DispatcherServlet中有doService()的實現,而doService()中的核心是調用本類的doDispatch()方法,所以研究doDispatch()方法是最終的方法
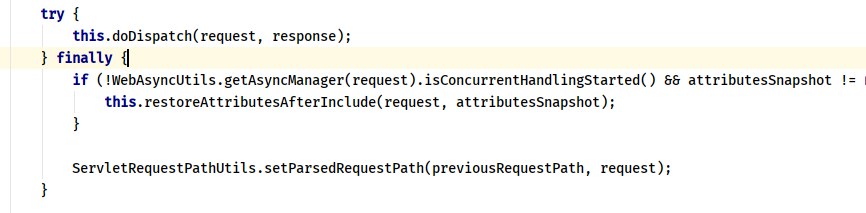
對Spring MVC功能分析從DispatcherServlet的doDispatch()方法開始:
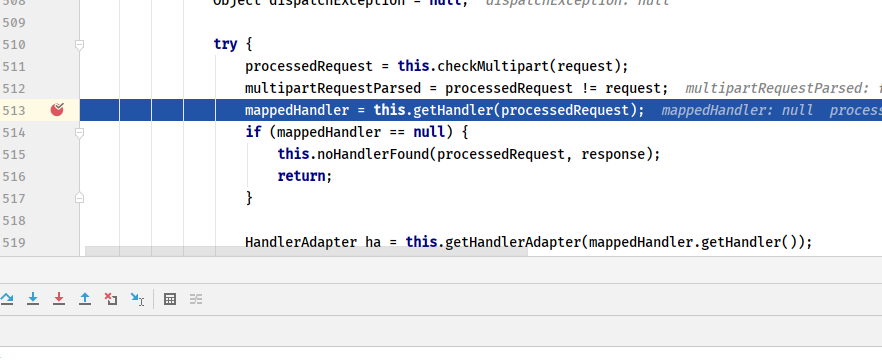
protected void doDispatch(HttpServletRequest request, HttpServletResponse response) throws Exception {HttpServletRequest processedRequest = request;HandlerExecutionChain mappedHandler = null;boolean multipartRequestParsed = false;WebAsyncManager asyncManager = WebAsyncUtils.getAsyncManager(request);try {try {ModelAndView mv = null;Object dispatchException = null;try {processedRequest = this.checkMultipart(request);multipartRequestParsed = processedRequest != request;//找到當前請求使用哪個Handler(Controller的方法)處理mappedHandler = this.getHandler(processedRequest);//HandlerMapping:處理器映射。/xxx->>xxxx
打斷點,發送請求并進入這個方法:
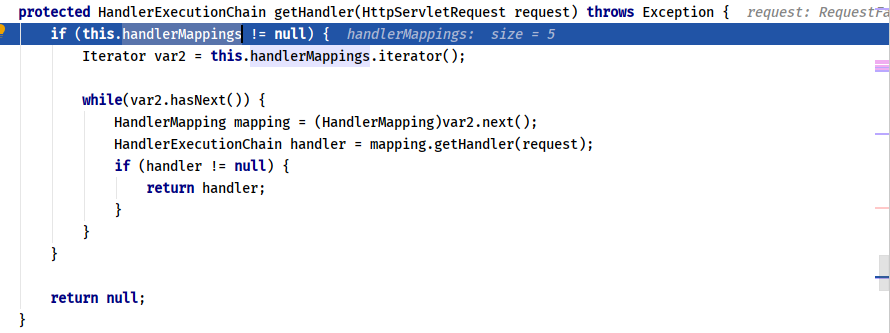
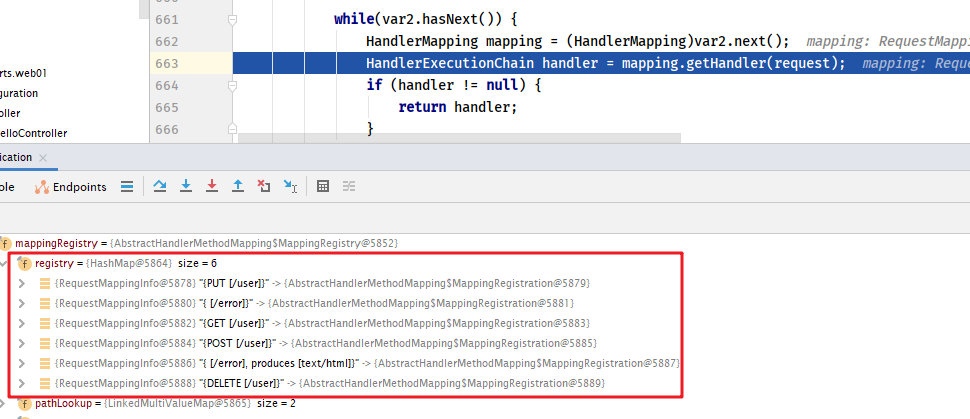
可以看到,這個方法內部是將所有的handlerMappings用迭代器進行匹配:
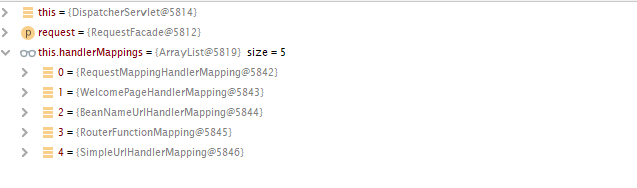
這些handlerMappings有(index頁發送的是Get請求):
進入第一個mapping,我們可以看到RequestMapping中有我們在控制器寫的各種處理請求的方法
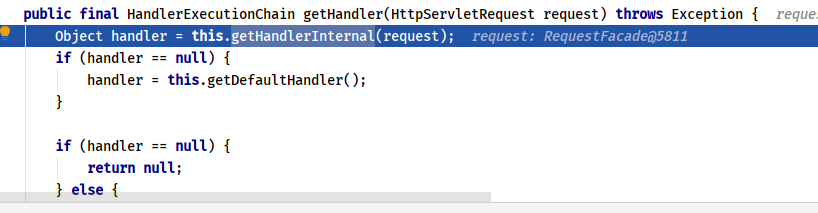
進入getHandler()方法,可以看到調用了getHandlerInternal()來處理:
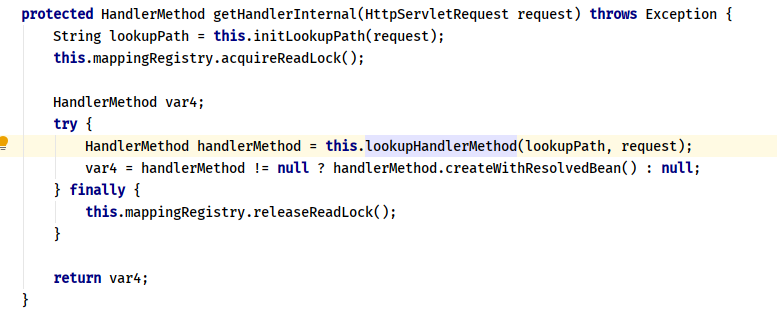
進入getHandlerInternal()方法,可以看到調用了父類的getHandlerInternal()方法,再次打斷點

在這個方法里再進行找路徑以及請求方法:
總結:所有的請求映射都在HandlerMapping中。
SpringBoot自動配置歡迎頁的 WelcomePageHandlerMapping 。訪問 /能訪問到index.html;
SpringBoot自動配置了默認 的 RequestMappingHandlerMapping
請求進來,挨個嘗試所有的HandlerMapping看是否有請求信息。
我們需要一些自定義的映射處理,我們也可以自己給容器中放HandlerMapping。自定義 HandlerMapping
@GetMapping("/car/id/{id}/owner/{owner}")public Map<String, Object> getCar(@PathVariable("id") Integer id,@PathVariable("owner") String owner,@PathVariable Map<String, String> kv,@RequestHeader("host") String host,@RequestHeader Map<String, String> headers){Map map = new HashMap();map.put("id", id);map.put("owner", owner);map.put("kv", kv);map.put("host", host);map.put("headers", headers);return map;}//前端頁面:<a href="/car/id/11/owner/lisi">測試@PathVariable和@RequestHeader</a><br/> @GetMapping("/person")public Map<String, Object> getInfo(@RequestParam("id") Integer id, @RequestParam Map<String, String> info,@CookieValue("_ga") Cookie cookie, @CookieValue("_ga") String _ga){Map map = new HashMap();map.put("id", id);map.put("info", info);System.out.println(cookie.getName() + "---->");return map;}//<a href="/person?id=12&username=zhangsan&age=18">測試@RequestParam</a><br/>
post方法請求才有請求體:
 @PostMapping("/save")public Map postMethod(@RequestBody String content){Map<String,Object> map = new HashMap<>();map.put("content",content);return map;}<form action="/save" method="post">姓名: <input type="text" name="username"><br/>密碼: <input type="text" name="password"><br/><input type="submit" value="submit">
</form>
獲取請求域的值
@Controller
public class RequestTestController {@GetMapping("/goto")public String goToPage(HttpServletRequest request){request.setAttribute("username", "zhangsan");request.setAttribute("password", 1234567);return "forward:/success";}@ResponseBody@GetMapping("/success")public Map success(@RequestAttribute("username") String username,@RequestAttribute("password") Integer password,HttpServletRequest request){Map map = new HashMap();map.put("username", username);map.put("password", password);map.put("username_re", request.getAttribute("username"));map.put("password_re", request.getAttribute("password"));return map;}
}
矩陣變量:
配置:
@Configuration
public class WebConfiguration implements WebMvcConfigurer {@Overridepublic void configurePathMatch(PathMatchConfigurer configurer) {UrlPathHelper urlPathHelper = new UrlPathHelper();urlPathHelper.setRemoveSemicolonContent(false);configurer.setUrlPathHelper(urlPathHelper);}
}
或者:
@Configuration
public class WebConfiguration{@Beanpublic WebMvcConfigurer webMvcConfigurer(){return new WebMvcConfigurer(){@Overridepublic void configurePathMatch(PathMatchConfigurer configurer) {UrlPathHelper urlPathHelper = new UrlPathHelper();urlPathHelper.setRemoveSemicolonContent(false);configurer.setUrlPathHelper(urlPathHelper);}};}
}
測試:
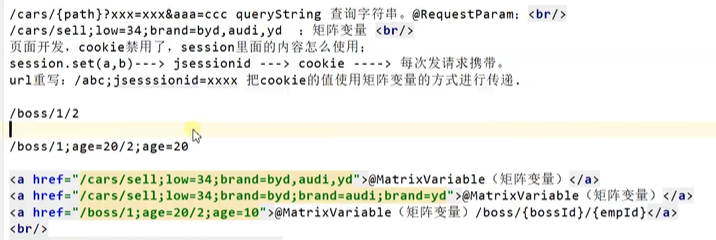
//1、語法: 請求路徑:/cars/sell;low=34;brand=byd,audi,yd//2、SpringBoot默認是禁用了矩陣變量的功能// 手動開啟:原理。對于路徑的處理。UrlPathHelper進行解析。// removeSemicolonContent(移除分號內容)支持矩陣變量的//3、矩陣變量必須有url路徑變量才能被解析@GetMapping("/cars/{path}/{info}")public Map carsSell(@MatrixVariable("low") Integer low,@MatrixVariable("brand") List<String> brand,@PathVariable("path") String path,@MatrixVariable("price") Integer price){Map<String,Object> map = new HashMap<>();map.put("low",low);map.put("brand",brand);map.put("path",path);map.put("price", price);return map;}// /boss/1;age=20/2;age=10@GetMapping("/boss/{bossId}/{empId}")public Map boss(@MatrixVariable(value = "age",pathVar = "bossId") Integer bossAge,@MatrixVariable(value = "age",pathVar = "empId") Integer empAge){Map<String,Object> map = new HashMap<>();map.put("bossAge",bossAge);map.put("empAge",empAge);return map;}WebRequest、ServletRequest、MultipartRequest、 HttpSession、javax.servlet.http.PushBuilder、Principal、InputStream、Reader、HttpMethod、Locale、TimeZone、ZoneId
Map、**Model(map、model里面的數據會被放在request的請求域 request.setAttribute)、**Errors/BindingResult、RedirectAttributes( 重定向攜帶數據)、ServletResponse(response)、SessionStatus、UriComponentsBuilder、ServletUriComponentsBuilder
Map<String,Object> map,  Model model, HttpServletRequest request 都是可以給request域中放數據,
request.getAttribute();
可以自動類型轉換與格式化,可以級聯封裝。
/***     姓名: <input name="userName"/> <br/>*     年齡: <input name="age"/> <br/>*     生日: <input name="birth"/> <br/>*     寵物姓名:<input name="pet.name"/><br/>*     寵物年齡:<input name="pet.age"/>*/
@Data
public class Person {private String userName;private Integer age;private Date birth;private Pet pet;}@Data
public class Pet {private String name;private String age;}
自定義converter
//1、WebMvcConfigurer定制化SpringMVC的功能@Beanpublic WebMvcConfigurer webMvcConfigurer(){return new WebMvcConfigurer() {@Overridepublic void configurePathMatch(PathMatchConfigurer configurer) {UrlPathHelper urlPathHelper = new UrlPathHelper();// 不移除;后面的內容。矩陣變量功能就可以生效urlPathHelper.setRemoveSemicolonContent(false);configurer.setUrlPathHelper(urlPathHelper);}@Overridepublic void addFormatters(FormatterRegistry registry) {registry.addConverter(new Converter<String, Pet>() {@Overridepublic Pet convert(String source) {// 啊貓,3if(!StringUtils.isEmpty(source)){Pet pet = new Pet();String[] split = source.split(",");pet.setName(split[0]);pet.setAge(Integer.parseInt(split[1]));return pet;}return null;}});}};}
        <dependency><groupId>org.springframework.boot</groupId><artifactId>spring-boot-starter-web</artifactId></dependency>
web場景自動引入了json場景<dependency><groupId>org.springframework.boot</groupId><artifactId>spring-boot-starter-json</artifactId><version>2.3.4.RELEASE</version><scope>compile</scope></dependency>
給前端自動返回json數據
    @ResponseBody@GetMapping("/pet")public Pet getPet(Pet pet){return pet;}<form action="/pet" method="get">姓名:<input type="text" name="name" value="cat"><br/>年齡:<input type="text" name="age" value="18"><br/><input type="submit" value="submit">
</form>
ModelAndView
Model
View
ResponseEntity
ResponseBodyEmitter
StreamingResponseBody
HttpEntity
HttpHeaders
Callable
DeferredResult
ListenableFuture
CompletionStage
WebAsyncTask
有 @ModelAttribute 且為對象類型的
@ResponseBody 注解 ---> RequestResponseBodyMethodProcessor;
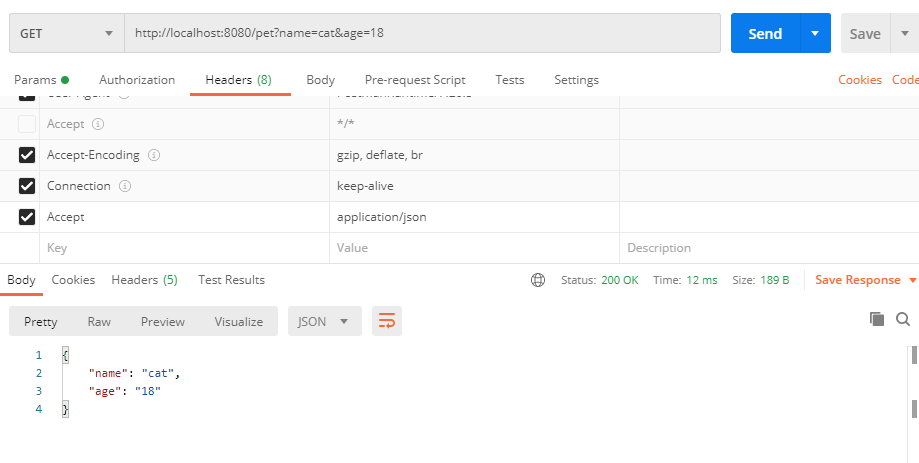
根據客戶端接收能力不同,返回不同媒體類型的數據
 <dependency><groupId>com.fasterxml.jackson.dataformat</groupId><artifactId>jackson-dataformat-xml</artifactId>
</dependency>
只需要改變請求頭中Accept字段。Http協議中規定的,告訴服務器本客戶端可以接收的數據類型。
xml:
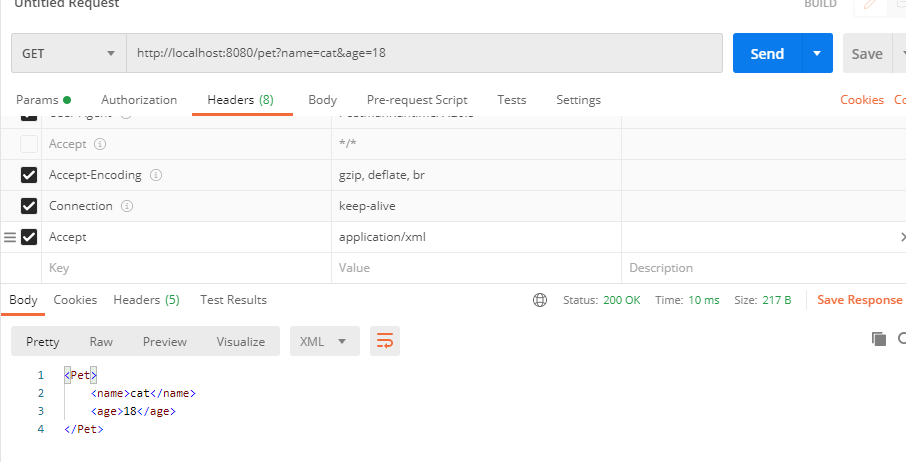
json:
Thymeleaf is a modern server-side Java template engine for both web and standalone environments, capable of processing HTML, XML, JavaScript, CSS and even plain text.
現代化、服務端Java模板引擎
文本值: ‘one text’ , ‘Another one!’ **,…**數字: 0 , 34 , 3.0 , 12.3 **,…**布爾值: true , false
空值: null
變量: one,two,… 變量不能有空格
運算符: + , - , * , / , %
運算符: and , or
一元運算: ! , not
比較: > , < , >= , <= ( gt , lt , ge , le **)**等式: == , != ( eq , ne )
If-then: (if) ? (then)
If-then-else: (if) ? (then) : (else)
Default: (value) ?: (defaultvalue)
無操作: _
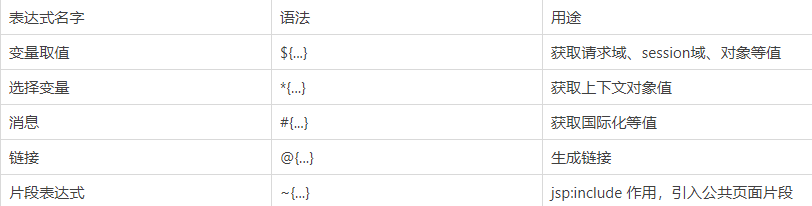
設置單個值
<form action="subscribe.html" th:attr="action=@{/subscribe}"><fieldset><input type="text" name="email" /><input type="submit" value="Subscribe!" th:attr="value=#{subscribe.submit}"/></fieldset>
</form>
設置多個值
<img src="../../images/gtvglogo.png" th:attr="src=@{/images/gtvglogo.png},title=#{logo},alt=#{logo}" />
替代寫法:
<input type="submit" value="Subscribe!" th:value="#{subscribe.submit}"/>
<form action="subscribe.html" th:action="@{/subscribe}">
<tr th:each="prod : ${prods}"><td th:text="${prod.name}">Onions</td><td th:text="${prod.price}">2.41</td><td th:text="${prod.inStock}? #{true} : #{false}">yes</td>
</tr>
<tr th:each="prod,iterStat : ${prods}" th:class="${iterStat.odd}? 'odd'"><td th:text="${prod.name}">Onions</td><td th:text="${prod.price}">2.41</td><td th:text="${prod.inStock}? #{true} : #{false}">yes</td>
</tr>
<a href="comments.html"
th:href="@{/product/comments(prodId=${prod.id})}"
th:if="${not #lists.isEmpty(prod.comments)}">view</a>
<div th:switch="${user.role}"><p th:case="'admin'">User is an administrator</p><p th:case="#{roles.manager}">User is a manager</p><p th:case="*">User is some other thing</p>
</div>
<dependency><groupId>org.springframework.boot</groupId><artifactId>spring-boot-starter-thymeleaf</artifactId></dependency>
@Configuration(proxyBeanMethods = false)
@EnableConfigurationProperties(ThymeleafProperties.class)
@ConditionalOnClass({ TemplateMode.class, SpringTemplateEngine.class })
@AutoConfigureAfter({ WebMvcAutoConfiguration.class, WebFluxAutoConfiguration.class })
public class ThymeleafAutoConfiguration { }
自動配好的策略
public static final String DEFAULT_PREFIX = "classpath:/templates/";public static final String DEFAULT_SUFFIX = ".html"; //xxx.html
html引入命名空間: xmlns:th=“http://www.thymeleaf.org”
<!DOCTYPE html>
<html lang="en" xmlns:th="http://www.thymeleaf.org">
<head><meta charset="UTF-8"><title>Title</title>
</head>
<body>
<h1 th:text="${msg}">哈哈</h1>
<h2><a href="www.atguigu.com" th:href="${link}">去百度</a>  <br/><a href="www.atguigu.com" th:href="@{link}">去百度2</a>
</h2>
</body>
</html>
<form class="form-signin" action="index.html" method="post" th:action="@{/login}">
這是前端登錄頁面的表格,點擊提交后會請求到相應的controller來處理:
@PostMapping("/login")public String main(User user, HttpSession session, Model model){String username = user.getUsername();String password = user.getPassword();if("deserts".equals(username) && "123".equals(password)){session.setAttribute("user", user);return "redirect:/main.html";}else{model.addAttribute("msg", "賬號或者密碼錯誤");return "login";}}@GetMapping("main.html")public String mainPage(HttpSession session, Model model){Object user = session.getAttribute("user");if (user != null){return "main";}else{model.addAttribute("msg", "請重新登錄");return "login";}}
直接寫入標簽內的文本:
<a href="#">[[${session.user.username}]]</a>
前面處理的用戶登錄的controller在用戶登錄失敗或著沒登錄直接訪問main頁面時,應該返回登錄頁及給出提示信息,通過model設置request域的值,從前端頁面取出來,達到回顯的效果
<label style="color:green;" th:text="${msg}"/>
這里主要參照官網,區分三種抽取的方式。抽取的片段:
<footer th:fragment="copy">© 2011 The Good Thymes Virtual Grocery
</footer
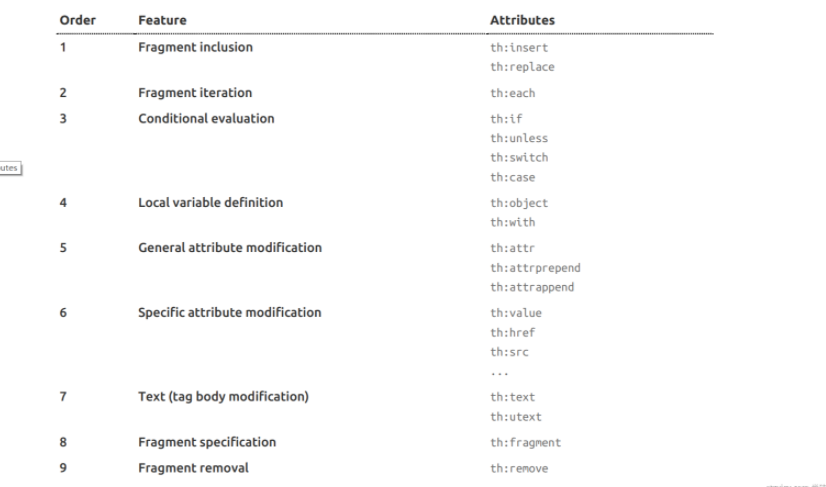
頁面引入抽取片段的三種方式:
<body>...<div th:insert="footer :: copy"></div><div th:replace="footer :: copy"></div><div th:include="footer :: copy"></div></body>
會導致的結果:
<body>...<div><footer>© 2011 The Good Thymes Virtual Grocery</footer></div><footer>© 2011 The Good Thymes Virtual Grocery</footer><div>© 2011 The Good Thymes Virtual Grocery</div></body>
區別:insert是插入原引入標簽的內部,replace是將原標簽給替換成碎片部分的標簽和內容,include是去掉標簽將碎片內容包含在原標簽中。
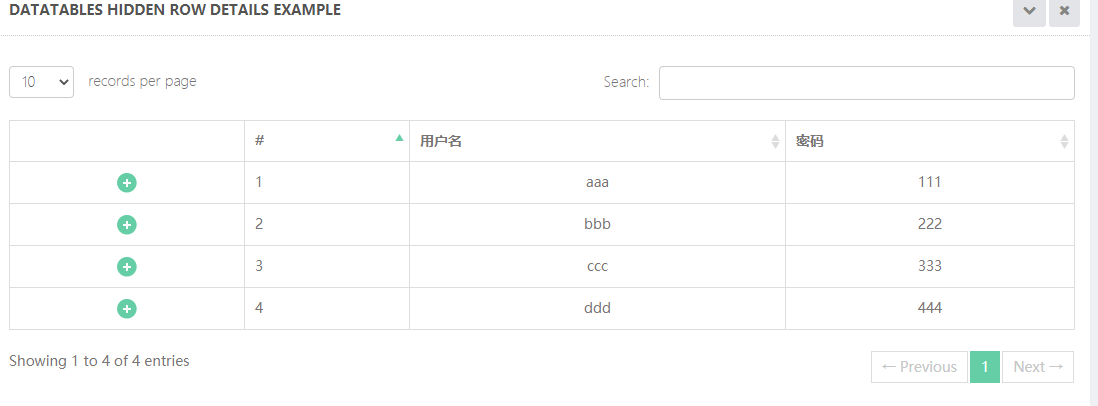
controller:
@GetMapping("/dynamic_table")public String dynamic_table(Model model){List<User> users = Arrays.asList(new User("aaa", "111"), new User("bbb", "222"),new User("ccc", "333"), new User("ddd", "444"));model.addAttribute("users", users);return "table/dynamic_table";}
頁面:
<table class="display table table-bordered" id="hidden-table-info"><thead><tr><th class="hidden-phone">#</th><th class="hidden-phone">用戶名</th><th class="hidden-phone">密碼</th></tr></thead><tbody><tr class="gradeX" th:each="user,status:${users}"><td class="hidden-phone" th:text="${status.count}"></td><td class="center hidden-phone">[[${user.username}]]</td><td class="center hidden-phone" th:text="${user.password}"></td></tr></tbody></table>
效果:
版权声明:本站所有资料均为网友推荐收集整理而来,仅供学习和研究交流使用。

工作时间:8:00-18:00
客服电话
电子邮件
admin@qq.com
扫码二维码
获取最新动态