Sprint实战第四版
java的配置和xml配置功能相同
@Configuration 类似于xml中的beans
@CompnetScan 类似于xml总的<context:component-scan>
@SpringJUnit4ClassRunner,以便在测试开始的时候自动创 建Spring的应用上下文。
@ContextConfiguration
@Autowired注解不仅能够用在构造器上,还能用在属性的Setter方法上。比如说,如 果CDPlayer有一个setCompactDisc()方法,那么可以采用如下的注解形式进行自动装配:
实际上,Setter方法并没有什么特殊之处。@Autowired注解可以用在类的任何方法上。假 设CDPlayer类有一个insertDisc()方法,那么@Autowired能够像 在setCompactDisc()上那样,发挥完全相同的作用。
不管是构造器、Setter方法还是其他的方法,Spring都会尝试满足方法参数上所声明的依赖。假如 有且只有一个bean匹配依赖需求的话,那么这个bean将会被装配进来。
如果没有匹配的bean,那么在应用上下文创建的时候,Spring会抛出一个异常。为了避免异常的 出现,你可以将@Autowired的required属性设置为false。
将required属性设置为false时,Spring会尝试执行自动装配,但是如果没有匹配的bean的 话,Spring将会让这个bean处于未装配的状态。但是,把required属性设置为false时,你需 要谨慎对待。如果在你的代码中没有进行null检查的话,这个处于未装配状态的属性有可能会出 现NullPointerException。
@Inject注解来源于Java依赖注入规范,该规范同时还为我们定义了@Named注解。在自动装配 中,Spring同时支持@Inject和@Autowired。尽管@Inject和@Autowired之间有着一些细 微的差别,但是在大多数场景下,它们都是可以互相替换的。
在@Inject和@Autowired中,我没有特别强烈的偏向性。实际上,在有的项目中,我会发现我 同时使用了这两个注解。不过在本书的样例中,我会一直使用@Autowired,而你可以根据自己 的情况,选择其中的任意一个。
@Rule TODO
@Test TODO
尽管在很多场景下通过组件扫描和自动装配实现Spring的自动化配置是更为推荐的方式,但有时候 自动化配置的方案行不通,因此需要明确配置Spring。比如说,你想要将第三方库中的组件装配到
你的应用中,在这种情况下,是没有办法在它的类上添加@Component和@Autowired注解的, 因此就不能使用自动化装配的方案了。
在这种情况下,你必须要采用显式装配的方式。在进行显式配置的时候,有两种可选方案:Java 和XML。在这节中,我们将会学习如何使用Java配置,接下来的一节中将会继续学习Spring的 XML配置。
就像我之前所说的,在进行显式配置时,JavaConfig是更好的方案,因为它更为强大、类型安全并 且对重构友好。因为它就是Java代码,就像应用程序中的其他Java代码一样。
参考 http://www.cnblogs.com/xing901022/p/4248674.html
在Spring中有许多的容器,在以前都是使用Bean工厂,但是现在基本都是使用应用上下文。
下面是几种常用的应用上下文加载方式:
ClassPathXmlApplicationContext:通过加载类路径下的xml文件,最常使用的方式,即加载src目录下的bean.xml文件。
FileSystemXmlApplicationContext:通过指定绝对路径加载配置文件。
XmlWebApplicationContext:读取web应用下的配置文件加载。
Bean的生命周期:
1 实例化
2 注入属性
3 BeanNameAware
4 BeanFactoryAware
5 ApplicationContextAware
6 BeanPostProcessor,ProcessBeforeInitialization
7 Initilalization
8 BeanPostProcessor,ProcessAfterInitialization
9 可以使用
10 DisposableBean destroy
可以通过constructor-arg 来传递构造函数的参数
<?xml version="1.0" encoding="UTF-8"?>
<beans xmlns:xsi="http://www.w3.org/2001/XMLSchema-instance"xmlns="http://www.springframework.org/schema/beans"xsi:schemaLocation="http://www.springframework.org/schema/beanshttp://www.springframework.org/schema/beans/spring-beans-3.0.xsd"><bean id="duke" class="com.spring.test.action1.Juggler"><constructor-arg value="15"/></bean>
</beans>
4 应用上下文获
如果有这样的需求:
1 不想再bean.xml加载的时候实例化bean,而是想把加载bean.xml与实例化对象分离。
2 实现单例的bean
以上的情况,都可以通过工厂方法factory-method来创建bean。
这样再加载bean.xml时,不会直接实例化bean,而是当调用factory-method所指的方法时,才开始真正的实例化。
首先看一下传统的单例模式的实现方式:
1 最原始的实现单例模式的方法(存在线程不安全):
public class SingletonOne {private static SingletonOne instance = null;private SingletonOne() {}public static SingletonOne getInstance() {if (instance == null) {instance = new SingletonOne(); }return instance;}
}
但是这种方法有一个弊端,就是存在线程的不安全!
比如当两个线程同时进入if(instance == null)时,一个线程判断了当前为空,然后切换到另一个线程,这个线程也判断为空。然后切换回第一个线程,进行实例化,再切换到第二个线程,进行实例化。这样就存在了两个实例。
2 通过关键字Synchronized强制线程同步
package com.something.singleton;
public class SingletonTwo {private static SingletonTwo instance = null;private SingletonTwo() {}public static synchronized SingletonTwo getInstance() {if (instance == null) {instance = new SingletonTwo();}return instance;}
}
这样当线程进行到getInstance会同步的进行,不会有线程安全问题,但是不仅仅是实例化,每次调用也需要同步,这样就会造成很多资源的浪费。
3 通过静态内部类进行单例
public class SingletonThree {private static class SingletonHolder{static SingletonThree instance = new SingletonThree();}
  private SingletonThree() {}public static SingletonThree getInstance() {return SingletonHolder.instance;}
}
这种方法时最推荐的一种方法,由于Java的调用机制,SingletonHolder只有在调用getInstance的时候才会加载,而内部的静态类只会被加载一次,因此又是线程安全的。
总结起来:
第一种方法,是存在线程安全问题的。
第二种方法,则消耗了一定的资源。
第三种方法,比较推荐。
通过spring的factory-method来创建单例的bean
首先通过静态内部类创建一个单例对象
package com.spring.test.factorymethod;public class Stage {public void perform(){System.out.println("演出开始...");}private Stage(){}private static class StageSingletonHolder{static Stage instance = new Stage();}public static Stage getInstance(){return StageSingletonHolder.instance;}
}
在spring配置文件中指定加载的方法getInstance
<?xml version="1.0" encoding="UTF-8"?>
<beans xmlns:xsi="http://www.w3.org/2001/XMLSchema-instance"xmlns="http://www.springframework.org/schema/beans"xsi:schemaLocation="http://www.springframework.org/schema/beanshttp://www.springframework.org/schema/beans/spring-beans-3.0.xsd"><bean id="theStage" class="com.spring.test.factorymethod.Stage"factory-method="getInstance"></bean>
</beans>
通过应用上下文调用bean获取实例
package com.spring.test.factorymethod;import org.springframework.context.ApplicationContext;
import org.springframework.context.support.ClassPathXmlApplicationContext;public class test {public static void main(String[] args) {ApplicationContext ctx = new ClassPathXmlApplicationContext("bean.xml");Stage stage = ((Stage)ctx.getBean("theStage"));//.getInstance();stage.perform();}
}
执行结果
一月 24, 2015 6:38:18 下午 org.springframework.context.support.AbstractApplicationContext prepareRefresh
信息: Refreshing org.springframework.context.support.ClassPathXmlApplicationContext@512dbd1a: startup date [Sat Jan 24 18:38:18 CST 2015]; root of context hierarchy
一月 24, 2015 6:38:19 下午 org.springframework.beans.factory.xml.XmlBeanDefinitionReader loadBeanDefinitions
信息: Loading XML bean definitions from class path resource [bean.xml]
一月 24, 2015 6:38:19 下午 org.springframework.beans.factory.support.DefaultListableBeanFactory preInstantiateSingletons
信息: Pre-instantiating singletons in org.springframework.beans.factory.support.DefaultListableBeanFactory@2d1879ea: defining beans [duke,sonnet29,poeticDuke,theStage]; root of factory hierarchy
演出开始...
Singleton:在一个应用上下文容器中,所有的线程或对象通过getBean获得指定id的Bean,得到的都是同一个实例。
这种的Bean实例完全由应用上下文容器来控制声明周期,用户无论何时何地得到的实例都是同一个。
Prototype: 这种类型的Bean会在每一次都创建一个新的实例,而实例的生命周期仅仅由应用上下文控制其初始化和装配,一旦初始化成功,控制权就会交给用户。
通过上面对生命周期的讲解,可以了解到,我们在spring中使用init-method和destroy-method方法时,仅仅在默认情况即singleton模式下,destroy-method才会起作用。
下面做个小例子,做一下验证:
举个例子,一个舞台Bean,我们想在使用舞台前打开灯光,在舞台使用后关闭灯光再拆掉舞台。就可以通过init-method和destroy-method来指定方法。

package com.spring.test.initdesotry;public class Stage {public void perform(){System.out.println("演出开始...");}public void turnOnLight(){System.out.println("演出开始前,开灯...");}public void turnOffLight(){System.out.println("演出结束前,关灯...");}
}
配置bean.xml
<?xml version="1.0" encoding="UTF-8"?>
<beans xmlns:xsi="http://www.w3.org/2001/XMLSchema-instance"xmlns="http://www.springframework.org/schema/beans"xsi:schemaLocation="http://www.springframework.org/schema/beanshttp://www.springframework.org/schema/beans/spring-beans-3.0.xsd">    <bean id="stage" class="com.spring.test.initdesotry.Stage"scope="prototype" //注意这句话,如果是singleton或者没有该句(默认情况)时,才会执行destroy-method指定的方法,如果是当前的prototype不会触发destroymethod的执行init-method="turnOnLight" destroy-method="turnOffLight"/>
</beans>
在主函数中,不要忘记应用上下文容器的关闭,只有这样,才会出发destroy-method的执行。
package com.spring.test.initdesotry;import org.springframework.context.ApplicationContext;
import org.springframework.context.support.ClassPathXmlApplicationContext;public class test {public static void main(String[] args) {ApplicationContext ctx = new ClassPathXmlApplicationContext("bean.xml");Stage stage = (Stage)ctx.getBean("stage");stage.perform();((ClassPathXmlApplicationContext) ctx).close();//关闭应用上下文容器,不要忘记这句话}
}
当Bean是singleton模式或者默认时,会得到如下的结果:
一月 25, 2015 1:30:42 下午 org.springframework.context.support.AbstractApplicationContext prepareRefresh
信息: Refreshing org.springframework.context.support.ClassPathXmlApplicationContext@4f5cb20e: startup date [Sun Jan 25 13:30:42 CST 2015]; root of context hierarchy
一月 25, 2015 1:30:42 下午 org.springframework.beans.factory.xml.XmlBeanDefinitionReader loadBeanDefinitions
信息: Loading XML bean definitions from class path resource [bean.xml]
一月 25, 2015 1:30:42 下午 org.springframework.beans.factory.support.DefaultListableBeanFactory preInstantiateSingletons
信息: Pre-instantiating singletons in org.springframework.beans.factory.support.DefaultListableBeanFactory@68df6513: defining beans [duke,sonnet29,poeticDuke,theStage,stage]; root of factory hierarchy
演出开始前,开灯...
演出开始...
一月 25, 2015 1:30:42 下午 org.springframework.context.support.AbstractApplicationContext doClose
信息: Closing org.springframework.context.support.ClassPathXmlApplicationContext@4f5cb20e: startup date [Sun Jan 25 13:30:42 CST 2015]; root of context hierarchy
一月 25, 2015 1:30:42 下午 org.springframework.beans.factory.support.DefaultSingletonBeanRegistry destroySingletons
信息: Destroying singletons in org.springframework.beans.factory.support.DefaultListableBeanFactory@68df6513: defining beans [duke,sonnet29,poeticDuke,theStage,stage]; root of factory hierarchy
演出结束前,关灯...
当是prototype模式时,得到如下的结果:
一月 25, 2015 1:05:40 下午 org.springframework.context.support.AbstractApplicationContext prepareRefresh
信息: Refreshing org.springframework.context.support.ClassPathXmlApplicationContext@4eadddd6: startup date [Sun Jan 25 13:05:40 CST 2015]; root of context hierarchy
一月 25, 2015 1:05:40 下午 org.springframework.beans.factory.xml.XmlBeanDefinitionReader loadBeanDefinitions
信息: Loading XML bean definitions from class path resource [bean.xml]
一月 25, 2015 1:05:40 下午 org.springframework.beans.factory.support.DefaultListableBeanFactory preInstantiateSingletons
信息: Pre-instantiating singletons in org.springframework.beans.factory.support.DefaultListableBeanFactory@2264f82f: defining beans [duke,sonnet29,poeticDuke,theStage,stage]; root of factory hierarchy
演出开始前,开灯...
演出开始...
一月 25, 2015 1:05:40 下午 org.springframework.context.support.AbstractApplicationContext doClose
信息: Closing org.springframework.context.support.ClassPathXmlApplicationContext@4eadddd6: startup date [Sun Jan 25 13:05:40 CST 2015]; root of context hierarchy
一月 25, 2015 1:05:40 下午 org.springframework.beans.factory.support.DefaultSingletonBeanRegistry destroySingletons
信息: Destroying singletons in org.springframework.beans.factory.support.DefaultListableBeanFactory@2264f82f: defining beans [duke,sonnet29,poeticDuke,theStage,stage]; root of factory hierarchy
spring Boot提倡约定优于配置,如何将类的生命周期交给spring
1、第一种自己写的类,Controller,Service。 用@controller @service即可
2、第二种,集成其它框架,比如集成shiro权限框架,集成mybatis分页插件PageHelper,第三方框架的核心类都要交于Spring大管家管理
Spring Boot不是spring的加强版,所以@Configuration和@Bean同样可以用在普通的spring项目中,而不是Spring Boot特有的,只是在spring用的时候,注意加上扫包配置
<context:component-scan base-package="com.xxx.xxx" />,普通的spring项目好多注解都需要扫包,才有用,有时候自己注解用的挺6,但不起效果,就要注意这点。
Spring Boot则不需要,主要你保证你的启动Spring Boot main入口,在这些类的上层包就行
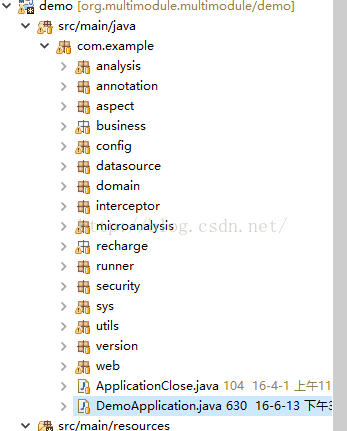
就像这样,DemoApplication是启动类,关于启动类的位置放置,在另一篇博客有专门的去分析。
@Configuration和@Bean的Demo类
- @Configuration
- public class ExampleConfiguration {
- @Value("com.mysql.jdbc.Driver")
- private String driverClassName;
- @Value("jdbc://xxxx.xx.xxx/xx")
- private String driverUrl;
- @Value("${root}")
- private String driverUsername;
- @Value("123456")
- private String driverPassword;
- @Bean(name = "dataSource")
- public DataSource dataSource() {
- BasicDataSource dataSource = new BasicDataSource();
- dataSource.setDriverClassName(driverClassName);
- dataSource.setUrl(driverUrl);
- dataSource.setUsername(driverUsername);
- dataSource.setPassword(driverPassword);
- return dataSource;
- }
- @Bean
- public PlatformTransactionManager transactionManager() {
- return new DataSourceTransactionManager(dataSource());
- }
- }
这样,在项目中
@Autowired
private DataSource dataSource;
的时候,这个dataSource就是我们在ExampleConfiguration中配的DataSource
一、首先,需要xml中进行少量的配置来启动Java配置:
- <?xml version="1.0" encoding="UTF-8"?>
- <beans xmlns="http://www.springframework.org/schema/beans"
- xmlns:xsi="http://www.w3.org/2001/XMLSchema-instance" xmlns:aop="http://www.springframework.org/schema/aop"
- xmlns:tx="http://www.springframework.org/schema/tx" xmlns:p="http://www.springframework.org/schema/p"
- xmlns:context="http://www.springframework.org/schema/context"
- xsi:schemaLocation="
- http://www.springframework.org/schema/beans http://www.springframework.org/schema/beans/spring-beans-3.2.xsd
- http://www.springframework.org/schema/aop http://www.springframework.org/schema/aop/spring-aop-3.2.xsd
- http://www.springframework.org/schema/tx http://www.springframework.org/schema/tx/spring-tx-3.2.xsd
- http://www.springframework.org/schema/context http://www.springframework.org/schema/context/spring-context-3.2.xsd">
- <context:component-scan base-package="SpringStudy.Model">
- </context:component-scan>
- </beans>
二、定义一个配置类
用@Configuration注解该类,等价 与XML中配置beans;用@Bean标注方法等价于XML中配置bean。
通过property关键字进行依赖注入,
<?xml version="1.0" encoding="UTF-8"?>
<beans xmlns:xsi="http://www.w3.org/2001/XMLSchema-instance"xmlns="http://www.springframework.org/schema/beans"xsi:schemaLocation="http://www.springframework.org/schema/beanshttp://www.springframework.org/schema/beans/spring-beans-3.0.xsd"><bean id="sax" class="com.spring.test.setter.Saxophone"/><bean id="kenny" class="com.spring.test.setter.Instrumentalist"><property name="song" value="Jingle Bells" /><property name="age" value="25" /><property name="instrument" ref="sax" /></bean>
</beans>
在配置文件中,可以发现,设值注入时,使用name来指定注入哪个属性。
name的命名方式依据变量名称。
1 首字母不区分大小写,其他部分与变量名称相同。
2 注入的属性类型,可以是String , int , double , float等,当属性是String或int时,可以根据变量的类型自动转换。
3 注入的是一个bean,则直接使用ref链接到另一个bean即可。
复杂类型的注入:
<?xml version="1.0" encoding="UTF-8"?>
<beans xmlns:xsi="http://www.w3.org/2001/XMLSchema-instance"xmlns="http://www.springframework.org/schema/beans"xsi:schemaLocation="http://www.springframework.org/schema/beanshttp://www.springframework.org/schema/beans/spring-beans-3.0.xsd"><bean id="java" class="com.spring.test.collector.Java"/><bean id="cpp" class="com.spring.test.collector.Cpp"/><bean id="xingoo" class="com.spring.test.collector.Programmer"><property name="language"><list><ref bean="java"/><ref bean="cpp"/></list></property></bean><bean id="halo" class="com.spring.test.collector.Programmer"><property name="language"><set><ref bean="java"/></set></property></bean><bean id="zhang3" class="com.spring.test.collector.Programmer"><property name="lang"><map><!-- key键为String key-ref键为其他bean的引用 --><!-- value值为String value-ref值为其他bean的引用 --><entry key="java" value-ref="java"/><entry key="cpp" value-ref="cpp"/></map></property></bean>
</beans>
自动装配,一般是byName和byType
采用byName方式的配置文件如下:
<?xml version="1.0" encoding="UTF-8"?>
<beans xmlns:xsi="http://www.w3.org/2001/XMLSchema-instance"xmlns="http://www.springframework.org/schema/beans"xsi:schemaLocation="http://www.springframework.org/schema/beanshttp://www.springframework.org/schema/beans/spring-beans-3.0.xsd"><bean id="instrument" class="com.spring.test.setter.Saxophone"/><bean id="kenny" class="com.spring.test.setter.Instrumentalist" autowire="byName"><property name="song" value="Jingle Bells" /><property name="age" value="25" /></bean>
</beans>
采用byType的配置文件如下:
<?xml version="1.0" encoding="UTF-8"?>
<beans xmlns:xsi="http://www.w3.org/2001/XMLSchema-instance"xmlns="http://www.springframework.org/schema/beans"xsi:schemaLocation="http://www.springframework.org/schema/beanshttp://www.springframework.org/schema/beans/spring-beans-3.0.xsd"><bean id="test2" class="com.spring.test.setter.Saxophone"/><bean id="test1" class="com.spring.test.setter.Saxophone" primary="true"/> <!-- 默认是false --><bean id="kenny" class="com.spring.test.setter.Instrumentalist" autowire="byType"><property name="song" value="Jingle Bells" /><property name="age" value="25" /></bean>
</beans>
如果有多个类型匹配的bean,则可以采用 primary 来设置主要装配的bean,默认情况下是false。
@Qualifier 限定自动装配的bean
@Qualifier注解是使用限定符的主要方式。它可以与@Autowired和@Inject协同使用,在注 入的时候指定想要注入进去的是哪个bean。
为@Qualifier注解所设置的参数就是想要注入的bean的ID。 所有使用@Component注解声明的类都会创建为bean,并且bean的ID为首字母变为小写的类名。 因此,@Qualifier("iceCream")指向的是组件扫描时所创建的bean,并且这个bean 是IceCream类的实例。
实际上,还有一点需要补充一下。更准确地讲,@Qualifier("iceCream")所引用的bean要具 有String类型的“iceCream”作为限定符。如果没有指定其他的限定符的话,所有的bean都会给定一 个默认的限定符,这个限定符与bean的ID相同。因此,框架会将具有“iceCream”限定符的bean注 入到setDessert()方法中。这恰巧就是ID为iceCream的bean,它是IceCream类在组件扫描 的时候创建的。
我们可以为bean设置自己的限定符,而不是依赖于将bean ID作为限定符。在这里所需要做的就是 在bean声明上添加@Qualifier注解。例如,它可以与@Component组合使用,
@Component
@Qualifier("cold")
public class IceCream implemnts Dessert {...}
@Qulifier可以与@Bean配合使用
@scope可以指定单例或者prototype模式。
@Scope("prototype") 与@Scope(ConfigurableBeanFactory.SCOPE_PROTOTYPE ) 相同
@EnableWebMvc
@Test
Spring现在包含了一种mock Spring MVC并针对控制器执行HTTP请求的机 制。这样的话,在测试控制器的时候,就没有必要再启动Web服务器和Web浏览器了。
@ConfigurationProperties 用法
@ConfigurationProperties(locations = "classpath:mail.properties", ignoreUnknownFields = false, prefix = "mail")
public class MailProperties { public static class Smtp { private boolean auth; private boolean starttlsEnable; // ... getters and setters } @NotBlank private String host; private int port; private String from; private String username; private String password; @NotNull private Smtp smtp; // ... getters and setters }
…从如下属性中创建 ( mail.properties ):
mail.host=localhost
mail.port=25
mail.smtp.auth=false
mail.smtp.starttls-enable=false
mail.from=me@localhost mail.username= mail.password=上例中我们用@ConfigurationProperties注解就可以绑定属性了。ignoreUnknownFields = false告诉Spring Boot在有属性不能匹配到声明的域的时候抛出异常。开发的时候很方便! prefix 用来选择哪个属性的prefix名字来绑定。
@Value(“${xxx}”)
这种方式是最简单的,通过@Value注解可以将属性值注入进来。
@ConfigurationProperties
Spring Boot 可以方便的将属性注入到一个配置对象中。例如:
my.name=Isea533
my.port=8080
my.servers[0]=dev.bar.com my.servers[1]=foo.bar.com
对应对象:
@ConfigurationProperties(prefix="my")
public class Config { private String name; private Integer port; private List<String> servers = new ArrayList<String>(); public String geName(){ return this.name; } public Integer gePort(){ return this.port; } public List<String> getServers() { return this.servers; } }
Spring Boot 会自动将prefix="my"前缀为my的属性注入进来。
Spring Boot 会自动转换类型,当使用List的时候需要注意在配置中对List进行初始化!
Spring Boot 还支持嵌套属性注入,例如:
name=isea533
jdbc.username=root
jdbc.password=root
...
对应的配置类:
@ConfigurationProperties
public class Config { private String name; private Jdbc jdbc; class Jdbc { private String username; private String password; //getter... } public Integer gePort(){ return this.port; } public Jdbc getJdbc() { return this.jdbc; } }jdbc开头的属性都会注入到Jdbc对象中。
在@Bean方法上使用@ConfigurationProperties
例如:
@ConfigurationProperties(prefix = "foo")
@Bean
public FooComponent fooComponent() { ... }
Spring Boot 会将foo开头的属性按照名字匹配注入到FooComponent对象中。
@Autowired与@Resource的区别
博客分类:- spring
1、@Autowired与@Resource都可以用来装配bean. 都可以写在字段上,或写在setter方法上。
2、@Autowired默认按类型装配(这个注解是属业spring的),默认情况下必须要求依赖对象必须存在,如果要允许null 值,可以设置它的required属性为false,如:@Autowired(required=false) ,如果我们想使用名称装配可以结合@Qualifier注解进行使用,如下:
- @Autowired() @Qualifier("baseDao")
- private BaseDao baseDao;
3、@Resource(这个注解属于J2EE的),默认安照名称进行装配,名称可以通过name属性进行指定,
如果没有指定name属性,当注解写在字段上时,默认取字段名进行按照名称查找,如果注解写在setter方法上默认取属性名进行装配。 当找不到与名称匹配的bean时才按照类型进行装配。但是需要注意的是,如果name属性一旦指定,就只会按照名称进行装配。
- @Resource(name="baseDao")
- private BaseDao baseDao;
我喜欢用 @Resource注解在字段上,且这个注解是属于J2EE的,减少了与spring的耦合。最重要的这样代码看起就比较优雅。