最近在做一个项目时需要用到在线HTML编辑器,之前做的是用的FreeTextBox,但总感觉不太完善。于是想起了FCKeditor,知道它很强大,但还没用过,于是准备使用FCKeditor。
FCKeditor目前已经改名为了CKEditor和CKFinder,CKEditor不包含上传文件功能,该功能被分割在了CKFinder中,因此需要同时使用这两个文件才能实现文件上传,同时因为我是基于ASP.NET开发的,需要同时下载CKEditor for ASP.NET。
下面详细介绍如下使用CKEditor&CKFinder实现在线HTML编辑器:
到官方下载相关文件(注意选择asp.net版本):ckeditor_3.6.2.zip ,ckeditor_aspnet_3.6.2.zipckfinder_aspnet_2.1.zip
我是在VS2010+SQL2008Express Win7 旗舰版的环境下开发的。
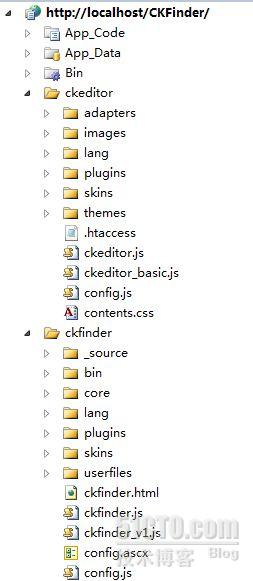
html5拖拽控件。新建ASP.NET空网站,分别把下载的文件解压下,复制解压后的ckeditor_3.6.2里面的ckeditor整个文件夹粘贴到网站的根目录下,然后删除不用的文件,有童鞋称这个过程为“瘦身”,呵呵
结果如下:

同样把解压后的ckfinder_aspnet_2.1的文件夹里的ckfinder文件夹整个复制粘贴到网站的根目录下,与ckeditor同级。也对其瘦身,结果如下:
添加到CKEditor.NET.dll和CKFinder.dll文件的引用,分别位于下载的文件的bin目录下。
接下来开始配置
先修改ckeditor,在ckeditor文件夹下打开config.js,添加如下代码,分别设置皮肤,语言,工具条
html和css怎么结合,CKEDITOR.editorConfig = function (config) {
// Define changes to default configuration here. For example:
// config.language = 'fr';
// config.uiColor = '#AADC6E';
config.skin = 'v2';
config.language = 'zh-cn';
htmleditor下载。config.toolbar = 'Full';
config.toolbar_Full =
[
{ name: 'document', items : [ 'Source','-','Save','NewPage','DocProps','Preview','Print','-','Templates' ] },
{ name: 'clipboard', items : [ 'Cut','Copy','Paste','PasteText','PasteFromWord','-','Undo','Redo' ] },
{ name: 'editing', items : [ 'Find','Replace','-','SelectAll','-','SpellChecker', 'Scayt' ] },
html 编辑器,{ name: 'forms', items : [ 'Form', 'Checkbox', 'Radio', 'TextField', 'Textarea', 'Select', 'Button', 'ImageButton', 'HiddenField' ] },
'/',
{ name: 'basicstyles', items : [ 'Bold','Italic','Underline','Strike','Subscript','Superscript','-','RemoveFormat' ] },
{ name: 'paragraph', items : [ 'NumberedList','BulletedList','-','Outdent','Indent','-','Blockquote','CreateDiv','-','JustifyLeft','JustifyCenter','JustifyRight','JustifyBlock','-','BidiLtr','BidiRtl' ] },
{ name: 'links', items : [ 'Link','Unlink','Anchor' ] },
{ name: 'insert', items : [ 'Image','Flash','Table','HorizontalRule','Smiley','SpecialChar','PageBreak','Iframe' ] },
vim编辑器,'/',
{ name: 'styles', items : [ 'Styles','Format','Font','FontSize' ] },
{ name: 'colors', items : [ 'TextColor','BGColor' ] },
{ name: 'tools', items : [ 'Maximize', 'ShowBlocks','-','About' ] }
];
config.toolbar_Basic =
html5。[
['Bold', 'Italic', '-', 'NumberedList', 'BulletedList', '-', 'Link', 'Unlink','-','About']
];
};
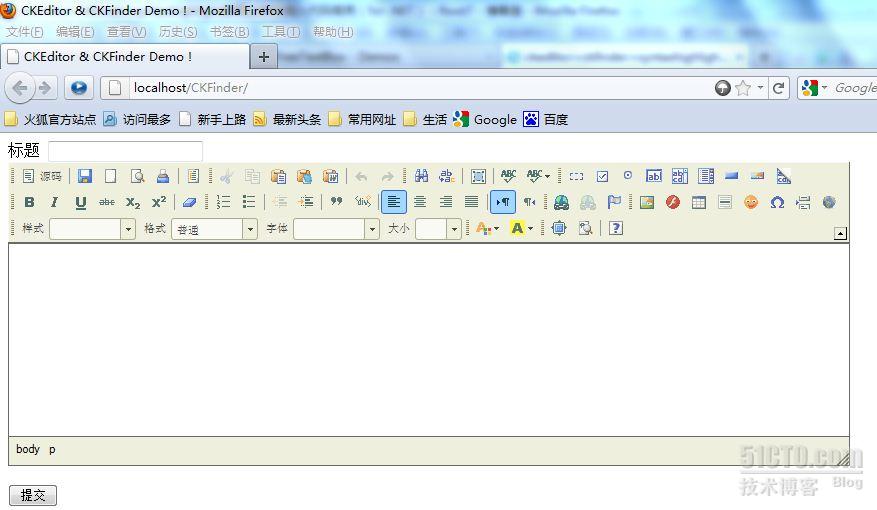
现在就可以在aspx页面添加ckeditor编辑器了,新建Default.aspx,在head部分添加js引用。
这个是必须的。
html?然后在div部分添加,
保存运行就可以看到编辑器了,
获取编辑器的值插入数据库 则TextBox.Text即可,绑定的话直就从数据库读取 ,提示:在插入类似'时候ASPX页面提示客户端(*)中检测到有潜在危险的 Request.Form 值。在页面HTML代码第一行加入validateRequest="false"或者修改web.config文件即可,但这不是最安全的做法,可能存在提交非法数据和跨站的危险。关键是这时点击插入图片时,出现的是
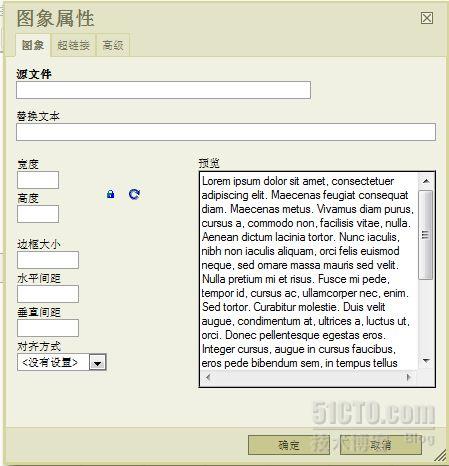
没有上传图片选项卡,虽然这样也可以用,需要通过其他方法上传图片到服务器,然后粘贴进图片的URL地址。但显然我们希望能够直接在此进行图片的上传和编辑。接下来就用到ckfinder了。
继续修改ckeditor下面的config.js,在函数的底部继续加入如下代码:
config.filebrowserBrowseUrl = 'ckfinder/ckfinder.html';
菜鸟教程html在线编辑器?config.filebrowserImageBrowseUrl = 'ckfinder/ckfinder.html?Type=Images';
config.filebrowserFlashBrowseUrl = 'ckfinder/ckfinder.html?Type=Flash';
config.filebrowserUploadUrl = 'ckfinder/core/connector/aspx/connector.aspx?command=QuickUpload&type=Files';
config.filebrowserImageUploadUrl = 'ckfinder/core/connector/aspx/connector.aspx?command=QuickUpload&type=Images';
config.filebrowserFlashUploadUrl = 'ckfinder/core/connector/aspx/connector.aspx?command=QuickUpload&type=Flash';
config.filebrowser* 为上传文件时调用的ckfinder connector.aspx文件相应路径,根据您的网站文件结构修改,仅为测试我没有修改文件夹名称。添加代码后在运行一下看看这个时候你发现有了上传的按钮
可拖拽html网页编辑器、但这时当上传图片时,出现“因为安全原因,文件不可浏览。请联系系统管理员并检查CKFinder配置文件。
这时打开ckfinder下面的config.ascx文件,修改public override bool CheckAuthentication()
返回值为true,这里需要添加过滤条件,因为是测试就不写了
publicoverride bool CheckAuthentication()
{
// WARNING : DO NOT simply return "true". By doing so, you are allowing
html5拖拽文件夹?// "anyone" to upload and list the files in your server. You must implement
// some kind of session validation here. Even something very simple as...
//
//return ( Session[ "IsAuthorized" ] != null && (bool)Session[ "IsAuthorized" ] == true );
//
// ... where Session[ "IsAuthorized" ] is set to "true" as soon as the
网页版html编辑器?// user logs on your system.
return true;
}
还是在这个文件内找到public override void SetConfig()
方法里面的BaseUrl = "/ckfinder/userfiles/";后面的目录根据自己的项目结构填写,我这里用的是默认的文件夹。
至此基本结束了。下一篇文章会介绍如何给上传的图片重命名。至于详细情况可查看官方文档。
版权声明:本站所有资料均为网友推荐收集整理而来,仅供学习和研究交流使用。

工作时间:8:00-18:00
客服电话
电子邮件
admin@qq.com
扫码二维码
获取最新动态


![[Matlab]求解线性方程组](/upload/rand_pic/2-402.jpg)