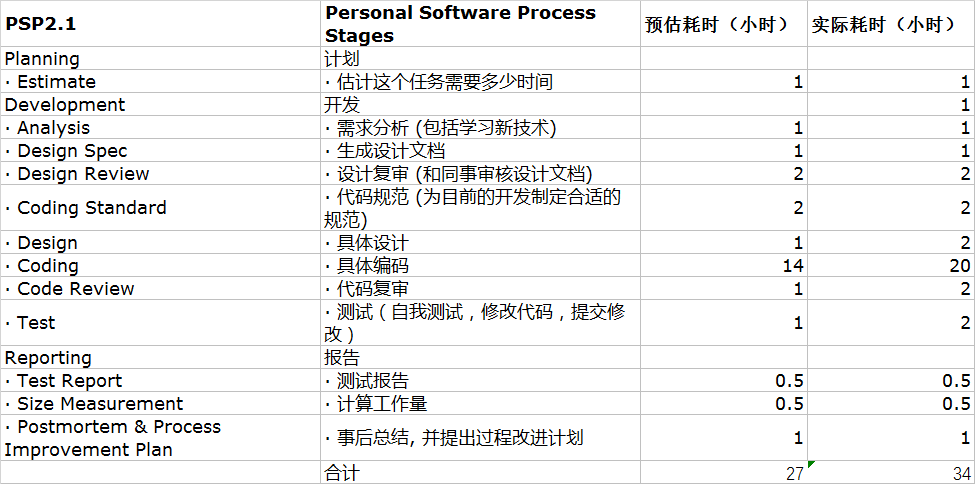
创建react应用程序
by Abhishek Jakhar
通过阿比舍克·贾卡(Abhishek Jakhar)
I’m going to teach you how to deploy and host your React app with Netlify.Netlify is a service that automates builds, deployments and manages your websites. It’s one of the fastest and easiest deployment solutions these days.
我将教您如何使用Netlify部署和托管React应用。 Netlify是一项服务,可自动构建,部署和管理您的网站。 这是当今最快,最简单的部署解决方案之一。
Netlify offers a free plan. So first, we will log in to Netlify using any one of the options(Github, Gitlab, Bitbucket, Email) given on the login page.
Netlify提供免费计划。 因此,首先,我们将登录Netlify使用的选项登录页面上给出的任何一个(Github上,Gitlab,到位桶,电子邮件)。
We will start by creating a build of our application by running this command:
我们将通过运行以下命令开始创建应用程序的构建:
npm run buildSo, now our build folder will get generated which will contain all the production-ready files.
因此,现在将生成我们的构建文件夹,其中将包含所有可用于生产的文件。
Now, there are two ways to deploy our application to Netlify.
现在,有两种方法可以将我们的应用程序部署到Netlify。
Netifly has made it so easy that we have to just drag and drop our build folder into their online app (Rightmost image above), and our application will get deployed to a live URL.
Netifly变得如此简单,我们只需要将构建文件夹 拖放到其在线应用程序中 (上面最右边的图像),我们的应用程序就会被部署到实时URL中。
Note: Netlify online app is the screen which appears after you have logged into your netlify account.
注意: Netlify在线应用程序是登录到Netlify帐户后出现的屏幕。
Netifly also provides a command line interface that lets you deploy your app straight from the command line. That’s what we will do now.
Netifly还提供了一个命令行界面,使您可以直接从命令行部署应用程序。 那就是我们现在要做的。
So first, we’ll install the CLI using the following command:
因此,首先,我们将使用以下命令安装CLI:
npm install netlify-cli -gNow, we’re ready to deploy it. To deploy the application we have to make sure that we’re in the project folder and then we will run this command:
现在,我们准备部署它。 要部署应用程序,我们必须确保我们位于项目文件夹中,然后我们将运行以下命令:
netlify deployWe might get a pop-up window which will ask us to log in with Netlify and grant access to the Netlify CLI.
我们可能会弹出一个窗口,要求我们使用Netlify登录并授予对Netlify CLI的访问权限。
Now, we’ll click Authorize. Now that we’re authorized, we can follow the command line prompts to deploy the app.
现在,我们将单击“授权”。 现在我们已经获得授权,我们可以按照命令行提示来部署应用程序。
In the console, it says that “This folder isn’t linked to a site yet. What would you like to do?” It wants to know if we want to link this directory to an existing site or create and configure a new site. Since this is a new site, we’ll select Create & configure a new site.
在控制台中,它说“ 该文件夹尚未链接到站点。 你想干什么?” 它想知道我们是否要将此目录链接到现有站点或创建并配置新站点。 由于这是一个新站点,因此我们将选择“ 创建并配置一个新站点”。
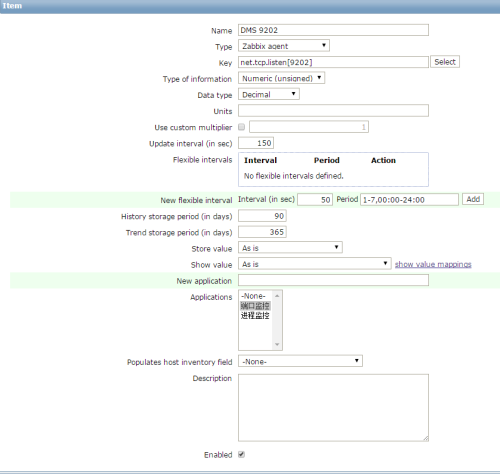
2. It gives us the option to give our site a name. I’ll type portfolio on netlify (You can type any available name which you like).
2.它使我们可以选择为站点命名。 我将在netlify上键入Portfolio (您可以键入任何可用的名称)。
3. Now it will ask for the Netlify account which you want to use, so I will select my account (Abhishek Jakhar), you can select yours.
3.现在,它将询问您要使用的Netlify帐户,因此我将选择我的帐户(Abhishek Jakhar) ,您可以选择您的帐户 。
4. Now, as deploy path, we need to specify our project's build directory which contains the assets for deployment. So, we will type build there and press enter.
4.现在,作为部署路径,我们需要指定项目的构建目录,其中包含要部署的资产。 因此,我们将在此处键入build并按Enter。
5. Now, our site will get created and will be deployed to a draft URL first, which we can view by copying and pasting the URL in the browser.
5.现在,将创建我们的网站,并将其首先部署到URL草案中,我们可以通过在浏览器中复制和粘贴URL进行查看。
Now, back in the console, it says “If everything looks good on your draft URL, take it to live with the --prod flag”.
现在,回到控制台,它显示“如果草稿URL上的所有内容看起来都不错,请将其与--prod标志一起使用” 。
So to make our app live, we’ll run the command shown on the command line
因此,要使我们的应用程序正常运行,我们将运行命令行上显示的命令
netlify deploy --prodIt will ask us one more time to specify the deploy path for the live build which again is our build folder.
它将要求我们再一次指定实时构建的部署路径,该路径也是我们的构建文件夹。
Now, in the console output, we get two URLs. A Unique Deploy URL, which represents the unique URL for each individual deployment, and a Live URL which always displays your latest deployment.
现在,在控制台输出中,我们得到两个URL。 唯一部署URL(代表每个单独部署的唯一URL)和实时URL (始终显示最新部署)。
So each time you update your website and deploy it, you’re going to get a unique URL for that deployment. Basically, if we deploy multiple times we will be having multiple unique URLs so that you can point users to a specific version of your application. But the live URL always displays your latest changes at the same URL.
因此,每次更新并部署网站时,您都将获得该部署的唯一URL。 基本上,如果我们多次部署,我们将拥有多个唯一的URL,以便您可以将用户指向您的应用程序的特定版本 。 但是实时URL始终在同一URL上显示您的最新更改 。
Note: Netlify automatically secures your site over HTTPS for free.
注:Netlify自动保护您的网站通过HTTPS是免费的 。
If you’re publishing an app that uses a router like React Router you’ll need to configure redirects and rewrite rules for your URLs. Because when we click on any navigation item to change the page (route) and refresh the browser, we get a 404 error page.
如果您要发布使用诸如React Router之类的路由器的应用,则需要为URL配置重定向和重写规则。 因为当我们单击任何导航项来更改页面(路线)并刷新浏览器时,我们都会看到404错误页面。
So Netlify makes configuring redirects and rewrite rules for your URLs really easy. We’ll need to add a file inside the build folder of our app named _redirects. Inside the file, we need to include the following rewrite rule.
因此,Netlify使配置URL重定向和重写规则变得非常容易。 我们需要在应用程序的build文件夹内添加一个名为_redirects的文件。 在文件内部,我们需要包括以下重写规则。
/* /index.html 200This rewrite rule is going to serve index.html file instead of giving a 404, no matter what URL the browser requests.
无论浏览器请求什么URL,此重写规则都将提供index.html文件而不是提供404。
So now, to view the latest changes in the live URL, we need to deploy with netlify deploy. Again, we’ll specify build as the deploy path. Now, when we see the live URL and refresh the app after changing the route we will no longer see the 404 error page.
因此,现在,要查看实时URL中的最新更改,我们需要使用netlify deploy 。 同样,我们将指定build作为部署路径。 现在,当我们看到实时URL并在更改路线后刷新应用程序时,将不再看到404错误页面。
That's all there is to it. On netlify.com you can see your site settings. There you can do stuff like set up a custom domain or connect the site to a GitHub repository.
这里的所有都是它的。 在netlify.com上,您可以看到您的网站设置。 在那里,您可以执行诸如设置自定义域或将站点连接到GitHub存储库之类的工作。
Netlify: All-in-one platform for automating modern web projectsDeploy modern static websites with Netlify. Get CDN, Continuous deployment, 1-click HTTPS, and all the services you…www.netlify.com
Netlify:用于自动化现代Web项目的多合一平台 使用Netlify部署现代静态网站。 获得CDN,持续部署,一键单击HTTPS以及您所需要的所有服务…… www.netlify.com
I hope you’ve found this post informative and helpful. I would love to hear your feedback!
希望您发现这篇文章对您有帮助。 我希望听到您的反馈!
Thank you for reading!
感谢您的阅读!
翻译自: https://www.freecodecamp.org/news/how-to-deploy-a-react-application-to-netlify-363b8a98a985/
创建react应用程序
版权声明:本站所有资料均为网友推荐收集整理而来,仅供学习和研究交流使用。

工作时间:8:00-18:00
客服电话
电子邮件
admin@qq.com
扫码二维码
获取最新动态


![在ASP.NET中防止注入攻击[翻译]](https://www.cnblogs.com/Images/OutliningIndicators/None.gif)


![BZOJ 3450: Tyvj1952 Easy [DP 概率]](/upload/rand_pic/2-1512.jpg)