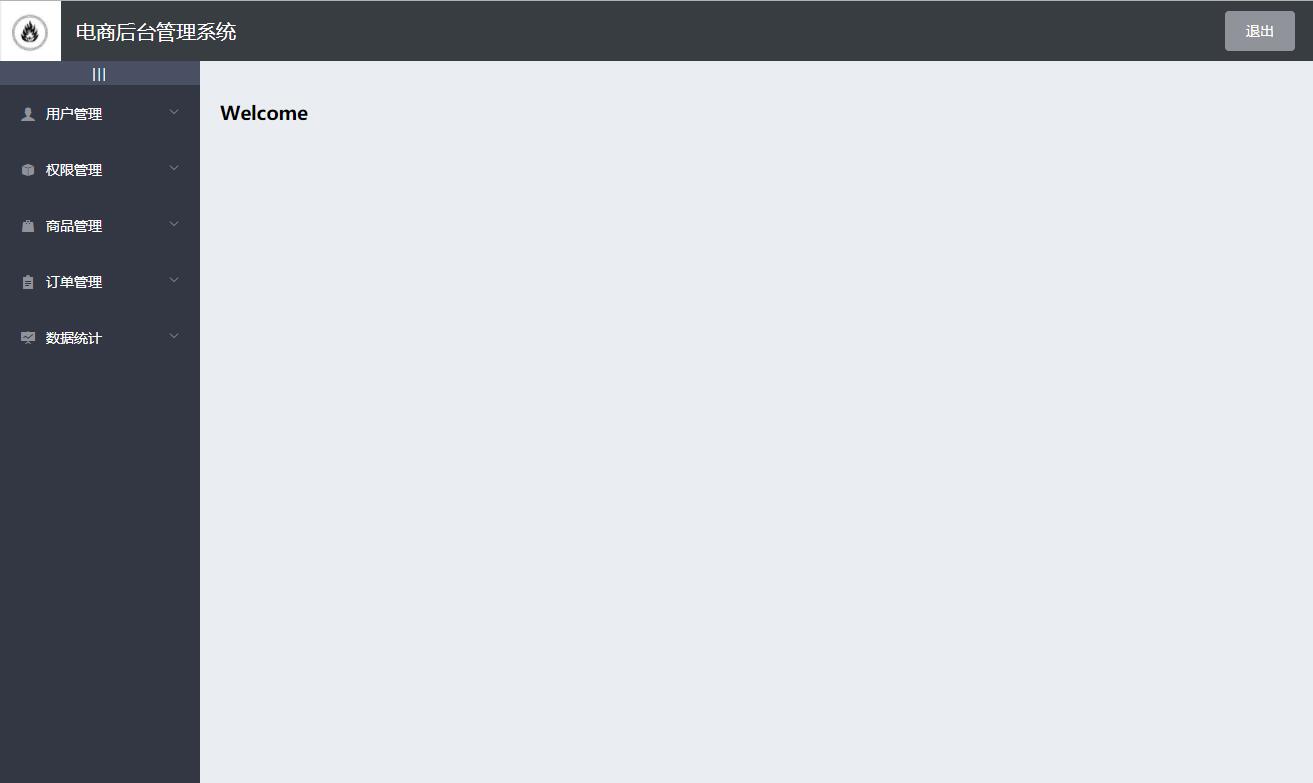
element.js中添加import { Container,Header,Aside,Main
} from 'element-ui'
Vue.use(Container)
Vue.use(Header)
Vue.use(Aside)
Vue.use(Main)
<template><el-container class="home-container"><!-- 头部区域 --><el-header><div><img src="Login.jpg" alt=""><span>电商后台管理系统</span></div><el-button type="info" @click="logout">退出</el-button></el-header><!-- 页面主体区域 --><el-container><!-- 侧边栏 --><el-aside :width="isCollapse ? '64px' : '200px'"></el-aside><!-- 右侧内容主体 --><el-main><!-- 路由占位符 --><router-view></router-view></el-main></el-container></el-container>
</template><script>
export default {
}
</script><style lang="less" scoped>
.home-container {height: 100%;
}
.el-header {background-color: #373d41;display: flex;justify-content: space-between;padding-left: 0;align-items: center;color: #fff;font-size: 20px;> div {display: flex;align-items: center;span {margin-left: 15px;}}
}.el-aside {background-color: #333744;.el-menu {border-right: none;}
}.el-main {background-color: #eaedf1;
}
</style>
element.js中添加import { Menu,Submenu,MenuItemGroup,MenuItem
} from 'element-ui'
Vue.use(Menu)
Vue.use(Submenu)
Vue.use(MenuItemGroup)
Vue.use(MenuItem)
<!-- 侧边栏 -->
<el-aside :width="200px"><!-- 侧边栏菜单区域 --><!-- unique-opened:每次只展开一个子菜单 --><el-menu background-color="#333744" text-color="#fff" active-text-color="#409EFF" unique-opened :collapse="isCollapse" :collapse-transition="false" router :default-active="activePath"><!-- 一级菜单 --><el-submenu :index="item.id + ''" v-for="item in menulist" :key="item.id"><!-- 一级菜单的模板区域 --><template slot="title"><!-- 图标 --><i :class="iconsObj[item.id]"></i><!-- 文本 --><span>{{item.authName}}</span></template><!-- 二级菜单 --><el-menu-item :index="'/' + subItem.path" v-for="subItem in item.children" :key="subItem.id" @click="saveNavState('/' + subItem.path)"><template slot="title"><!-- 图标 --><i class="el-icon-menu"></i><!-- 文本 --><span>{{subItem.authName}}</span></template></el-menu-item></el-submenu></el-menu>
</el-aside>
通过axios请求拦截器添加token,保证拥有获取数据的权限
main.js文件中添加// axios请求拦截
axios.interceptors.request.use(config => {// 为请求头对象,添加 Token 验证的 Authorization 字段config.headers.Authorization = window.sessionStorage.getItem('token')return config
})
created() {//获取到所有菜单this.getMenuList()
},methods: {async getMenuList() {const {data: res} = await this.$http.get('menus')if (res.meta.status !== 200) return this.$message.error(res.meta.msg)this.menulist = res.dataconsole.log(res)},}
vue.js从入门到项目实战、
data() {return {// 左侧菜单数据menulist: [],iconsObj: {'125': 'iconfont icon-user','103': 'iconfont icon-tijikongjian','101': 'iconfont icon-shangpin','102': 'iconfont icon-danju','145': 'iconfont icon-baobiao'},}
}
.iconfont {margin-right: 10px;
}
实现左侧菜单折叠和展开
<!-- 侧边栏 -->
<el-aside :width="isCollapse ? '64px' : '200px'"><div class="toggle-button" @click="toggleCollapse">|||</div>
</el-aside>
.toggle-button {background-color: #4a5064;font-size: 10px;line-height: 24px;color: #fff;text-align: center;letter-spacing: 0.2em;cursor: pointer;
}
<script>export default {data() {return {// 是否折叠isCollapse: false,}},methods: {toggleCollapse() {this.isCollapse = !this.isCollapse}}}
</script>
Welcome.vueindex.js中添加import Welcome from "../components/Welcome";
const routes = [{path: '/home',component: Home,redirect: '/welcome',children:[{path: '/welcome',component: Welcome}]}]
<el-main><!-- 路由占位符 --><router-view></router-view>
</el-main>
电商项目实战、
通过后台管理用户的账号信息,具体包括用户信息的展示、添加、修改、删除、角色分配、账号启用/注销等功能
用户信息列表展示
添加用户
修改用户
删除用户
前端vue项目、启用或禁用用户
用户角色分配
面包屑导航 el-breadcrumb
Element-UI 栅格系统基本使用 el-row
表格布局 el-table、el-pagination
Users.vueindex.js中添加import Users from "../components/user/Users"const routes = [{path: '/home',component: Home,redirect: '/welcome',children:[{path: '/welcome',component: Welcome},{path: '/users',component: Users},]}]
Vue项目?处理高亮问题
default-active="/users"<el-menu-item :index="'/' + subItem.path" v-for="subItem in item.children" :key="subItem.id" @click="saveNavState('/' + subItem.path)">
</el-submenu>
saveNavState(activePath) {window.sessionStorage.setItem('activePath', activePath)this.activePath = activePath
}
activePath: ''
created() {this.activePath = window.sessionStorage.getItem('activePath')
}
绘制基本ui结构
面包屑<div><!-- 面包屑导航区域 --><el-breadcrumb separator-class="el-icon-arrow-right"><el-breadcrumb-item :to="{ path: '/home' }">首页</el-breadcrumb-item><el-breadcrumb-item>用户管理</el-breadcrumb-item><el-breadcrumb-item>用户列表</el-breadcrumb-item></el-breadcrumb>
</div>
element.jsimport Breadcrumb,BreadcrumbItem from 'element-ui'Vue.use(Breadcrumb)
Vue.use(BreadcrumbItem)
卡片<el-card class="box-card"><div v-for="o in 4" :key="o" class="text item">{{'列表内容 ' + o }}</div>
</el-card>
element.jsimport Card from 'element-ui'Vue.use(Card)
.el-breadcrumb {margin-bottom: 15px;font-size: 12px;
}.el-card {box-shadow: 0 1px 1px rgba(0, 0, 0, 0.15) !important;
}
<!-- 搜索与添加区域 -->
<el-row :gutter="20"><el-col :span="8"><el-input placeholder="请输入内容"><el-button slot="append" icon="el-icon-search"></el-button></el-input></el-col><el-col :span="4"><el-button type="primary">添加用户</el-button></el-col>
</el-row>
element.jsimport Row,Col from 'element-ui'Vue.use(Row)
Vue.use(Col)
获取用户列表数据
export default {data() {return {// 获取用户列表的参数对象queryInfo: {query: '',// 当前的页数pagenum: 1,// 当前每页显示多少条数据pagesize: 2},userlist:[],total:0}},created() {this.getUserList()},methods:{async getUserList() {const { data: res } = await this.$http.get('users', {params: this.queryInfo})//判断if (res.meta.status !== 200) {return this.$message.error('获取用户列表失败!')}//赋值this.userlist = res.data.usersthis.total = res.data.totalconsole.log(res)},}}
渲染列表数据
表格<el-table :data="userlist" border stripe><!--添加索引列--><el-table-column type="index"></el-table-column><el-table-column label="姓名" prop="username"></el-table-column><el-table-column label="邮箱" prop="email"></el-table-column><el-table-column label="电话" prop="mobile"></el-table-column><el-table-column label="角色" prop="role_name"></el-table-column><el-table-column label="状态"></el-table-column><el-table-column label="操作" width="180px"></el-table-column>
</el-table>
element.jsimport Table,TableColumn from 'element-ui'Vue.use(Table)
Vue.use(TableColumn)
.el-table {margin-top: 15px;font-size: 12px;
}
显示
开关<el-table-column label="状态"><template slot-scope="scope"><el-switch v-model="scope.row.mg_state"></el-switch></template>
</el-table-column>
element.jsimport Switch from 'element-ui'Vue.use(Switch)
vuejs项目实战pdf。操作
大小和文字提示<el-table-column label="操作" width="180px"><template slot-scope="scope"><!-- 修改按钮 --><el-button type="primary" icon="el-icon-edit" size="mini"></el-button><!-- 删除按钮 --><el-button type="danger" icon="el-icon-delete" size="mini"></el-button><!-- 分配角色按钮 --><el-tooltip effect="dark" content="分配角色" placement="top" :enterable="false"><el-button type="warning" icon="el-icon-setting" size="mini"></el-button></el-tooltip></template>
</el-table-column>
element.jsimport Tooltip from 'element-ui'Vue.use(Tooltip)
① 当前页码:pagenum
② 每页条数:pagesize
③ 记录总数:total
④ 页码变化事件
vue开发实战、⑤ 每页条数变化事件
⑥ 分页条菜单控制
页码显示
分页<!-- 分页区域 -->
<el-pagination @size-change="handleSizeChange" @current-change="handleCurrentChange" :current-page="queryInfo.pagenum" :page-sizes="[1, 2, 5, 10]" :page-size="queryInfo.pagesize" layout="total, sizes, prev, pager, next, jumper" :total="total">
</el-pagination>
element.jsimport Pagination from 'element-ui'Vue.use(Pagination)
handleSizeChange(newSize) {// console.log(newSize)this.queryInfo.pagesize = newSizethis.getUserList()
}
handleCurrentChange(newPage) {console.log(newPage)this.queryInfo.pagenum = newPagethis.getUserList()
}
.el-pagination {margin-top: 15px;
}
修改用户状态
开关<el-table-column label="状态"><template slot-scope="scope"><el-switch v-model="scope.row.mg_state" @change="userStateChanged(scope.row)"></el-switch></template>
</el-table-column>
// 监听 switch 开关状态的改变
async userStateChanged(userinfo) {console.log(userinfo)const { data: res } = await this.$http.put(`users/${userinfo.id}/state/${userinfo.mg_state}`)if (res.meta.status !== 200) {userinfo.mg_state = !userinfo.mg_statereturn this.$message.error('更新用户状态失败!')}this.$message.success('更新用户状态成功!')
},
搜索功能
js项目实战,将搜索关键字,作为参数添加到列表查询的参数
<el-col :span="8"><el-input placeholder="请输入内容" v-model="queryInfo.query"><el-button slot="append" icon="el-icon-search" @click="getUserList"></el-button></el-input>
</el-col>
输入框,实现可清空效果clearable
@clear="getUserList"
对话框
对话框<!-- 添加用户的对话框 -->
<el-dialog title="添加用户" :visible.sync="addDialogVisible" width="50%" @close="addDialogClosed"><!-- 内容主体区域 --><!-- 底部区域 --><span slot="footer" class="dialog-footer"><el-button @click="addDialogVisible = false">取 消</el-button><el-button type="primary" @click="addDialogVisible">确 定</el-button></span>
</el-dialog>
element.jsimport Dialog from 'element-ui'Vue.use(Dialog)
表单
<el-form:model="addForm":rules="addFormRules"ref="addFormRef"label-width="70px"><el-form-item label="用户名" prop="username"><el-input v-model="addForm.username"></el-input></el-form-item><el-form-item label="密码" prop="password"><el-input v-model="addForm.password"></el-input></el-form-item><el-form-item label="邮箱" prop="email"><el-input v-model="addForm.email"></el-input></el-form-item><el-form-item label="手机" prop="mobile"><el-input v-model="addForm.mobile"></el-input></el-form-item>
</el-form>
addForm: {username: '',password: '',email: '',mobile: ''
},
addFormRules: {username: [{ required: true, message: '请输入用户名', trigger: 'blur' },{min: 3,max: 10,message: '用户名的长度在3~10个字符之间',trigger: 'blur'}],password: [{ required: true, message: '请输入密码', trigger: 'blur' },{min: 6,max: 15,message: '用户名的长度在6~15个字符之间',trigger: 'blur'}],email: [{ required: true, message: '请输入邮箱', trigger: 'blur' },{ validator: checkEmail, trigger: 'blur' }],mobile: [{ required: true, message: '请输入手机号', trigger: 'blur' },{ validator: checkMobile, trigger: 'blur' }]
}
自定义规则
var checkEmail = (rule, value, cb) => {// 验证邮箱的正则表达式const regEmail = /^([a-zA-Z0-9_-])+@([a-zA-Z0-9_-])+(\.[a-zA-Z0-9_-])+/if (regEmail.test(value)) {// 合法的邮箱return cb()}cb(new Error('请输入合法的邮箱'))
}
var checkMobile = (rule, value, cb) => {// 验证手机号的正则表达式const regMobile = /^(0|86|17951)?(13[0-9]|15[012356789]|17[678]|18[0-9]|14[57])[0-9]{8}$/if (regMobile.test(value)) {return cb()}cb(new Error('请输入合法的手机号'))
}
预验证
// 点击按钮,添加新用户
addUser() {this.$refs.addFormRef.validate(async valid => {if (!valid) return// 可以发起添加用户的网络请求const { data: res } = await this.$http.post('users', this.addForm)if (res.meta.status !== 201) {this.$message.error('添加用户失败!')}this.$message.success('添加用户成功!')// 隐藏添加用户的对话框this.addDialogVisible = false// 重新获取用户列表数据this.getUserList()})
}
项目开发实战?
@click="showEditDialog(scope.row.id)"
async showEditDialog(id) {// console.log(id)const { data: res } = await this.$http.get('users/' + id)if (res.meta.status !== 200) {return this.$message.error('查询用户信息失败!')}this.editForm = res.datathis.editDialogVisible = true
},
<!-- 修改用户的对话框 -->
<el-dialogtitle="修改用户":visible.sync="editDialogVisible"width="50%"@close="editDialogClosed"><el-form:model="editForm":rules="editFormRules"ref="editFormRef"label-width="70px"><el-form-item label="用户名"><el-input v-model="editForm.username" disabled></el-input></el-form-item><el-form-item label="邮箱" prop="email"><el-input v-model="editForm.email"></el-input></el-form-item><el-form-item label="手机" prop="mobile"><el-input v-model="editForm.mobile"></el-input></el-form-item></el-form><span slot="footer" class="dialog-footer"><el-button @click="editDialogVisible = false">取 消</el-button><el-button type="primary" @click="editUserInfo">确 定</el-button></span>
</el-dialog>
editDialogVisible: false,
editForm: {}
// 修改表单的验证规则对象
editFormRules: {email: [{ required: true, message: '请输入用户邮箱', trigger: 'blur' },{ validator: checkEmail, trigger: 'blur' },],mobile: [{ required: true, message: '请输入用户手机', trigger: 'blur' },{ validator: checkMobile, trigger: 'blur' },],
},
@close="editDialogClosed"editDialogClosed() {this.$refs.editFormRef.resetFields()
},
editUserInfo() {this.$refs.editFormRef.validate(async (valid) => {if (!valid) return// 发起修改用户信息的数据请求const { data: res } = await this.$http.put('users/' + this.editForm.id,{email: this.editForm.email,mobile: this.editForm.mobile,})if (res.meta.status !== 200) {return this.$message.error('更新用户信息失败!')}// 关闭对话框this.editDialogVisible = false// 刷新数据列表this.getUserList()// 提示修改成功this.$message.success('更新用户信息成功!')})
}
弹框
element.jsimport MessageBox from 'element-ui'
// 全局挂载
Vue.prototype.$confirm = MessageBox.confirm
@click="removeUserById(scope.row.id)"
async removeUserById(id) {// 弹框询问用户是否删除数据const confirmResult = await this.$confirm('此操作将永久删除该用户, 是否继续?','提示',{confirmButtonText: '确定',cancelButtonText: '取消',type: 'warning',}).catch((err) => err)// 如果用户确认删除,则返回值为字符串 confirm// 如果用户取消了删除,则返回值为字符串 cancel// console.log(confirmResult)if (confirmResult !== 'confirm') {return this.$message.info('已取消删除')}const { data: res } = await this.$http.delete('users/' + id)if (res.meta.status !== 200) {return this.$message.error('删除用户失败!')}this.$message.success('删除用户成功!')this.getUserList()
}
select和option并导入import { Option,Select
} from 'element-ui'Vue.use(Option)
Vue.use(Select)
<el-dialogtitle="分配角色":visible.sync="setRoleDialogVisible"width="50%"@close="setRoleDialogClosed"><div><p>当前的用户:{{ userInfo.username }}</p><p>当前的角色:{{ userInfo.role_name }}</p><p>分配新角色:<el-select v-model="selectedRoleId" placeholder="请选择"><el-optionv-for="item in rolesList":key="item.id":label="item.roleName":value="item.id"></el-option></el-select></p></div><span slot="footer" class="dialog-footer"><el-button @click="setRoleDialogVisible = false">取 消</el-button><el-button type="primary" @click="saveRoleInfo">确 定</el-button></span>
</el-dialog>
// 监听分配角色对话框的关闭事件
setRoleDialogClosed() {this.selectedRoleId = ''this.userInfo = {}
},
// 展示分配角色的对话框
async setRole(userInfo) {this.userInfo = userInfo// 在展示对话框之前,获取所有角色的列表const { data: res } = await this.$http.get('roles')if (res.meta.status !== 200) {return this.$message.error('获取角色列表失败!')}this.rolesList = res.datathis.setRoleDialogVisible = true
},
// 点击按钮,分配角色
async saveRoleInfo() {if (!this.selectedRoleId) {return this.$message.error('请选择要分配的角色!')}const { data: res } = await this.$http.put(`users/${this.userInfo.id}/role`,{rid: this.selectedRoleId,})if (res.meta.status !== 200) {return this.$message.error('更新角色失败!')}this.$message.success('更新角色成功!')this.getUserList()this.setRoleDialogVisible = false
},
// 监听分配角色对话框的关闭事件
setRoleDialogClosed() {this.selectedRoleId = ''this.userInfo = {}
},
版权声明:本站所有资料均为网友推荐收集整理而来,仅供学习和研究交流使用。

工作时间:8:00-18:00
客服电话
电子邮件
admin@qq.com
扫码二维码
获取最新动态
