作為一名code需要了解更多的知識,編程方面的東西太多了,是個逐漸積累的過程。最近學習一下spring web mvc,寫下我個人的一些經驗。
?
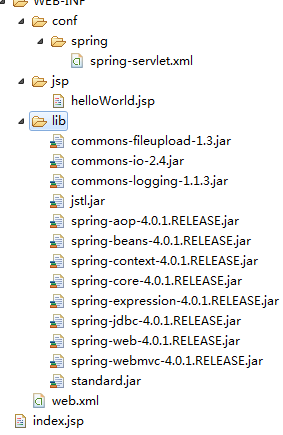
1。準備jar包。spring mvc 已經到了版本4,網上的很多資料已經不在適用。給出的下載地址也無法適用。這是非常痛苦的。我費了好大功夫才獲得這些JAR包。
在官方介紹文檔里獲得http://docs.spring.io/spring/docs/4.1.0.BUILD-SNAPSHOT/spring-framework-reference/htmlsingle/#overview-distribution-zip
在這里下載:http://repo.spring.io/release/org/springframework/spring/4.0.1.RELEASE/
同時還需要jstl包,你可以搜索到。
2. 創建一個web project項目,將jar包放入工程的WEB-INF的lib下。如下圖:
3,創建 web.xml
<?xml version="1.0" encoding="UTF-8"?>
<web-app xmlns:xsi="http://www.w3.org/2001/XMLSchema-instance" xmlns="http://java.sun.com/xml/ns/javaee" xmlns:web="http://java.sun.com/xml/ns/javaee/web-app_2_5.xsd" xsi:schemaLocation="http://java.sun.com/xml/ns/javaee http://java.sun.com/xml/ns/javaee/web-app_2_5.xsd" version="2.5"><display-name>Web Application</display-name><servlet><servlet-name>dispatcherServlet</servlet-name><servlet-class>org.springframework.web.servlet.DispatcherServlet</servlet-class><init-param><param-name>contextConfigLocation</param-name><param-value>/WEB-INF/conf/spring/spring-servlet.xml</param-value></init-param><load-on-startup>1</load-on-startup></servlet><servlet-mapping><servlet-name>dispatcherServlet</servlet-name><url-pattern>*.htm</url-pattern></servlet-mapping><context-param><param-name>contextConfigLocation</param-name><param-value>/WEB-INF/conf/spring/spring-servlet.xml</param-value></context-param><listener><listener-class>org.springframework.web.context.ContextLoaderListener</listener-class></listener>
</web-app>
4.創建文件夾WEB-INF/conf/spring,再創建文件spring-servlet.xml 內容如下:
<?xml version="1.0" encoding="UTF-8"?>
<!-- 配置SpringMVC配置文件所需的xml文件解析模板 -->
<beans xmlns="http://www.springframework.org/schema/beans"xmlns:xsi="http://www.w3.org/2001/XMLSchema-instance" xmlns:cxf="http://cxf.apache.org/core"xmlns:tx="http://www.springframework.org/schema/tx" xmlns:context="http://www.springframework.org/schema/context"xmlns:mvc="http://www.springframework.org/schema/mvc"xsi:schemaLocation="http://www.springframework.org/schema/beans http://www.springframework.org/schema/beans/spring-beans.xsd http://cxf.apache.org/core http://cxf.apache.org/schemas/core.xsd http://www.springframework.org/schema/mvc http://www.springframework.org/schema/mvc/spring-mvc.xsdhttp://www.springframework.org/schema/context http://www.springframework.org/schema/context/spring-context.xsdhttp://www.springframework.org/schema/tx http://www.springframework.org/schema/tx/spring-tx.xsd"><!-- 配置控制器要掃描的包路徑 --><context:component-scan base-package="zyf.demo" /><!-- 配置視圖解析器 --><bean id="jspViewResolver"class="org.springframework.web.servlet.view.InternalResourceViewResolver"><property name="viewClass"value="org.springframework.web.servlet.view.JstlView" /><!-- 解析器解析/WEB-INF/jsp/路徑下,以.jsp結尾的視圖文件 --><property name="prefix" value="/WEB-INF/jsp/" /><property name="suffix" value=".jsp" /></bean>
</beans>
?
5.寫控制器
package zyf.demo;import org.springframework.stereotype.Controller;
import org.springframework.web.bind.annotation.RequestMapping;@Controller
@RequestMapping("/demo")
public class HelloWorldController {@RequestMapping("/helloWorld")//url字段名public String helloWorld() {return "helloWorld";//jsp文件名
    }
}
6.寫 index.jsp
<%@ page language="java" contentType="text/html; charset=ISO-8859-1"pageEncoding="ISO-8859-1"%>
<!DOCTYPE html PUBLIC "-//W3C//DTD HTML 4.01 Transitional//EN" "http://www.w3.org/TR/html4/loose.dtd">
<%request.getRequestDispatcher("/demo/helloWorld.htm").forward(request, response);
%>
?
大功告成。中間更多的時間浪費在找jar包問題上。
?
?
?
?