npm install vditor -s
導入依賴包
import Vditor from “vditor”;
導入樣式
import “vditor/src/assets/scss/index.scss”;
export default class Vditor extends Component {constructor(props) {super(props);this.state = {editValue: ""};}componentDidMount = () => {//組件掛載完成之后調用 注意一定要在組件掛載完成之后調用 否則會找不到注入的DOMthis.createVidtor({ value: this.state.editValue });}//創建編輯器 下面會詳解createVidtor = params => {let { value } = params;value = value ? value : " ";let that = this;const vditor = new Vditor("vditor", {height: 800,mode: "ir", //及時渲染模式placeholder: "React Vditor",toolbar: ["emoji","headings","bold","italic","strike","link","|","list","ordered-list","check","outdent","indent","|","quote","line","code","inline-code","insert-before","insert-after","|","upload","table","|","undo","redo","|","fullscreen","edit-mode",{name: "more",toolbar: ["both","code-theme","content-theme","export","outline","preview","devtools","info","help"]},"|",{hotkey: "?-S",name: "save",tipPosition: "s",tip: "保存",className: "right",icon: `<img style="height: 16px" src='https://img.58cdn.com.cn/escstatic/docs/imgUpload/idocs/save.svg'/>`,click() {that.saveDoc();}},{hotkey: "",name: "publish",tipPosition: "s",tip: "發布文章",className: "right",icon: `<img style="height: 16px" src='https://img.58cdn.com.cn/escstatic/docs/imgUpload/idocs/publish.svg'/>`,click() {that.publishDoc();}}],after() {vditor.setValue(value);},blur() {that.saveDoc();},upload: {accept: "image/*",multiple: false,filename(name) {return name.replace(/[^(a-zA-Z0-9\u4e00-\u9fa5\.)]/g, "").replace(/[\?\\/:|<>\*\[\]\(\)\$%\{\}@~]/g, "").replace("/\\s/g", "");},handler(files) {function callback(path) {let name = files[0] && files[0].name;let succFileText = "";if (vditor && vditor.vditor.currentMode === "wysiwyg") {succFileText += `\n <img alt=${name} src="${path}">`;} else {succFileText += ` \n`;}document.execCommand("insertHTML", false, succFileText);}that.handleImageUpload(files, callback);},url(files) {that.handleImageUpload(files);}}});this.vditor = vditor;return vditor;};//首先需要在render里面注入DOM,可自定義注入DOM的ID,初始化編輯器的時候使用自定義的ID即可render() {<div className="editorWrap"><div id="vditor" /></div>}
}
示例:
const vditor = new Vditor("vditor", ...option);
新建對象時第一個參數ID,要對應上再render里面注入的ID
tip:只列舉一下常用參數,其他的參數請參照官方API
| 參數 | 說明 |
|---|---|
| height | 配置編輯器高度 |
| mode | 編輯器模式 wysiwyg:所見即所得2 ir:及時渲染 sv:分屏模式 |
| placeholder | 占位符 |
| toolbar | 工具欄 |
Tip:如果要自定義工具欄的話,一定要加上默認的工具欄,不然只展示自定義的了
tip:此為源碼里面copy 不用更改可直接使用,官方已定義好了快捷鍵和功能
toolbar: ["emoji","headings","bold","italic","strike","link","|","list","ordered-list","check","outdent","indent","|","quote","line","code","inline-code","insert-before","insert-after","|","upload","record","table","|","undo","redo","|","fullscreen","edit-mode",{name: "more",toolbar: ["both","code-theme","content-theme","export","outline","preview","devtools","info","help",],}]
對應工具欄展示:

let that = this;
const vditor = new Vditor("vditor", {toolbar: [{hotkey: "?-S",name: "save",tipPosition: "s",tip: "保存",className: "right",icon: `<img style="height: 16px" src='https://img.58cdn.com.cn/escstatic/docs/imgUpload/idocs/save.svg'/>`,click() {that.saveDoc();}},{hotkey: "",name: "publish",tipPosition: "s",tip: "發布文章",className: "right",icon: `<img style="height: 16px" src='https://img.58cdn.com.cn/escstatic/docs/imgUpload/idocs/publish.svg'/>`,click() {that.publishDoc();}}]
});
//tip:在調用本類封裝的方法時提前把this賦值給其他方法內的變量,在Vditor內部改變了this指向
| 參數 | 說明 |
|---|---|
| hotkey | 熱鍵配置 |
| name | 功能區分(唯一性) |
| tip | 懸浮提示 |
| className | UI展示 right靠右 |
| icon | 按鈕圖標 |
| click | 點擊事件 |
示例:

saveDoc = () => {//在初始化時已經把vditor賦值到this對象上 可直接通過getValue方法獲取當前編輯器的值let mdValue = this.vditor && this.vditor.getValue();//獲取完值業務保存就行 這里不再詳細寫本人的保存方法了...
}
let { value } = params;
value = value ? value : " ";
//如果是空值的話 最好給一個空格 以免編輯器初始化時報錯
const vditor = new Vditor("vditor", {// value: value,after() {vditor.setValue(value);}
});
//tip:雖說官方也提供value直接賦值 但是在React里面不生效,就需要在after里面去調用setValue來完成賦值
const vditor = new Vditor("vditor", {upload: {accept: "image/*",multiple: false,filename(name) {return name.replace(/[^(a-zA-Z0-9\u4e00-\u9fa5\.)]/g, "").replace(/[\?\\/:|<>\*\[\]\(\)\$%\{\}@~]/g, "").replace("/\\s/g", "");},handler(files) {function callback(path) {let name = files[0] && files[0].name;let succFileText = "";if (vditor && vditor.vditor.currentMode === "wysiwyg") {succFileText += `\n <img alt=${name} src="${path}">`;} else {succFileText += ` \n`;}document.execCommand("insertHTML", false, succFileText);}that.handleImageUpload(files, callback);},url(files, callback) {that.handleImageUpload(files, callback);}}
});
//此接口里面調用的是自己的圖片上傳 業務方自行實現
handleImageUpload = (file, callback) => {const reader = new FileReader();let formdata = new FormData();formdata.append("files", file[0]);reader.onload = () => {// setTimeout 模擬異步上傳圖片// 當異步上傳獲取圖片地址后,執行callback回調(參數為imageUrl字符串),即可將圖片地址寫入markdownnew Promise(resolve => {this.props.dispatch({type: "docManager/imageUpload",payload: { resolve, username: myInfo.userId, formdata }});}).then(res => {let imgurl = res.result.path;callback(imgurl);});};reader.readAsDataURL(file[0]);
};
| 參數 | 說明 |
|---|---|
| accept | 接收文件類型(我這邊只做了圖片上傳) |
| multiple | 是否多選 |
| filename | 格式化文件名 |
| handler | 點擊數觸發方法 |
| url | 配置此方法時可實現圖片粘貼并上傳 |
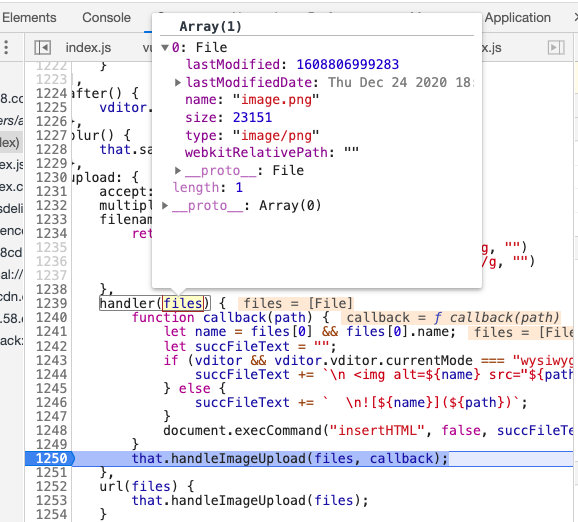
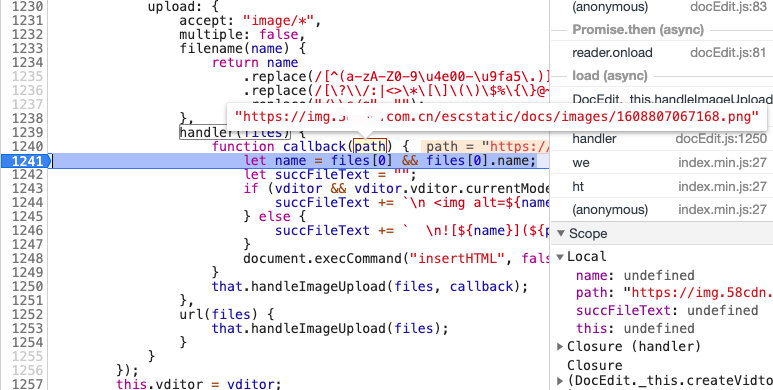
handler(files) {function callback(path) {let name = files[0] && files[0].name;let succFileText = "";//上傳完成獲取當前編輯器模式 根據不同模式拼接不同的展示標簽if (vditor && vditor.vditor.currentMode === "wysiwyg") {succFileText += `\n <img alt=${name} src="${path}">`;} else {succFileText += ` \n`;}//拼接完直接插入到鼠標選中位置document.execCommand("insertHTML", false, succFileText);}that.handleImageUpload(files, callback);
}
以上是本人在接入vditor編輯器是的一些使用總結,如果您還有什么更高級的定制玩法,可留言。
版权声明:本站所有资料均为网友推荐收集整理而来,仅供学习和研究交流使用。

工作时间:8:00-18:00
客服电话
电子邮件
admin@qq.com
扫码二维码
获取最新动态


配置Spring IOC容器的Bean](/upload/rand_pic/2-555.jpg)