Android項目實戰(二十七):數據交互(信息編輯)填寫總結
前言:
項目中必定用到的數據填寫需求。比如修改用戶名的文字編輯對話框,修改生日的日期選擇對話框等等。現總結一下,方便以后使用。
注:
android開發基礎。 先寫實現過程,想要學習的同學可以看看,不需要的同學可以直接拉到最下面復制代碼使用。
?
------------------------------------------------------------------------------------------------------------------------------------
一、文字編輯對話框
Android,看下效果圖(仿今日頭條):

需求包括:
一個標題TextView
項目?一個圓角白色背景EditText
一個可輸入個數提示的TextView
兩個按鈕,‘確定’、‘取消’
對話框展現形式。?
android開發項目app實例?代碼實現:
(1)編寫布局文件
 ?dialog_edit_txt
?
里面編輯框EditView涉及到了圓角白色背景 需要寫一個drawable文件
?bg_popup_editandroid移動開發基礎案例代碼,(2)、在activity或者fragment中使用
①、這里我把對話框寫在一個方法里,方便使用

title 文本對話框的標題
isSingleLine EditText是否限制一行顯示
maxSize EditText中文字的最大長度
textview 修改的TextView控件,首先要講該控件的文本顯示在EditText中,點擊確定后需要將編輯文本顯示在改控件中

private void showEditDialog(String title , boolean isSingleLine , final int maxSize, final TextView textview)
②、根據布局文件生成view 并 初始化控件
View view = LayoutInflater.from(this).inflate(R.layout.dialog_edit_txt, null);TextView popup_edit_info_txt_title;//標題final TextView popup_edit_info_txt_tip; //編輯框剩余個數提示TextView popup_edit_info_btn_cancel; //取消按鈕TextView popup_edit_info_btn_confirm; //確定按鈕final EditText popup_edit_info_edit_content; //編輯框popup_edit_info_txt_title = (TextView) view.findViewById(R.id.popup_edit_info_txt_title);popup_edit_info_txt_tip = (TextView) view.findViewById(R.id.popup_edit_info_txt_tip);popup_edit_info_btn_cancel = (TextView) view.findViewById(R.id.popup_edit_info_btn_cancel);popup_edit_info_btn_confirm = (TextView) view.findViewById(R.id.popup_edit_info_btn_confirm);popup_edit_info_edit_content = (EditText) view.findViewById(R.id.popup_edit_info_edit_content);
③、進行控件的屬性設置
popup_edit_info_edit_content.setText(textview.getText().toString()); // 將參數textview的文本數據顯示在EditText中popup_edit_info_edit_content.setSingleLine(isSingleLine); // 設置EditView是否單行,像用戶名這種信息需要單行,像評價簡介這種的不需要單行popup_edit_info_edit_content.setFilters(new InputFilter[]{new InputFilter.LengthFilter(maxSize)}); // 設置EditText的最大長度,當輸入超過這個值的時候不在允許輸入popup_edit_info_txt_tip.setText("剩余可輸入個數:"+(maxSize-textview.getText().toString().length())); // 設置 剩余文字個數提示 popup_edit_info_edit_content.setSelection(content.getText().length()); // 光標默認顯示在最后
final AlertDialog dialog = new AlertDialog.Builder(this) //創建對話框.setView(view).create();popup_edit_info_txt_title.setText(title); // 設置標題
dialog.setCanceledOnTouchOutside(false); // 設置點擊屏幕Dialog不消失
android軟件開發實例, ④、進行EditText的設置 ,監聽文字數據字數變化,改變提示文本的內容
popup_edit_info_edit_content.addTextChangedListener(new TextWatcher() {@Overridepublic void beforeTextChanged(CharSequence s, int start, int count, int after) {}@Overridepublic void onTextChanged(CharSequence s, int start, int before, int count) {}@Overridepublic void afterTextChanged(Editable s) {int length = s.length();popup_edit_info_txt_tip.setText("剩余可輸入個數:"+(maxSize-length));}}); ⑤、設置‘確定’、‘取消’點擊事件
popup_edit_info_btn_cancel.setOnClickListener(new View.OnClickListener() {@Overridepublic void onClick(View v) {dialog.dismiss();}});popup_edit_info_btn_confirm.setOnClickListener(new View.OnClickListener() {@Overridepublic void onClick(View v) {textview.setText(popup_edit_info_edit_content.getText().toString());dialog.dismiss();}}); ⑥、顯示對話框
dialog.show();
?
android做個小項目。------------------------------------------------------------------------------------------------------------------------------------
?
?二、單個條件選擇的自定義PopupWindow
?效果圖:
android項目實例。 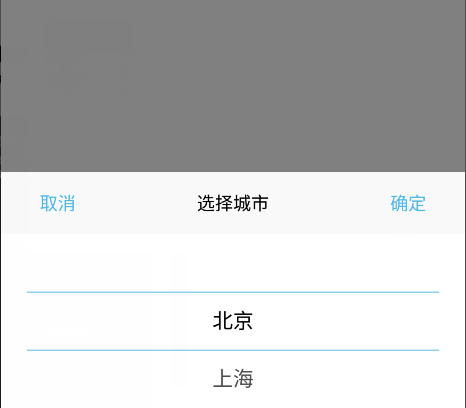
?
需求包括:?
1、頂部兩個按鈕:“取消”、“確定”按鈕
2、標題
3、滾動的wheelview選擇器
?
代碼實現:
1、選擇一個WheelView控件,這個github上很多,我這里選用的是?
https://github.com/xiangyunwan/WheelView-master/
在app目錄下的 build.gradle文件中添加
compile 'com.wx.wheelview:wheelview:1.3.3'
?
2、構建PopupWindow布局文件
這個比較簡單,按效果圖來 兩個按鈕,一個標題文本,一個WheelView
?popup_one_item對應的幾個資源:
<color name="grey_6">#faf9f9</color>
<color name="blue_main">#4ab8e9</color>
?
3、寫一個封裝的繼承PopupWindow的類,以后類似的直接拿來用即可,這里命名OneItemPopupWindow
①、參數分析
需要上下文 Context 用于構建View
需要點擊事件,接口回調的方式 View.OnClickListener
需要標題文本,String
需要WheelView顯示的數據源,ArrayList<String>
所以構造方法:
public OneItemPopupWindow(Context context, View.OnClickListener itemsOnClick, String t, ArrayList<String> datas) {super(context);
}
②、定義需要的數據
private View mMenuView; //popupwindow布局生成的Viewprivate TextView title; //標題private Button cancel; //取消按鈕private Button submit; //確定按鈕private WheelView wheel; //wheelview控件private int currentPosition; // 當然的wheelview選擇的item的位置ArrayList<String> datas = new ArrayList<>(); // wheelview的數據源
③、生成PopupWindow的View 并獲取相應控件 初始化, ?從這里開始都寫在構造方法里
LayoutInflater inflater = (LayoutInflater) context.getSystemService(Context.LAYOUT_INFLATER_SERVICE);mMenuView = inflater.inflate(R.layout.popup_one_item, null);cancel = (Button) mMenuView.findViewById(R.id.popup_one_item_btn_cancel);submit = (Button) mMenuView.findViewById(R.id.popup_one_item_btn_submit);wheel = (WheelView) mMenuView.findViewById(R.id.popup_one_item_wheel);title = (TextView) mMenuView.findViewById(R.id.popup_one_item_txt_title);this.datas = datas; //根據參數初始化數據源title.setText(t); //設置標題
④、設置wheelview控件的相應屬性方法
wheel.setWheelAdapter(new ArrayWheelAdapter(context)); // 文本數據源wheel.setSkin(WheelView.Skin.Holo); // common皮膚wheel.setWheelData(datas); // 數據集合wheel.setOnWheelItemSelectedListener(new WheelView.OnWheelItemSelectedListener() {@Overridepublic void onItemSelected(int position, Object o) {currentPosition = wheel.getCurrentPosition();}});cancel.setOnClickListener(new View.OnClickListener() {@Overridepublic void onClick(View v) {dismiss();}});submit.setOnClickListener(itemsOnClick); ⑤、設置PopupWindow的自身屬性方法
this.setContentView(mMenuView);this.setWidth(ViewGroup.LayoutParams.MATCH_PARENT);this.setHeight(ViewGroup.LayoutParams.WRAP_CONTENT);ColorDrawable dw = new ColorDrawable(0x000000);this.setBackgroundDrawable(dw);this.setFocusable(true);//點擊popupWindow之外的部分 關閉popupWindowmMenuView.setOnTouchListener(new View.OnTouchListener() {public boolean onTouch(View v, MotionEvent event) {int height = mMenuView.findViewById(R.id.popup_one_item_ly).getTop();int y = (int) event.getY();if (event.getAction() == MotionEvent.ACTION_UP){if(y<height){dismiss();}}return true;}}); 到這里構造方法完成了,然后我們需要寫一個方法,讓new OneItemPopupWindow(...)的Activity能獲取到數據源選中位置的數據
public int getCurrentPosition() { // 獲取到wheelview當前選中的位置return currentPosition;}public ArrayList<String> getDatas() { //獲取wheelview的數據源return datas;} 自定義 OneItemPopupWindow 的全部代碼
?OneItemPopupWindow至此 封裝好了一個 有一個篩選條件的 自定義PopupWindow
?
4、OneItemPopupWindow 的使用
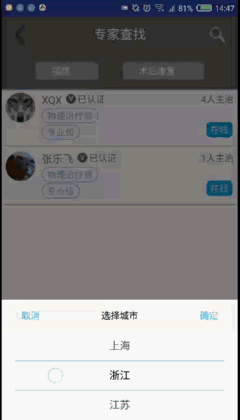
ArrayList<String> condition = new ArrayList<>(); //構建數據源condition.add("北京");condition.add("上海");condition.add("浙江");condition.add("江蘇");condition.add("山東");condition.add("山西");condition.add("廣東");condition.add("福建");popup = new OneItemPopupWindow(this, selectItemsOnClick,"選擇城市",condition); //創建自定義的popupwindow對象// 設置popupWindow顯示的位置// 此時設在界面底部并且水平居中popup.showAtLocation(find_expert_ly,Gravity.BOTTOM| Gravity.CENTER_HORIZONTAL, 0, 0);// 當popupWindow 出現的時候 屏幕的透明度 ,設為0.5 即半透明 灰色效果backgroundAlpha(0.5f);// 設置popupWindow取消的點擊事件,即popupWindow消失后,屏幕的透明度,全透明,就回復原狀態popup.setOnDismissListener(new PopupWindow.OnDismissListener() {@Overridepublic void onDismiss() {backgroundAlpha(1f);}}); 5、監聽事件的接口回調,也是寫在創建?OneItemPopupWindow 對象的Activity中
private View.OnClickListener selectItemsOnClick = new View.OnClickListener() {public void onClick(View v) {switch (v.getId()) {//根據popupWindow 布局文件中的id 來執行相應的點擊事件case R.id.popup_one_item_btn_submit:String s = popup.getDatas().get(popup.getCurrentPosition());find_expert_btn_location.setText(s);break;// ....}//每次點擊popupWindow中的任意按鈕,記得關閉此popupWindow,popup.dismiss();}}; 6、界面半透明效果方法
/*** 設置添加屏幕的背景透明度* @param bgAlpha*/public void backgroundAlpha(float bgAlpha){WindowManager.LayoutParams lp = getWindow().getAttributes();lp.alpha = bgAlpha; //0.0-1.0getWindow().setAttributes(lp);} ?
效果圖:

?
------------------------------------------------------------------------------------------------------------------------------------
?三、日期選擇的自定義DatePopupWindow
?需求同上,一個標題,一個確定按鈕 ,一個時間按鈕
? 三個水平排列的wheelview選擇空間
?效果圖:
?
?代碼實現:
1、 和 “單個條件選擇的自定義PopupWindow” 實現類似,只是多了兩個wheelview ,代碼直接貼在最下面了
?
?
?
?
?
---------------------------------------------------------------------------------------------------------------------
完整代碼:
一、文字編輯對話框
布局文件:
?dialog_edit_txtdrawable文件: 用于設置EditText圓角白色背景
?bg_popup_editjava文件:
?java效果圖:

?
二、單個條件選擇PopupWindow
布局文件:
?popup_one_itemjava文件:
?OneItemPopupWindowcolor資源:
<color name="grey_6">#faf9f9</color>
<color name="blue_main">#4ab8e9</color>
使用代碼:
點擊事件接口回調:
?onclicklistener彈出PopupWindow操作
?popupwindow效果圖:
?
三、日期選擇的自定義DatePopupWindow
1、布局文件:
?popup_date2、DatePopupWindow.java
?DatePopupWindow3、使用代碼:
?useCode效果圖:
?