This article explores an SSIS package for importing multiple Excel files data into SQL Server tables.
本文探討了用于將多個Excel文件數據導入SQL Server表的SSIS包。
Recently I come across a situation in which third-party vendors send multiple Excel files to load data into SQL Server tables. We can use SSMS Import and Export Wizards for data import. You can read more about this in How to import/export data to SQL Server using the SQL Server Import and Export Wizard.
最近,我遇到一種情況,第三方供應商發送多個Excel文件以將數據加載到SQL Server表中。 我們可以使用SSMS導入和導出向導進行數據導入。 您可以在如何使用SQL Server導入和導出向導將數據導入/導出到SQL Server中閱讀有關此內容的更多信息。
Excel表格?
Suppose you received multiple Excel files (let’s say 50) for data import. You need to launch an import wizard 50 times and complete it. It is a manual, tedious, and time-consuming task.
假設您收到了多個Excel文件(比如說50個)用于數據導入。 您需要啟動導入向導50次并完成導入。 這是一項手動,繁瑣且耗時的任務。
As I started earlier in my articles, SSIS is a true friend for DBA and developers. It comes for rescue in such situations. Let’s explore the SSIS solution in this article.
正如我在文章前面所提到的,SSIS是DBA和開發人員的真正朋友。 在這種情況下可以進行救援。 讓我們探索本文中的SSIS解決方案。
PDF文件, For this article, I want data import from the following Excel files:
對于本文,我希望從以下Excel文件導入數據:
Each Excel file contains one row, and source column shows the excel file name:
每個Excel文件包含一行,并且源列顯示excel文件名:
pdf文件怎么打開,
First, we will create an SSIS package for importing a single Excel file data into the SQL Server table. Later, we will convert the same package and import multiple Excel files data using SSIS variables and parameters.
首先,我們將創建一個SSIS包,用于將單個Excel文件數據導入到SQL Server表中。 稍后,我們將轉換相同的包并使用SSIS變量和參數導入多個Excel文件數據。
We require a SQL table that will have data from SSIS import operation. Execute the following script for creating a SQL table for data import:
我們需要一個SQL表,該表將包含來自SSIS導入操作的數據。 執行以下腳本來創建用于數據導入SQL表:
CREATE TABLE [dbo].[SSISDataImport]([EmpID] [int] NULL,[EmpName] [varchar](50) NULL,[Source] [nvarchar](50) NULL
) ON [PRIMARY]
GO
excel文件, Open Visual Studio and create a new SSIS package project. In Control Flow, right-click and go to New Connection:
打開Visual Studio并創建一個新的SSIS包項目。 在“ 控制流”中 ,右鍵單擊并轉到“ 新建連接” :
It shows all available connection types. Click on EXCEL connection manager and add it:
它顯示所有可用的連接類型。 單擊EXCEL連接管理器并添加它:
word怎么轉excel?
In Excel Connection Manager, provide the path of Excel file, and it automatically selects the Microsoft Excel versions. The first row of the Excel sheet contains the column header; therefore, we have a check on the First row has column names option:
在Excel Connection Manager中 ,提供Excel文件的路徑,它會自動選擇Microsoft Excel版本。 Excel工作表的第一行包含列標題; 因此,我們在“ 第一行具有列名”選項中進行了檢查:
Click OK, and it shows the Excel connection in the connections manager area:
文件。 單擊OK ,它在連接管理器區域中顯示Excel連接:
Now, add a destination OLE DB connection manager. Click on add new connection and select an OLE DB connection:
現在,添加目標OLE DB連接管理器。 單擊添加新連接,然后選擇一個OLE DB連接:
sql server導入數據庫。 Add SQL Server instance name, authentication (windows\SQL) in the OLE DB connection manager:
在OLE DB連接管理器中添加SQL Server實例名稱,身份驗證(windows \ SQL):
We have both source and destination connections in the connection manager window. We will use these connections in the data flow and control flow tasks of the SSIS package:
在連接管理器窗口中,我們同時具有源連接和目標連接。 我們將在SSIS包的數據流和控制流任務中使用這些連接:
sqlserver導入sql文件。
Add a Data Flow Task in the Control Flow. This data flow task will flow data from the Excel files into SQL Server tables:
在控制流中添加數據流任務 。 此數據流任務會將數據從Excel文件流到SQL Server表中:
Rename Data Flow Task to Data import from multiple excels files. It is an optional step. However, it is a better approach to renaming the tasks. We can easily recognize the task desired behavior using the custom names:
將外部sql文件導入SQLserver? 將數據流任務重命名為從多個Excel文件導入數據 。 這是一個可選步驟。 但是,這是重命名任務的更好方法。 我們可以使用自定義名稱輕松識別任務所需的行為:
Double-click on this data flow task, and it takes you to the Data Flow tab. Drag an Excel Source to the data flow. A red cross icon shows that configuration is required for this SSIS task:
雙擊此數據流任務,它將帶您到“ 數據流”選項卡。 將Excel Source拖到數據流中。 紅叉圖標顯示此SSIS任務需要配置:
sqlserver數據表的導入導出。 Double-click on this excel source and in Excel Source Editor, select the Excel sheet that contains data. We should have data on similar sheets of all Excel files:
雙擊此excel源,然后在Excel Source Editor中 ,選擇包含數據的Excel工作表。 我們應該在所有Excel文件的相似圖紙上擁有數據:
Click on Preview, and we can get a glimpse of the Excel sheet data:
單擊預覽,我們可以一窺Excel工作表數據:
sqlserver數據導入、
In the left-hand menu, click on Columns and verify the Excel sheet columns. If we want excluding any column from data import, we can remove the checkmark from the particular column:
在左側菜單中,單擊“ 列”,然后驗證Excel工作表列。 如果要從數據導入中排除任何列,則可以刪除特定列中的復選標記:
Click on OK, and it shows the successful connection of an Excel Source:
excel文件格式無效、 單擊“ 確定” ,它顯示成功連接了Excel Source:
Now, drag an OLE DB Destination and connect it with the Excel Source using blue precedence constraint:
現在,拖動OLE DB目標并使用藍色優先級約束將其與Excel Source連接:
Double-click on OLE DB Destination and it opens the OLE DB Destination Editor. Specify the OLE DB connection and SQL table that we created earlier:
雙擊OLE DB目標 ,它會打開OLE DB目標編輯器 。 指定我們之前創建的OLE DB連接和SQL表:
We need to verify the source and destination mapping. Click on Mappings and verify it:
我們需要驗證源映射和目標映射。 單擊映射并進行驗證:
Click OK, and it verifies the conversion error between Unicode and non-Unicode string data types:
單擊“ 確定” ,它會驗證Unicode和非Unicode字符串數據類型之間的轉換錯誤:
To resolve this, we need a Data Conversion task from the SSIS toolbox. Drag it from SSIS toolbox and connect it with the Excel Source:
要解決此問題,我們需要SSIS工具箱中的數據轉換任務。 將其從SSIS工具箱中拖動,并將其與Excel Source連接:
Double-click on Data Conversion. It opens the Data Conversion Transformation Editor. Select the Input Column (Source) and change the data type as Unicode_string[D_WSTR]. We also change the EmpName data type as String[DT_STR]:
雙擊數據轉換 。 打開數據轉換轉換編輯器 。 選擇輸入列(源)并將數據類型更改為Unicode_string [D_WSTR] 。 我們還將EmpName數據類型更改為String [DT_STR] :
In the above screenshot, we also changed the output column alias. Click OK and add precedence constraint from data conversion task to OLE DB Destination:
在上面的屏幕截圖中,我們還更改了輸出列別名。 單擊確定,然后將優先級約束從數據轉換任務添加到OLE DB目標:
We can still see a red cross on the OLE DB Destination task. It requires a configuration with the new columns that we derived from the data conversion.
我們仍然可以在OLE DB Destination任務上看到一個紅叉。 它需要使用我們從數據轉換派生的新列進行配置。
Open the OLE DB Destination Editor again and navigate to Mappings. In the Mapping, change the input columns, as shown below:
再次打開OLE DB目標編輯器,然后導航到“映射”。 在“映射”中,更改輸入列,如下所示:
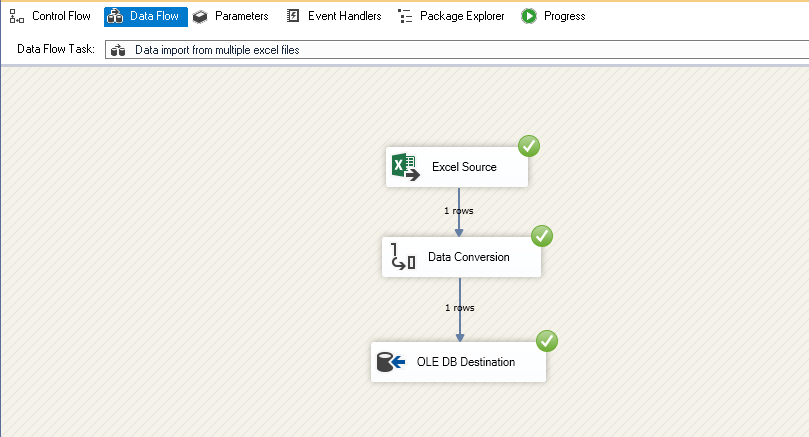
Click OK. We can see that all configuration of the SSIS package is successful:
單擊確定 。 我們可以看到SSIS包的所有配置都成功:
Execute the package, and it shows successful data import from a single Excel file:
執行該程序包,它顯示從單個Excel文件成功導入數據:
Now, execute the following TRUNCATE TABLE statement to configure SSIS package data import from multiple Excel sheets:
現在,執行以下TRUNCATE TABLE語句以配置從多個Excel工作表導入SSIS包數據:
TRUNCATE TABLE [SQLShack].[dbo].[SSISDataImport];
Right-click on the SSIS project and go to properties. In the debugging menu, disable the Run64BitRunTime option:
右鍵單擊SSIS項目,然后轉到屬性。 在調試菜單中,禁用Run64BitRunTime選項:
Click Apply and OK to save changes.
單擊“ 應用”,然后單擊“確定”保存更改。
We will use SQL variables for defining multiple Excel sheets in a for each loop. Right-click in data flow and add variables.
我們將在每個循環中使用SQL變量定義多個Excel工作表。 右鍵單擊數據流并添加變量。
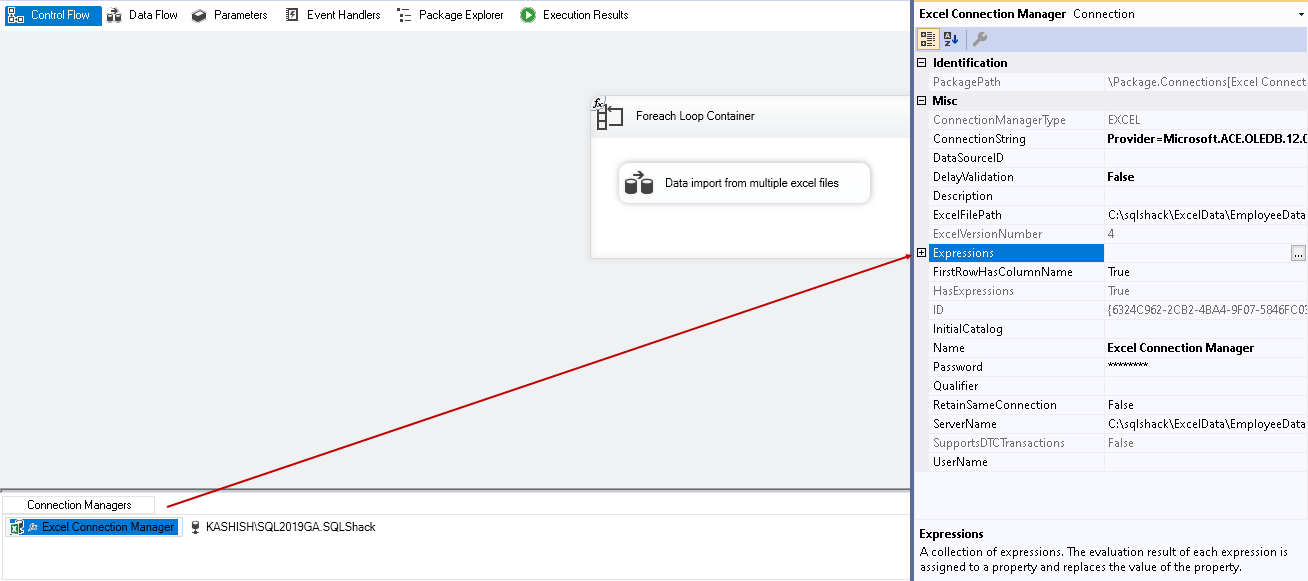
Under the Connection Manager, click on the Excel Connection Manager and view its properties. Click on Expressions, as shown below:
在“ 連接管理器”下 ,單擊“ Excel連接管理器”并查看其屬性。 點擊Expressions ,如下所示:
In the Expression Builder, expand the Variables and Parameters folder. Drag the variable [User:: ExcelPath] to the expression and evaluate the expression. It should show the variable value we defined earlier:
在“ 表達式生成器”中 ,展開“ 變量和參數”文件夾。 將變量[User :: ExcelPath]拖到表達式中并評估表達式。 它應該顯示我們之前定義的變量值:
Click OK, and you can see the variable in the Property Expressions Editor:
單擊“ 確定” ,您可以在“ 屬性表達式編輯器”中看到該變量:
Click OK, and it shows a symbol “fx” in the Excel Connection Manager:
單擊“ 確定” ,它在Excel Connection Manager中顯示符號“ fx”:
Now, go back to Control Flow and drag a Foreach Loop Container. We use this container for starting a loop for the number of executions specified. You can read more about For Each loop in the Using SSIS ForEach Loop containers to process files in Date Order and SSIS Foreach Loop vs For Loop Container:
現在,返回“控制流”并拖動一個Foreach循環容器。 我們使用此容器為指定的執行次數啟動循環。 您可以在使用SSIS ForEach循環容器以日期順序處理文件以及SSIS Foreach循環與For循環容器中閱讀有關For Each循環的更多信息:
Drag the Data import from multiple excel files task into the Foreach Loop Container:
將來自多個Excel文件的數據導入任務拖動到Foreach循環容器中:
Double-click on Foreach Loop Container, and it opens the following loop editor. Make the following changes:
雙擊Foreach循環容器,它將打開以下循環編輯器。 進行以下更改:
In the Expression, click on eclipse and specify the variable User:: Directory. You can also evaluate an expression, and it should show the value of the variable, as shown below:
在表達式中 ,單擊eclipse并指定變量User :: Directory 。 您還可以對表達式求值,它應該顯示變量的值,如下所示:
Under the Folder, specify the path of the folder. We want data import from all files in this folder, so we have specified *.* in the files section:
在文件夾下 ,指定文件夾的路徑。 我們希望從該文件夾中的所有文件導入數據,因此我們在文件部分中指定了*。*:
Now, click on Variable Mappings and map the User:: ExcelPath variable as shown below. It automatically takes index value zero:
現在,單擊“ 變量映射”并映射User :: ExcelPath變量,如下所示。 它會自動將索引值設為零:
Click OK, and it completes the configuration of SSIS package for importing multiple files:
單擊OK ,它完成了用于導入多個文件的SSIS包的配置:
Before executing the package, let’s verify that our SQL table does not have any data:
在執行程序包之前,讓我們確認我們SQL表沒有任何數據:
Execute the SSIS package using the Start button:
使用“ 開始”按鈕執行SSIS包:
SSIS Package is successful now. You can see a green tick icon on the Foreach Loop Container and data import task:
SSIS包現在成功。 您可以在Foreach循環容器和數據導入任務上看到一個綠色的勾號圖標:
Let’s verify data in the SQL table. In the following screenshot, using the source table, we can verify that we have data from all Excel files. We have data from EmployeeData-1 to EmployeeData-10:
讓我們驗證SQL表中的數據。 在下面的屏幕快照中,使用源表,我們可以驗證是否具有來自所有Excel文件的數據。 我們有從EmployeeData-1到EmployeeData-10的數據 :
We should have a similar column structure in an Excel file for data import. You can configure additional tasks for error handling or capture bad data. Take reference of An overview of Error Handling in SSIS packages for it.
我們應該在Excel文件中具有類似的列結構以進行數據導入。 您可以配置其他任務以進行錯誤處理或捕獲不良數據。 為此,請參考SSIS軟件包中的錯誤處理概述 。
This article explores the process of importing multiple Excel files into SQL Server table. It saves manual efforts and expedites the data import process with N number of files. You can schedule a SQL agent job for SSIS package execution for frequent tasks.
本文探討了將多個Excel文件導入SQL Server表的過程。 使用N個文件,可以節省人工,并加快了數據導入過程。 您可以為頻繁執行的任務計劃SQL代理作業以執行SSIS包。
翻譯自: https://www.sqlshack.com/import-data-from-multiple-excel-files-in-sql-server-tables-using-an-ssis-package/
版权声明:本站所有资料均为网友推荐收集整理而来,仅供学习和研究交流使用。

工作时间:8:00-18:00
客服电话
电子邮件
admin@qq.com
扫码二维码
获取最新动态


