大型網站高并發處理傳送門:
??比如:淘寶雙11,在1秒中就會有上百萬的并發。在做web項目時,通常通過Tomcat來做,在進程里啟動線程的方式。服務器需要處理線程的創建與銷毀、線程調度,這些都需要消耗一定的資源。所以,經過測試單個Tomcat支持最高并發如下:
php高并發解決方案,
怎么解決高并發問題,解決單個服務器過載問題?
答:Nginx起到反向代理的功能,實現負載均衡,解決高并發問題。通過輪詢將請求轉發到其他服務器節點上。Nginx可以做到50000左右的并發。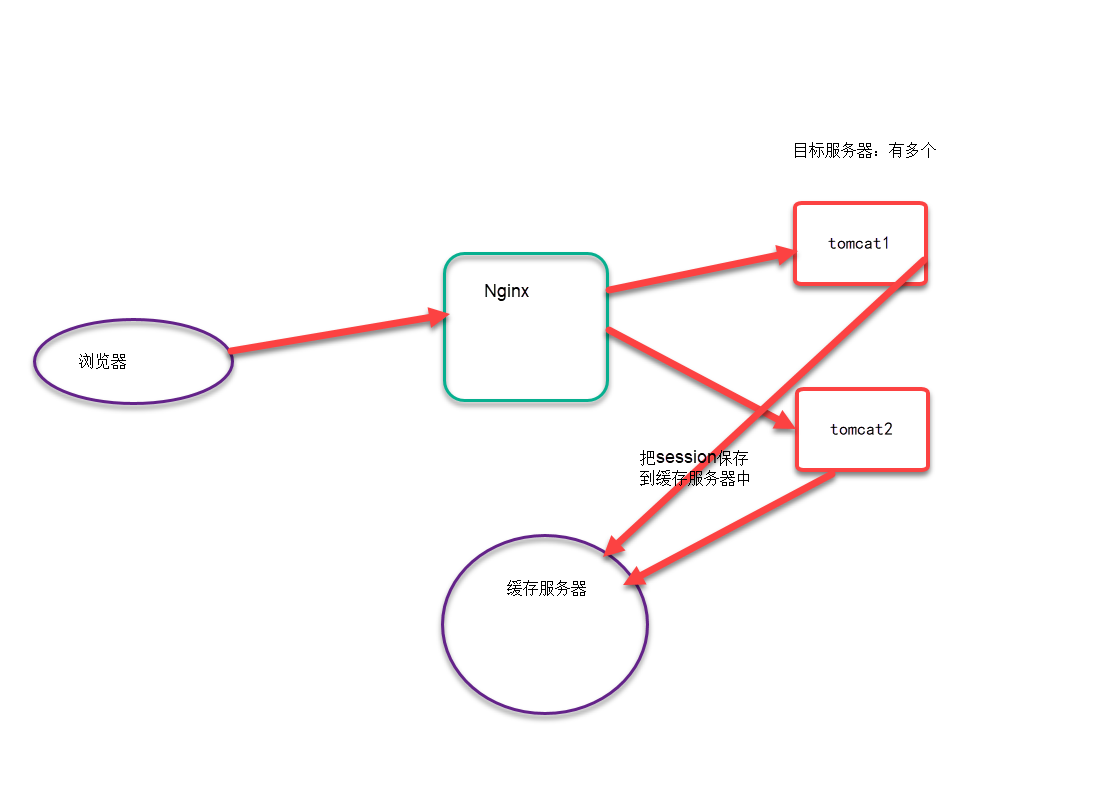
轉發:
Nginx (“engine x”) 是一個高性能的 靜態 HTTP 和 反向代理 服務器,也是一個 IMAP/POP3/SMTP 代理服務器。
java如何處理高并發問題?第一個公開版本 0.1.0 發布于 2004 年 10 月 4 日。
其將源代碼以類 BSD 許可證的形式發布,因它的穩定性、豐富的功能集、示例配置文件和低系統資源的消耗而聞名
官方測試 nginx 能夠支撐 5 萬并發鏈接,并且 cpu、內存等資源消耗卻非常低,運行非常穩定
2011 年 6 月 1 日,nginx 1.0.4 發布。apache httpd
Nginx 是一款輕量級的 Web 服務器/反向代理服務器及電子郵件(IMAP/POP3)代理服務器,并在一個 BSD-like 協議下發行。由俄羅斯的程序設計師 Igor Sysoev 所開發,其特點是占有內存少,并發能力強,事實上 nginx 的并發能力確實在同類型的網頁服務器中表現較好,中國大陸使用 nginx 網站用戶有:新浪、網易、騰訊等。
redis處理高并發。輕量級,同樣起 web 服務,比 apache 占用更少的內存及資源
抗并發 , nginx 處 理請求是異步非阻塞 ( 可 參 考 文 章 https://zhuanlan.zhihu.com/p/82935440)的,而 apache 則是阻塞型的, 在高并發下 nginx 能保持低資源低消耗高性能 NIO netty NIO
高度模塊化的設計,編寫模塊相對簡單
社區活躍,各種高性能模塊出品迅速
rewrite ,比 nginx 的 rewrite 強大
django高并發解決方案,模塊超多,基本想到的都可以找到
少 bug ,nginx 的 bug 相對較多
Nginx 配置簡潔, Apache 復雜
最核心的區別在于apache是同步多進程模型,一個連接對應一個進程中線程;nginx是異步非阻塞的,多個連接(萬級別)可以對應一個進程
tengine 網址:http://tengine.taobao.org/
如何應對高并發、??Tengine 是由淘寶網發起的 Web 服務器項目。它在 Nginx 的基礎上,針對大訪問量網站的需求,添加了很多高級功能和特性。Tengine 的性能和穩定性已經在大型的網站如淘寶網,天貓商城等得到了很好的檢驗。它的最終目標是打造一個高效、穩定、安全、易用的Web 平臺
??從2011年12月開始,Tengine 成為一個開源項目,Tengine 團隊在積極地開發和維護著它。Tengine 團隊的核心成員來自于淘寶、搜狗等互聯網企業。Tengine 是社區合作的成果,我們歡迎大家參與其中,貢獻自己的力量
tengine和nginx性能測試 : http://tengine.taobao.org/document_cn/benchmark_cn.html
Tengine 相比 Nginx 默認配置,提升 200%的處理能力。
Tengine 相比 Nginx 優化配置,提升 60%的處理能力。
什么是高并發怎么解決、tengine 更詳細參數解釋詳見: http://tengine.taobao.org/nginx_docs/cn/docs/
??官網下載 Nginx 軟件 http://nginx.org 。Nginx 官方提供了三個類型的版本:
Mainline Version:主線版,是最新版,但未經過過多的生產測試。
Stable Version:穩定版,生產環境使用版本。
Legacy Version:老版本。
高并發處理方案,我們需要下載的是 Stable Version。其中又分為兩種版本:Linux 版與 Windows 版。 開發時這兩個版本我們都下載。Linux 版用于生產環境,而 Windows 版用于開發測試。

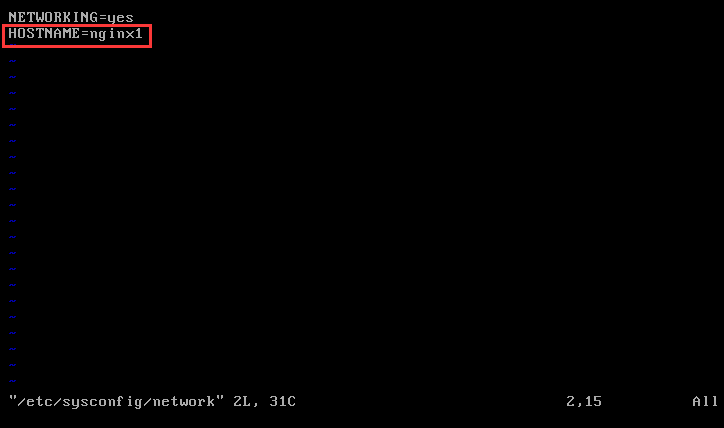
??克隆一個沒有安裝其它軟件的純凈主機。名為:nginx1。完成以下配置:
修改主機名
vim /etc/sysconfig/network
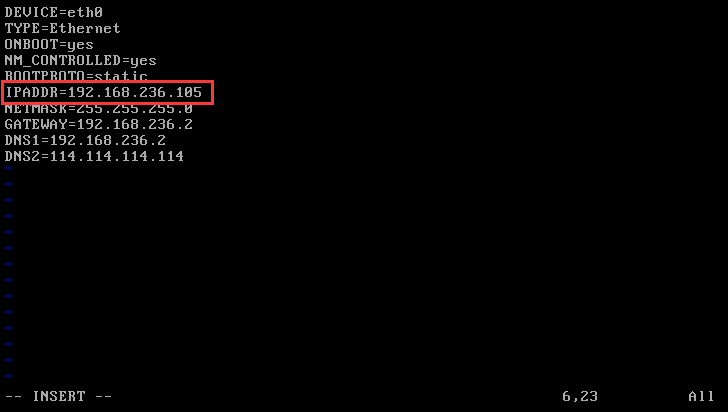
修改網絡配置
vim /etc/sysconfig/network-scripts/ifcfg-eth0
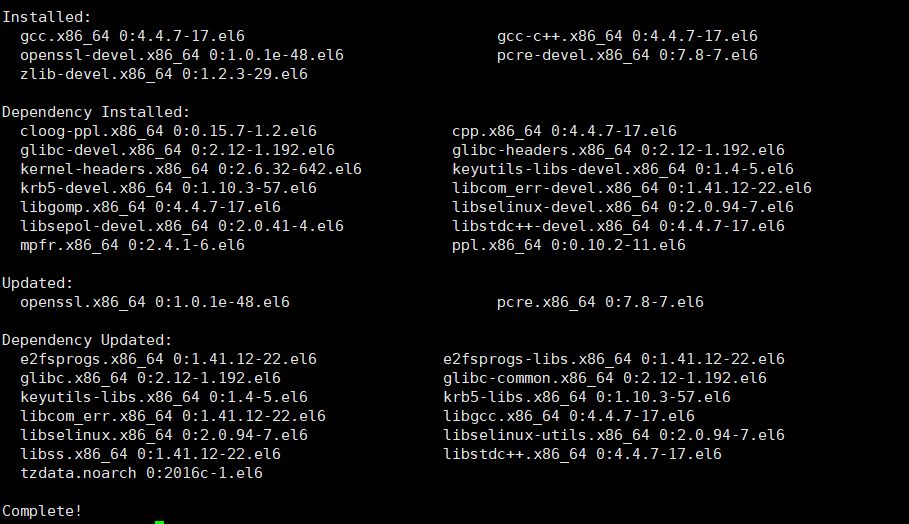
安裝源碼編譯以及 Nginx 依賴的庫
[root@nginx1 ~]# yum install gcc gcc-c++ pcre pcre-devel openssl openssl-devel zlib zlib-devel -y
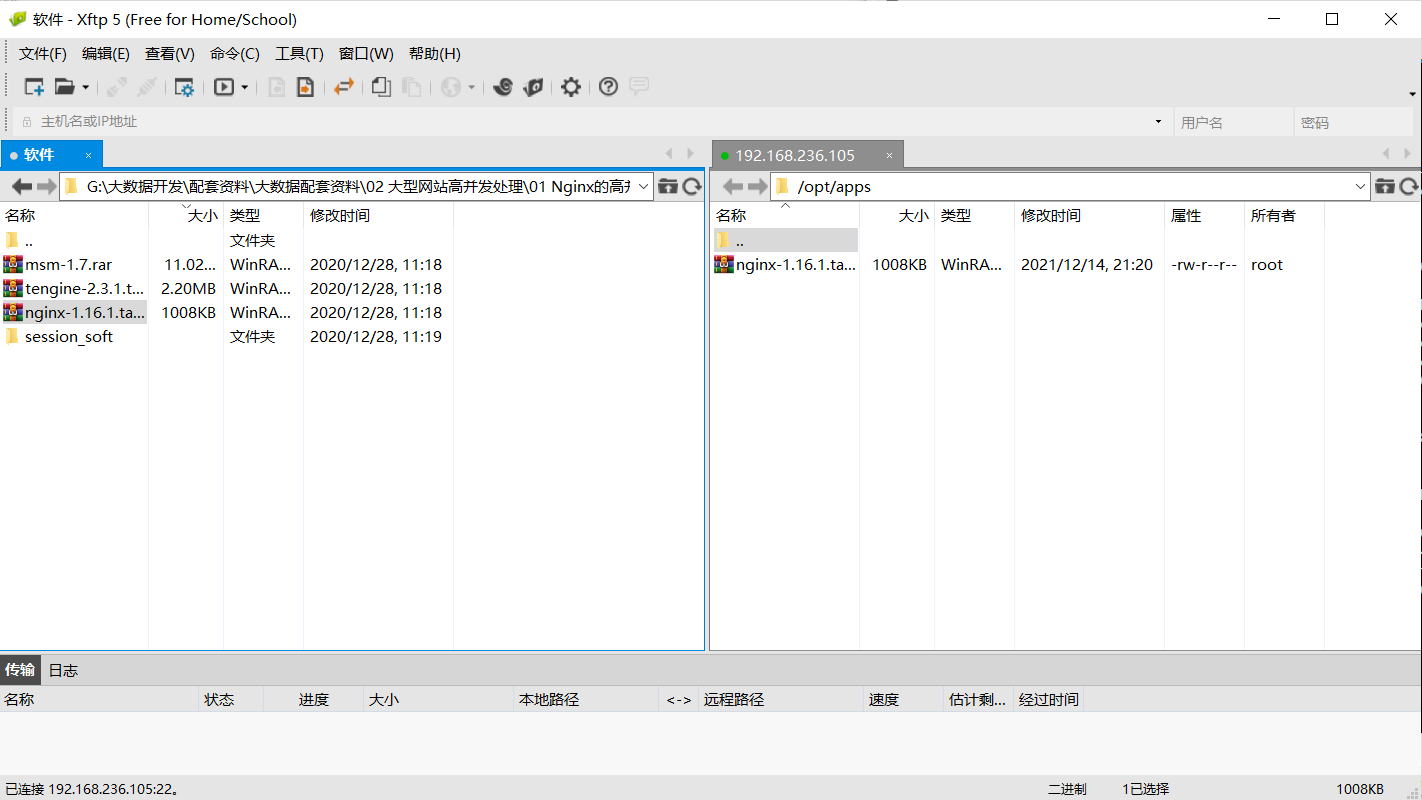
創建存放源文件的文件夾
首先在目錄/opt 下創建 apps 目錄,用于存放源文件以及解壓后的文件
[root@nginx1 ~]# mkdir /opt/apps/
上傳 Nginx 到 2 創建的目錄
解壓 Nginx
[root@nginx1 apps]# pwd /opt/apps
[root@nginx1 apps]# ls
nginx-1.16.1.tar.gz
[root@nginx1 apps]# tar -zxvf nginx-1.16.1.tar.gz
進入到/opt/apps 目錄中的 Nginx 解壓包目錄,查看 Nginx 的目錄。 其中各個目錄中存放的文件作用為:
生成 makefile
在 Nginx 解壓目錄下運行 make 命令,用于完成編譯。但此時會給出提示:沒有指定目標,并且沒有發現編譯文件 makefile。編譯命令 make 需要根據編譯文件makefile 進行編譯,所以在編譯之前需要先生成編譯文件 makefile。使用 configure命令可以生成該文件。那么,configure 命令需要配置些什么參數呢?使用--help 可以查看到可以使用的參數說明。這些參數可以分為三類:
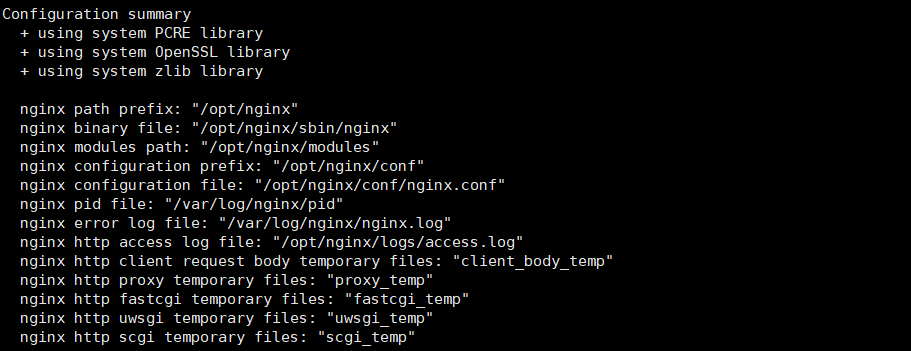
下面是簡單配置的命令執行。命令中每一行的最后添加了反斜杠\表示當前命令并未結束,回車不會執行該命令。執行成功后,會給出配置報告。下面以安裝對 https 訪問協議支持的模塊 http_ssl_module 為例。
--prefix:用于指定 nginx 的安裝目錄。注意,安裝目錄與解壓目錄不一樣--http_ssl_module:https 訪問協議需要安裝 Http 安全連接協議模塊 SSL(Secure SocketsLayer,安全套接層)。注意,在執行過 configure 命令后并不會立即生成/usr/local/nginx 目錄,也不會馬上開始安裝指定的模塊,而僅僅是將命令中指定的參數及默認配置寫入到即將要生成的 Makefile 文件中配置報告以兩部分構成:第一部分給出了配置的系統庫;第二部分給出了系統配置信息
配置成功后,再次查看 Nginx 解壓目錄,發現其中多出了一個文件 Makefile。后面的編譯就是依靠該文件進行的。
復雜安裝:
注意: /var/tmp/nginx/client目錄需要手動創建,并且需要創建nginx用戶與用戶組
[root@nginx1 nginx-1.16.1]# mkdir –p /var/tmp/nginx/client
[root@nginx1 nginx-1.16.1]# pwd
/opt/apps/nginx-1.16.1
[root@nginx1 nginx-1.16.1]# ./configure \
--prefix=/opt/nginx \
--sbin-path=/usr/sbin/nginx\
--conf-path=/etc/nginx/nginx.conf \
--error-log-path=/var/log/nginx/error.log \
--http-log-path=/var/log/nginx/access.log \
--pid-path=/var/run/nginx/nginx.pid \
--lock-path=/var/lock/nginx.lock \
--user=nginx \ 10
--group=nginx \
--with-http_ssl_module \
--with-http_flv_module \
--with-http_stub_status_module \
--with-http_gzip_static_module \
--http-client-body-temp-path=/var/tmp/nginx/client/ \
--http-proxy-temp-path=/var/tmp/nginx/proxy/ \
--http-fastcgi-temp-path=/var/tmp/nginx/fcgi/ \
--http-uwsgi-temp-path=/var/tmp/nginx/uwsgi \
--http-scgi-temp-path=/var/tmp/nginx/scgi \
--with-pcre
簡單安裝:使用簡單安裝,指定安裝目錄和 https 訪問支持
[root@nginx1 nginx-1.16.1]# ./configure --prefix=/opt/nginx --with-http_ssl_module --with-http_gzip_static_module --error-log-path=/var/log/nginx/nginx.log --pid-path=/var/log/nginx/pid
編譯安裝
這是兩個命令,make 為編譯命令,make install 為安裝命令,可以分別執行。這里使用&&將兩個命令連接執行,會在前面命令執行成功的前提下才會執行第二個命令
[root@nginx1 nginx-1.16.1]# make && make install
nginx命令隨處可用
在 Nginx 的安裝目錄/opt/nginx 中有一個 sbin 目錄,其中存放著 nginx 的命令程序 nginx。默認情況下,若要使用 nginx 命令,則必須要在/opt/nginx/sbin 目錄中,或指定命令路徑,使用起來很不方便。
[root@nginx1 ~]# cd /opt/nginx/
[root@nginx1 nginx]# ls
conf   html  logs   sbin
[root@nginx1 nginx]# cd sbin/
[root@nginx1 sbin]# ls
nginx
[root@nginx1 sbin]# ./nginx
[root@nginx1 sbin]# ps aux|grep nginx
root       1131  0.0  0.1  47332  1196 ?        Ss   11:31   0:00 nginx: master process ./nginx
nobody     1132  0.0  0.1  47772  1784 ?        S    11:31   0:00 nginx: worker process
root       1134  0.0  0.0 103256   864 pts/0    S+   11:31   0:00 grep nginx
[root@nginx1 sbin]# kill -9 1131 1132
[root@nginx1 sbin]# ps aux|grep nginx
root       1136  0.0  0.0 103256   864 pts/0    S+   11:32   0:00 grep nginx
為了能夠在任意目錄下均可直接執行 nginx 命令,通過下面的方式來完成。
添加安裝的 nginx 到服務列表:將如下內容添加到/etc/init.d/nginx 腳 本中,nginx 需要具有可執行權限。
[root@nginx1 nginx-1.16.1]# vim /etc/init.d/nginx#!/bin/sh
#
# nginx - this script starts and stops the nginx daemon
#
# chkconfig: - 85 15
# description: Nginx is an HTTP(S) server, HTTP(S) reverse \
# proxy and IMAP/POP3 proxy server
# processname: nginx
# config: /etc/nginx/nginx.conf
# config: /etc/sysconfig/nginx
# pidfile: /var/run/nginx.pid# Source function library.
. /etc/rc.d/init.d/functions# Source networking configuration.
. /etc/sysconfig/network# Check that networking is up.
[ "$NETWORKING" = "no" ] && exit 0nginx="/opt/nginx/sbin/nginx"
prog=$(basename $nginx)NGINX_CONF_FILE="/opt/nginx/conf/nginx.conf"[ -f /etc/sysconfig/nginx ] && . /etc/sysconfig/nginxlockfile=/var/lock/subsys/nginxmake_dirs() {# make required directoriesuser=`nginx -V 2>&1 | grep "configure arguments:" | sed 's/[^*]*--user=\([^ ]*\).*/\1/g' -`options=`$nginx -V 2>&1 | grep 'configure arguments:'`for opt in $options; do if [ `echo $opt | grep '.*-temp-path'` ]; then value=`echo $opt | cut -d "=" -f 2` if [ ! -d "$value" ]; then # echo "creating" $value mkdir -p $value && chown -R $user $value fi fi done
}start() { [ -x $nginx ] || exit 5[ -f $NGINX_CONF_FILE ] || exit 6 make_dirs echo -n $"Starting $prog: " daemon $nginx -c $NGINX_CONF_FILE retval=$? echo [ $retval -eq 0 ] && touch $lockfile return $retval
}stop() { echo -n $"Stopping $prog: " killproc $prog -QUIT retval=$? echo [ $retval -eq 0 ] && rm -f $lockfile return $retval
}restart() { configtest || return $? stop sleep 1 start
}reload() { configtest || return $?echo -n $"Reloading $prog: " killproc $nginx -HUP RETVAL=$? echo
}force_reload() { restart
}configtest() { $nginx -t -c $NGINX_CONF_FILE
}rh_status() { status $prog
}rh_status_q() { rh_status >/dev/null 2>&1
}case "$1" in start) rh_status_q && exit 0 $1;; stop)rh_status_q || exit 0 $1;; restart|configtest)$1;; reload) rh_status_q || exit 7 $1;; force-reload) force_reload ;; status) rh_status ;; condrestart|try-restart) rh_status_q || exit 0 ;; *)echo $"Usage: $0{start|stop|status|restart|condrestart|try-restart|reload|force-reloa d|configtest}" exit 2
esac
修改 nginx 文件的執行權限
[root@nginx1 sbin]# chmod +x /etc/init.d/nginx
添加該文件到系統服務中去
[root@nginx1 ~]# chkconfig --add nginx
查看是否添加成功
[root@nginx1 ~]# chkconfig |grep nginx
nginx          	0:off	1:off	2:off	3:off	4:off	5:off	6:off
啟動
[root@nginx1 ~]#  service nginx start
Starting nginx:
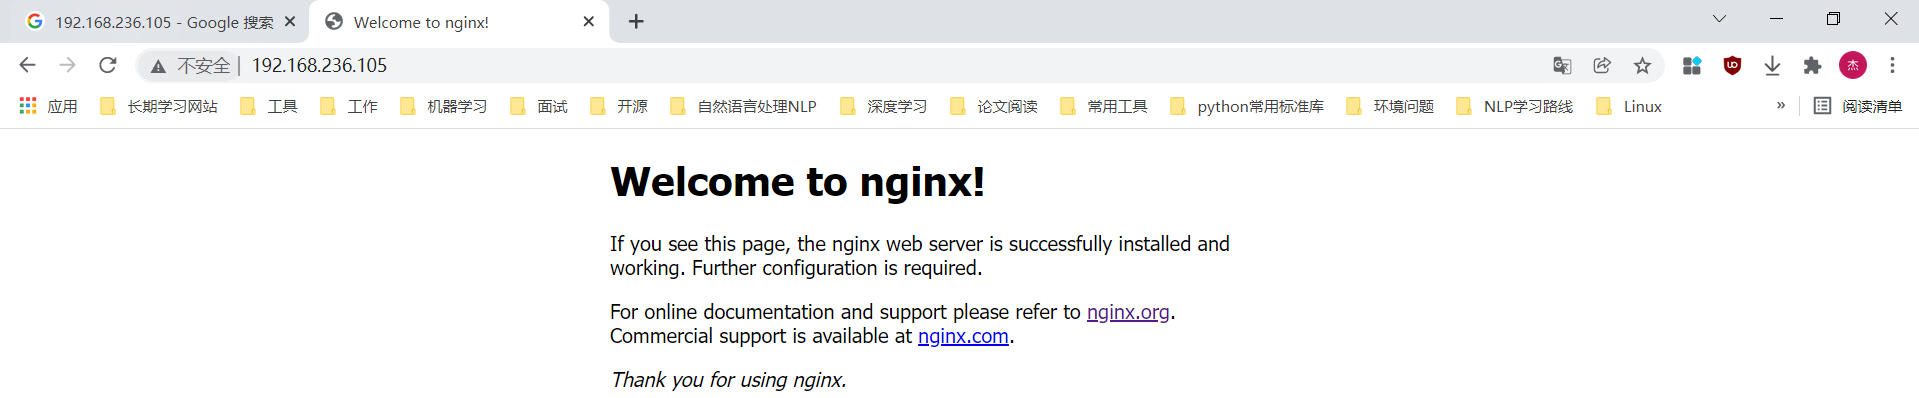
訪問:
停止
[root@nginx1 ~]# service nginx stop
重新裝載
[root@nginx1 ~]# service nginx reload
查看狀態
[root@nginx1 ~]# service nginx status
設置開機啟動
[root@nginx1 ~]# chkconfig nginx on
[root@nginx1 ~]# chkconfig
auditd         	0:off	1:off	2:on	3:on	4:on	5:on	6:off
blk-availability	0:off	1:on	2:on	3:on	4:on	5:on	6:off
crond          	0:off	1:off	2:on	3:on	4:on	5:on	6:off
htcacheclean   	0:off	1:off	2:off	3:off	4:off	5:off	6:off
httpd          	0:off	1:off	2:off	3:off	4:off	5:off	6:off
ip6tables      	0:off	1:off	2:on	3:on	4:on	5:on	6:off
iptables       	0:off	1:off	2:off	3:off	4:off	5:off	6:off
iscsi          	0:off	1:off	2:off	3:on	4:on	5:on	6:off
iscsid         	0:off	1:off	2:off	3:on	4:on	5:on	6:off
lvm2-monitor   	0:off	1:on	2:on	3:on	4:on	5:on	6:off
mdmonitor      	0:off	1:off	2:on	3:on	4:on	5:on	6:off
multipathd     	0:off	1:off	2:off	3:off	4:off	5:off	6:off
netconsole     	0:off	1:off	2:off	3:off	4:off	5:off	6:off
netfs          	0:off	1:off	2:off	3:on	4:on	5:on	6:off
network        	0:off	1:off	2:on	3:on	4:on	5:on	6:off
nginx          	0:off	1:off	2:on	3:on	4:on	5:on	6:off
ntpd           	0:off	1:off	2:on	3:on	4:on	5:on	6:off
ntpdate        	0:off	1:off	2:off	3:off	4:off	5:off	6:off
postfix        	0:off	1:off	2:on	3:on	4:on	5:on	6:off
rdisc          	0:off	1:off	2:off	3:off	4:off	5:off	6:off
restorecond    	0:off	1:off	2:off	3:off	4:off	5:off	6:off
rsyslog        	0:off	1:off	2:on	3:on	4:on	5:on	6:off
saslauthd      	0:off	1:off	2:off	3:off	4:off	5:off	6:off
sshd           	0:off	1:off	2:on	3:on	4:on	5:on	6:off
udev-post      	0:off	1:on	2:on	3:on	4:on	5:on	6:off
Nginx 在啟動后,會有一個 master 進程和多個相互獨立的 worker 進程。
[root@nginx1 ~]# ps aux|grep nginx
root       1230  0.0  0.1  47328  1196 ?        Ss   12:10   0:00 nginx: master process /opt/nginx/sbin/nginx -c /opt/nginx/conf/nginx.conf
nobody     1231  0.0  0.2  47772  2124 ?        S    12:10   0:00 nginx: worker process
root       1260  0.0  0.0 103256   864 pts/0    S+   12:42   0:00 grep nginx
Master進程接收來自外界的信號,向各 worker 進程發送信號,每個進程都有可能來處理這個連接。
Master 進程能監控 Worker 進程的運行狀態,當 worker 進程退出后(異常情況下), 會自動啟動新的 worker 進程

??由于所有子進程都繼承了父進程的 sockfd,那么當連接進來時,所有子進程都將收到通知并“爭著”與它建立連接,這就叫“驚群現象”。大量的進程被激活又掛起,只有一個進程可以 accept() 到這個連接,這當然會消耗系統資源。Nginx 提供了一個 accept_mutex加在 accept 上的一把共享鎖。即每個 worker 進程在執行 accept 之前都需要先獲取鎖,獲取不到就放棄執行 accept()。有了這把鎖之后,同一時刻,就只會有一個進程去accpet(),這樣就不會有驚群問題了。
??當一個 worker 進程在 accept()這個連接之后,就開始讀取請求,解析請求,處理請求, 產生數據后,再返回給客戶端,最后才斷開連接,完成一個完整的請求。一個請求,完全由worker 進程來處理,而且只能在一個 worker 進程中處理。
多線程涉及到線程的調度,調度涉及到一些鎖,使用進程而不使用線程可以節省鎖帶來的開銷。每個 worker 進程都是獨立的進程,不共享資源,不需要加鎖。同時在編程以及問題查上時,也會方便很多。
獨立進程,減少風險。采用獨立的進程,可以讓互相之間不會影響,一個進程退出后, 其它進程還在工作,服務不會中斷,master 進程則很快重新啟動新的 worker 進程。當然, worker 進程的也能發生意外退出。
??每進來一個 request,會有一個 worker 進程去處理。但不是全程的處理,處理到什么程度呢?處理到可能發生阻塞的地方,比如向上游(后端)服務器轉發 request,并等待請求返回。那么,這個處理的 worker 不會這么傻等著,他會在發送完請求后,注冊一個事件:“如果 upstream 返回了,告訴我一聲,我再接著干”。于是他就休息去了。此時,如果再有 request 進來,他就可以很快再按這種方式處理。而一旦上游服務器返回了,就會觸發這個事件,worker 才會來接手,這個 request 才會接著往下走。由于 web server的工作性質決定了每個 request 的大部份生命都是在網絡傳輸中,實際上花費在 server機器上的時間片不多,這就是幾個進程就能解決高并發的秘密所在,一個worker進程可以處理上萬的并發。
??nginx 由三部分組成,#是注釋
[root@nginx1 ~]# vim /opt/nginx/conf/nginx.conf#---全局塊開始----
#user  nobody;
worker_processes  1;#error_log  logs/error.log;
#error_log  logs/error.log  notice;
#error_log  logs/error.log  info;#pid        logs/nginx.pid;
#----全局塊結束---- #====events 塊開始====
events { worker_connections 1024;
}
#====events 塊結束====#****http 塊開始****
http {include       mime.types;default_type  application/octet-stream;#log_format  main  '$remote_addr - $remote_user [$time_local] "$request" '#                  '$status $body_bytes_sent "$http_referer" '#                  '"$http_user_agent" "$http_x_forwarded_for"';......
}
#****http 塊結束****
??從配置文件開始到 events 之間的內容,主要會設置一些影響 nginx 服務器整體運行的配置參數。主要包括配置運行 Nginx 服務器的用戶(組)、允許生成的 worker process 數,進程 PID 存放路徑、日志存放路徑和類型以及配置文件的引 入等。
#user  nobody;
worker_processes  1;#error_log  logs/error.log;
#error_log  logs/error.log  notice;
#error_log  logs/error.log  info;#pid        logs/nginx.pid;
worker_processes 是 Nginx 服務器并發處理服務的關鍵配置,值越大,可以支持的并發處理量也越多,但是會受到硬件、軟件等設備的制約。CPU的核數與可同時運行的進程數相同
error_log 配置 nginx 日志文件的全路徑名
pid 配置進程 PID 存放路徑
events {worker_connections  1024;
}
??events 塊涉及的參數主要影響 Nginx 服務器與用戶的網絡連接,常用的設置包括
上述的例子表示每個 work process 支持的最大連接數為 1024。這部分的配置對 Nginx的性能影響比較大,在實際中應該靈活配置。
??這是 Nginx 服務器配置中最頻繁的部分,代理、緩存和日志定義等絕大多數功能和第三方模塊的配置都在這里。需要注意的是:http 塊也可以包括 http 全局塊、server 塊。
??http 全局塊配置的指令包括文件引入、MIME-TYPE 定義、連接超時時間、單鏈接請求數上限等。
http {include       mime.types;default_type  application/octet-stream;#log_format  main  '$remote_addr - $remote_user [$time_local] "$request" '#                  '$status $body_bytes_sent "$http_referer" '#                  '"$http_user_agent" "$http_x_forwarded_for"';#access_log  logs/access.log  main;sendfile        on;#tcp_nopush     on;#keepalive_timeout  0;keepalive_timeout  65;  # 連接超時時間#gzip  on;   # 是否啟動壓縮server { ......}
}
??這塊和虛擬主機有密切關系,虛擬主機從用戶角度看,和一臺獨立的硬件主機是完全一樣的,該技術的產生是為了節省互聯網服務器硬件成本。
??每個 http 塊可以包括多個 server 塊,而每個 server 塊就相當于一個虛擬主機。而每個server 塊也分為全局 server 塊以及同時包含多個 location 塊
#gzip on;server {listen 80; #監聽的端口號server_name localhost; #監聽的域名#charset koi8-r; # 字符集編碼#access_log logs/host.access.log main; # 日志文件location / {root html;index index.html index.htm;}#error_page 404 /404.html;# redirect server error pages to the static page /50x.html#error_page 500 502 503 504 /50x.html;location = /50x.html {root html;}# proxy the PHP scripts to Apache listening on 127.0.0.1:80##location ~ \.php$ {# proxy_pass http://127.0.0.1;#}# pass the PHP scripts to FastCGI server listening on 127.0.0.1:9000##location ~ \.php$ {# root html;# fastcgi_pass 127.0.0.1:9000;# fastcgi_index index.php;# fastcgi_param SCRIPT_FILENAME /scripts$fastcgi_script_name;# include fastcgi_params;#}# deny access to .htaccess files, if Apache's document root# concurs with nginx's one##location ~ /\.ht {# deny all;#}}# another virtual host using mix of IP-, name-, and port-based configuration##server {# listen 8000;# listen somename:8080;# server_name somename alias another.alias;# location / {# root html;# index index.html index.htm;# }#}# HTTPS server##server {# listen 443 ssl;# server_name localhost;# ssl_certificate cert.pem;# ssl_certificate_key cert.key;# ssl_session_cache shared:SSL:1m;# ssl_session_timeout 5m;# ssl_ciphers HIGH:!aNULL:!MD5;# ssl_prefer_server_ciphers on;# location / {# root html;# index index.html index.htm;# }#}
全局server塊
最常見的配置是本虛擬主機的監聽配置和本虛擬主機的名稱或 IP 配置。
server {listen 80;#監聽的端口號 server_name localhost;#監聽的域名 #charset koi8-r; # 字符集編碼#access_log logs/host.access.log main; # 日志文件
location塊
一個 server 塊可以配置多個 location 塊,與location塊進行匹配,匹配到哪里,從哪里出去
??這塊的主要作用是基于 Nginx 服務器接受到的請求字符串(例如 server_name/uri-string), 對虛擬主機名稱(也可以是 IP 別名)之外的字符串(列如 前面的/uri-string)進行匹配,對特定的請求進行處理。地址定向、數據緩存和應答控制等功能,還有許多第三方模塊的配置也在這里進行。
#user nobody;
worker_processes 1;
events { use epoll; worker_connections 1024;
}
用戶與工作進程
正如下面演示的,nginx啟動后,會有一個master進程與worker進程;當殺死worker進程時,會立即啟動一個新的worker進程
[root@nginx1 ~]# service nginx status
nginx is stopped
[root@nginx1 ~]# service nginx start
Starting nginx:                                            [  OK  ]
[root@nginx1 ~]# ps aux|grep nginx
root       1355  0.0  0.1  47328  1188 ?        Ss   13:59   0:00 nginx: master process /opt/nginx/sbin/nginx -c /opt/nginx/conf/nginx.conf
nobody     1356  0.0  0.1  47772  1780 ?        S    13:59   0:00 nginx: worker process
root       1359  0.0  0.0 103256   864 pts/0    S+   13:59   0:00 grep nginx
[root@nginx1 ~]# kill -9 1356
[root@nginx1 ~]# ps aux|grep nginx
root       1355  0.0  0.1  47328  1336 ?        Ss   13:59   0:00 nginx: master process /opt/nginx/sbin/nginx -c /opt/nginx/conf/nginx.conf
nobody     1360  0.0  0.1  47772  1780 ?        S    13:59   0:00 nginx: worker process
root       1362  0.0  0.0 103256   860 pts/0    S+   13:59   0:00 grep nginx[root@nginx1 ~]# id nobody
uid=99(nobody) gid=99(nobody) groups=99(nobody)
[root@nginx1 ~]# cat /etc/passwd|grep nobody
nobody:x:99:99:Nobody:/:/sbin/nologin
use epoll
參考事件模型,use [ kqueue | rtsig | epoll | /dev/poll | select | poll ]; epoll 模型是 Linux 2.6 以上版本內核中的高性能網絡 I/O 模型,如果跑在 FreeBSD上面,就用 kqueue 模型。
worker_connections 1024;
單個后臺 worker process 進程的最大并發鏈接數。并發總數是 worker_processes 和 worker_connections 的乘積即:
max_clients=worker_processes?worker_connectionsmax\_clients = worker\_processes * worker\_connectionsmax_clients=worker_processes?worker_connections
在 設 置 了 反 向 代 理 的 情 況 下 , max_clients=worker_processes?worker_connections/4max\_clients=worker\_processes * worker\_connections / 4max_clients=worker_processes?worker_connections/4
為什么上面反向代理要除以 4,應該說是一個經驗值
根據以上條件,正常情況下的 Nginx Server 可以應付的最大連接數為:4 * 8000 = 32000
worker_connections 值的設置跟物理內存大小有關
因為并發受 IO 約束,max_clients 的值須小于系統可以打開的最大文件數
系統可以打開的最大文件數和內存大小成正比,一般 1GB 內存的機器上可以打開的文件數大約是 10 萬左右 。我們來看看 360M 內存的 VPS 可以打開的文件句柄數是多少:
$ cat /proc/sys/fs/file-max
34336
32000 < 34336,即并發連接總數小于系統可以打開的文件句柄總數,這樣就在操作系統可以承受的范圍之內 。worker_connections 的值需根據 worker_processes 進程數目和系統可以打開的最大文件總數進行適當地進行設置使得并發總數小于操作系統可以打開的最大文件數目 。其實質也就是根據主機的物理 CPU 和內存進行配置 。當然,理論上的并發總數可能會和實際有所偏差,因為主機還有其他的工作進程需要消耗系統資源。
? sendfile 實際上是 Linux2.0+以后的推出的一個系統調用,web 服務器可以通過調整自身的配置來決定是否利用 sendfile 這個系統調用。sendfile() 不但能減少切換次數而且還能減少拷貝次數。
??先來看一下不用 sendfile 的傳統網絡傳輸過程:
硬盤 >> kernel buffer >> user buffer>> kernel socket buffer >>協議棧
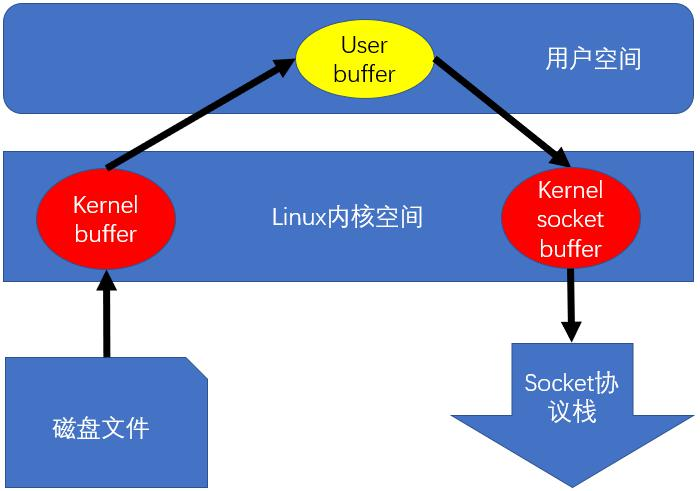
一個基于 socket 的服務,首先讀硬盤數據,然后寫數據到 socket 來完成網絡傳輸的。
read(file,tmp_buf, len);
write(socket,tmp_buf, len);
上面 2 行用代碼解釋了這一點,不過上面 2 行簡單的代碼掩蓋了底層的很多操作。來看看底層是怎么執行上面 2 行代碼的:
上面 4 個步驟有 4 次上下文切換,有 4 次拷貝,我們發現如果能減少切換次數和拷貝次數將會有效提升性能。在 kernel2.0+ 版本中,系統調用 sendfile() 就是用來簡化上面步驟提升性能的。sendfile() 不但能減少切換次數而且還能減少拷貝次數。
??再來看一下用 sendfile()來進行網絡傳輸的過程:
硬盤 >> kernel buffer (快速拷貝到 kernelsocket buffer) >>協議棧
sendfile(socket,file, len);
系統調用 sendfile()通過 DMA 把硬盤數據拷貝到 kernel buffer,然后數據被 kernel 直接拷貝到另外一個與 socket 相關的 kernel buffer。這里沒有 user mode 和 kernel mode 之間的切換,在 kernel 中直接完成了從一個 buffer 到另一個 buffer 的拷貝。
DMA 把數據從 kernel buffer 直接拷貝給協議棧,沒有切換,也不需要數據從 user mode 拷貝到 kernel mode,因為數據就在 kernel 里
簡單說,sendfile 是個比 read 和 write 更高性能的系統接口, 不過需要注意的是, sendfile 是將 in_fd 的內容發送到 out_fd 。而 in_fd 不能是 socket , 也就是 只能文件句柄。 所以當 Nginx 是一個靜態文件服務器的時候,開啟 SENDFILE 配置項能大大提高 Nginx 的性能。 但是當 Nginx 是作為一個反向代理來使用的時候,SENDFILE 則沒什么用了,因為 Nginx 是反向代理的時候。 in_fd 就不是文件句柄而是 socket,此時就不符合 sendfile 函數的參數要求了。
keepalive_timeout 65
測試時改為 0,便于看出負載切換的效果,部署到生產前進行優化(生產時默認65)來提高效率。
#gzip on;壓縮可以有效減少文件的大小,有利于網絡傳輸。
autoindex on;: 開啟目錄列表訪問,適合下載服務器,默認關閉。在瀏覽器上訪問nginx就可以看到對應目錄下有哪些文件,點擊可以下載。
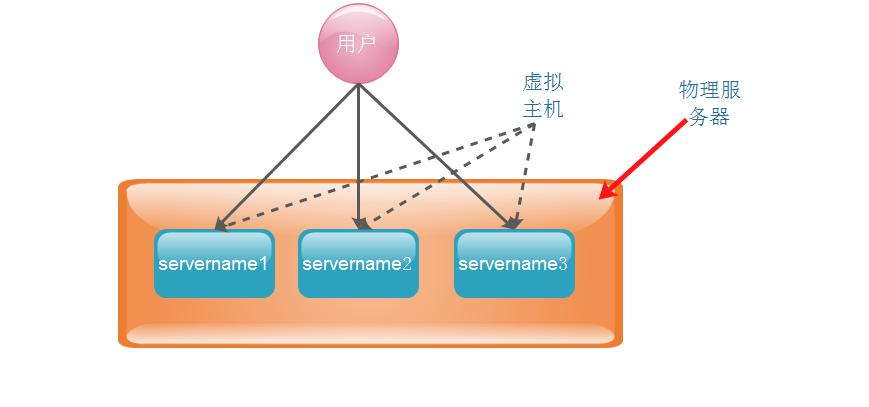
??虛擬主機,就是將一臺物理服務器虛擬為多個服務器來使用,從而實現在一臺服務器上配置多個站點,即可以在一臺物理主機上配置多個域名。Nginx 中,一個 server 標簽就是一臺虛擬主機,配置多個 server 標簽就虛擬出了多臺主機。
Nginx 虛擬主機的實現方式有兩種:
域名虛擬方式
域名虛擬方式是指不同的虛擬機使用不同的域名,通過不同的域名虛擬出不同的主機;
端口虛擬方式
端口虛擬方式是指不同的虛擬機使用相同的域名不同的端口號,通過不同的端口號虛擬出不同的主機。基于端口的虛擬方式不常用。
修改 nginx.conf 文件
[root@nginx1 ~]# vim /opt/nginx/conf/nginx.conf#user nobody;
worker_processes 1;#error_log logs/error.log;
#error_log logs/error.log notice;
#error_log logs/error.log info;#pid logs/nginx.pid;events {worker_connections 1024;
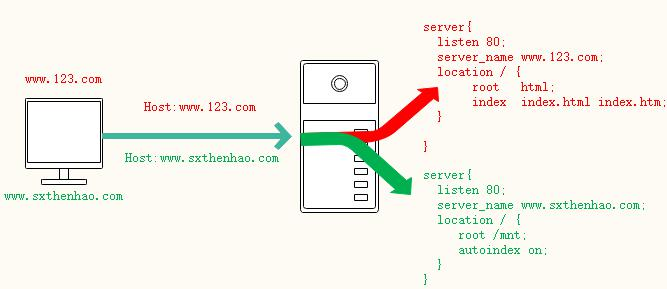
}http {include mime.types;default_type application/octet-stream;#log_format main '$remote_addr - $remote_user [$time_local] "$request" '# '$status $body_bytes_sent "$http_referer" '# '"$http_user_agent" "$http_x_forwarded_for"';#access_log logs/access.log main;sendfile on;#tcp_nopush on;keepalive_timeout 0;#keepalive_timeout 65;gzip on;server {listen 80;server_name www.sxthenhao.com;location / {root /mnt;autoindex on;}}server {listen 80;server_name www.123.com;location / {root html;index index.html index.htm;}}
}
重新加載 nginx:
[root@nginx1 ~]# service nginx reload
nginx: the configuration file /opt/nginx/conf/nginx.conf syntax is ok
nginx: configuration file /opt/nginx/conf/nginx.conf test is successful
Reloading nginx:
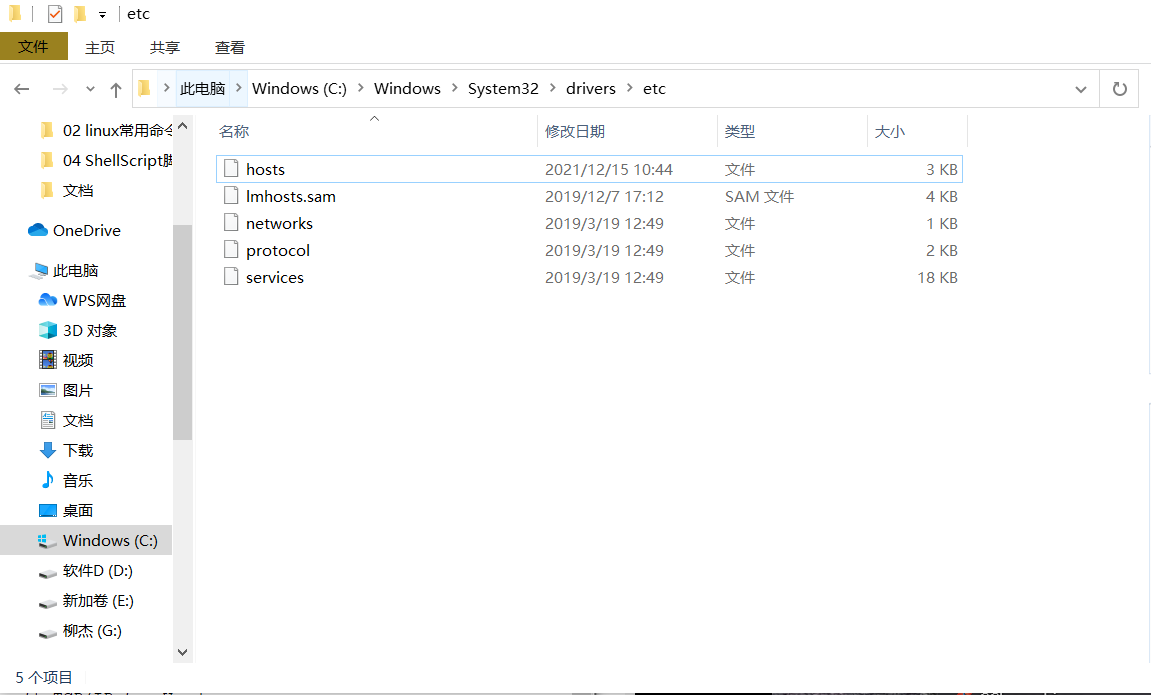
修改本機 hosts 文件(C:\Windows\System32\drivers\etc)
192.168.236.105 nginx1 www.123.com www.sxt.com
[外鏈圖片轉存失敗,源站可能有防盜鏈機制,建議將圖片保存下來直接上傳(img-gnMwRZQj-1639662151711)(01 Nginx的高并發處理/image-20211215170845288.png)]
訪問測試(谷歌瀏覽器打不開,微軟瀏覽器可以打開,未找到原因)
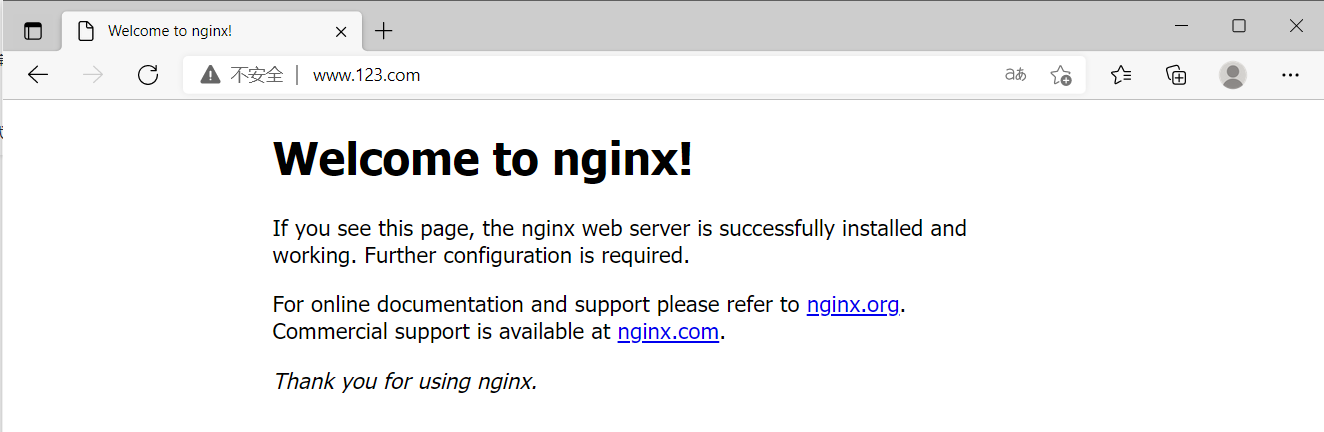
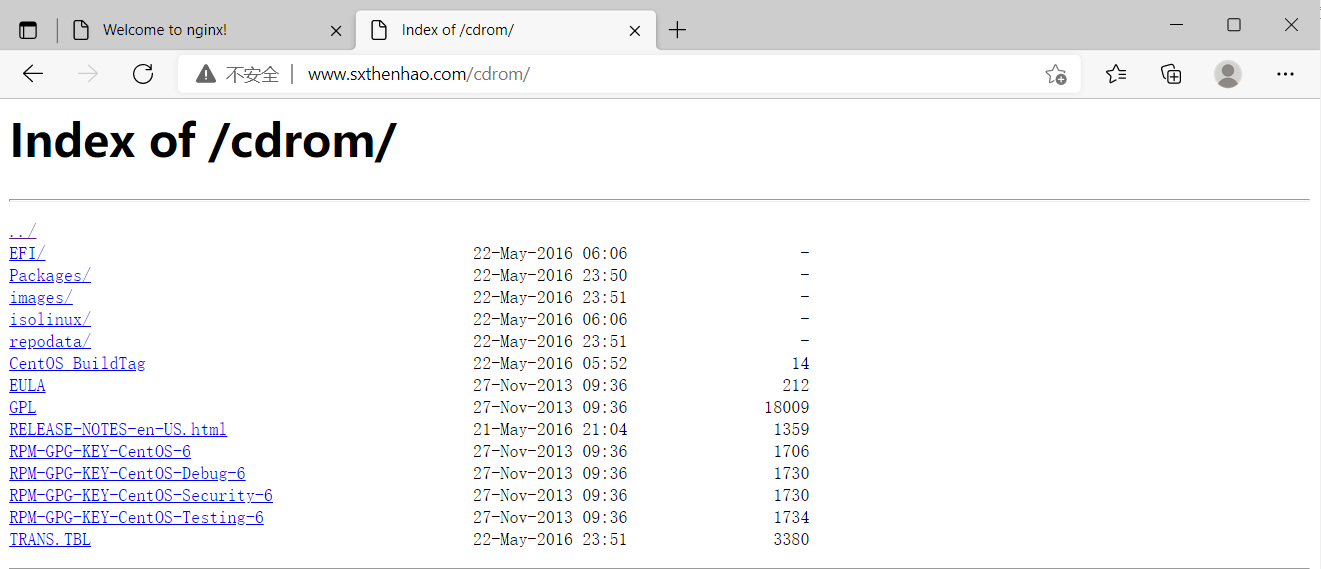
對比下圖,
這樣就實現了一臺物理主機,使用兩個域名可以進行訪問。
??Nginx 還可以作為日志服務器
[root@nginx1 ~]# cd /opt/nginx/logs/
[root@nginx1 logs]# ls
access.log
[root@nginx1 logs]# tail -f access.log   # tail-f表示監視這個文件
192.168.236.1 - - [15/Dec/2021:17:21:08 +0800] "GET / HTTP/1.1" 200 396 "-" "Mozilla/5.0 (Windows NT 10.0; Win64; x64) AppleWebKit/537.36 (KHTML, like Gecko) Chrome/96.0.4664.93 Safari/537.36 Edg/96.0.1054.53"
192.168.236.1 - - [15/Dec/2021:17:21:08 +0800] "GET /favicon.ico HTTP/1.1" 404 187 "http://www.123.com/" "Mozilla/5.0 (Windows NT 10.0; Win64; x64) AppleWebKit/537.36 (KHTML, like Gecko) Chrome/96.0.4664.93 Safari/537.36 Edg/96.0.1054.53"
192.168.236.1 - - [15/Dec/2021:17:22:32 +0800] "GET / HTTP/1.1" 200 163 "-" "Mozilla/5.0 (Windows NT 10.0; Win64; x64) AppleWebKit/537.36 (KHTML, like Gecko) Chrome/96.0.4664.93 Safari/537.36 Edg/96.0.1054.53"
192.168.236.1 - - [15/Dec/2021:17:22:32 +0800] "GET /favicon.ico HTTP/1.1" 404 187 "http://www.sxt.com/" "Mozilla/5.0 (Windows NT 10.0; Win64; x64) AppleWebKit/537.36 (KHTML, like Gecko) Chrome/96.0.4664.93 Safari/537.36 Edg/96.0.1054.53"
192.168.236.1 - - [15/Dec/2021:17:22:37 +0800] "GET /cdrom/ HTTP/1.1" 200 475 "http://www.sxt.com/" "Mozilla/5.0 (Windows NT 10.0; Win64; x64) AppleWebKit/537.36 (KHTML, like Gecko) Chrome/96.0.4664.93 Safari/537.36 Edg/96.0.1054.53"
192.168.236.1 - - [15/Dec/2021:17:22:38 +0800] "GET / HTTP/1.1" 200 163 "http://www.sxt.com/cdrom/" "Mozilla/5.0 (Windows NT 10.0; Win64; x64) AppleWebKit/537.36 (KHTML, like Gecko) Chrome/96.0.4664.93 Safari/537.36 Edg/96.0.1054.53"
192.168.236.1 - - [15/Dec/2021:17:26:05 +0800] "GET /favicon.ico HTTP/1.1" 404 187 "http://www.123.com/" "Mozilla/5.0 (Windows NT 10.0; Win64; x64) AppleWebKit/537.36 (KHTML, like Gecko) Chrome/96.0.4664.93 Safari/537.36 Edg/96.0.1054.53"
192.168.236.1 - - [15/Dec/2021:17:26:16 +0800] "GET / HTTP/1.1" 200 163 "-" "Mozilla/5.0 (Windows NT 10.0; Win64; x64) AppleWebKit/537.36 (KHTML, like Gecko) Chrome/96.0.4664.93 Safari/537.36 Edg/96.0.1054.53"
192.168.236.1 - - [15/Dec/2021:17:26:16 +0800] "GET /favicon.ico HTTP/1.1" 404 187 "http://www.sxthenhao.com/" "Mozilla/5.0 (Windows NT 10.0; Win64; x64) AppleWebKit/537.36 (KHTML, like Gecko) Chrome/96.0.4664.93 Safari/537.36 Edg/96.0.1054.53"
192.168.236.1 - - [15/Dec/2021:17:26:56 +0800] "GET /cdrom/ HTTP/1.1" 200 475 "http://www.sxthenhao.com/" "Mozilla/5.0 (Windows NT 10.0; Win64; x64) AppleWebKit/537.36 (KHTML, like Gecko) Chrome/96.0.4664.93 Safari/537.36 Edg/96.0.1054.53"
本地瀏覽器訪問:http://www.123.com/2019-12-03maxwd19,先不管 404 的問題,查看日志多了一天記錄

修改一下 http://www.123.com/2019-12-04maxwd20,日志又記錄一條

當然日志格式我們也可以自定義 :
日志的默認配置是:
[root@nginx1 ~]# vim /opt/nginx/conf/nginx.conf
#log_format main '$remote_addr - $remote_user [$time_local] "$request" '# '$status $body_bytes_sent "$http_referer" '# '"$http_user_agent" "$http_x_forwarded_for"';#access_log logs/access.log main;
修改為:
log_format myfmt '$remote_addr,$remote_user,$time_local,$request';
然后在主機名下,設置所使用的日志格式,做如下配置:
server {listen 80;server_name www.sxthenhao.com;access_log logs/myfmt.log myfmt;location / {root /mnt;autoindex on;}}
然后,將nginx進行重啟
[root@nginx1 ~]# service nginx restart
nginx: the configuration file /opt/nginx/conf/nginx.conf syntax is ok
nginx: configuration file /opt/nginx/conf/nginx.conf test is successful
Stopping nginx:                                            [  OK  ]
Starting nginx:                                            [  OK  ]
此時,如果訪問https://www.123.com,日志格式還是默認配置,監視access.log還會增加一條;如果訪問https://www.sxthenhao.com,日志格式使用自定義的格式,在文件logs/myfmt.log增加一條

參考:http://tengine.taobao.org/nginx_docs/cn/docs/http/ngx_http_core_module.html#location
語法:	location [ = | ~ | ~* | ^~ ] uri { ... }location @name { ... }
默認值:一
上下文:server, location
可以使用前綴字符串或者正則表達式定義路徑。使用正則表達式需要在路徑開始添加“~*”前綴 (不區分大小寫),或者“~”前綴(區分大小寫)。為了根據請求URI查找路徑,nginx先檢查前綴字符串定義的路徑 (前綴路徑),在這些路徑中找到能最精確匹配請求URI的路徑。然后nginx按在配置文件中的出現順序檢查正則表達式路徑, 匹配上某個路徑后即停止匹配并使用該路徑的配置,否則使用最大前綴匹配的路徑的配置。
正則表達式中可以包含匹配組(0.7.40),結果可以被后面的其他指令使用。
如果最大前綴匹配的路徑以“^~”開始,那么nginx不再檢查正則表達式。
而且,使用“=”前綴可以定義URI和路徑的精確匹配。如果發現匹配,則終止路徑查找。 比如,如果請求“/”出現頻繁,定義“location = /”可以提高這些請求的處理速度, 因為查找過程在第一次比較以后即結束。這樣的路徑明顯不可能包含嵌套路徑。
讓我們用一個例子解釋上面的說法:
location = / {[ configuration A ]
}location / {[ configuration B ]
}location /documents/ {[ configuration C ]
}location ^~ /images/ {[ configuration D ]
}location ~* \.(gif|jpg|jpeg)$ { [ configuration E ]
}
請求“/”匹配配置 A,
請求“/index.html”匹配配置 B,
請求“/documents/document.html”匹配配置 C,
請求“/images/1.gif”匹配配置 D,
請求“/documents/1.jpg”匹配配置 E。
總結:
location映射(ngx_http_core_module)
location [=/~l~*|^~] uri { ...}location配置規則
nginx收到請求頭:判定ip, port,hosts決定server
請求頭:
nginx location匹配:用客戶端的uri匹配location的uri
先普通
順序無關
最大前綴
匹配規則簡單
打斷:
再正則
不完全匹配
正則特殊性:一條URI可以和多條location匹配上
有順序的
先匹配,先應用,即時退出匹配
修改 nginx.conf 配置文件
[root@nginx1 ~]# vim /opt/nginx/conf/nginx.confserver {listen 80;server_name www.sxthenhao.com;access_log logs/myfmt.log myfmt;location / {root /mnt;autoindex on;}location /aabb {proxy_pass http://192.168.236.102/; #帶上/訪問該 url 對應的首頁,}}
重新加載nginx
[root@nginx1 ~]# service nginx restart
nginx: the configuration file /opt/nginx/conf/nginx.conf syntax is ok
nginx: configuration file /opt/nginx/conf/nginx.conf test is successful
Stopping nginx:                                            [  OK  ]
Starting nginx:
訪問測試
先在虛擬機主機node2中配置
[root@node2 ~]# ls /var
cache  db  empty  games  lib  local  lock  log  mail  nis  opt  preserve  run  spool  tmp  www  yp
[root@node2 ~]# cd /var/www
[root@node2 www]# ls
cgi-bin  error  html  icons
[root@node2 www]# cd html/
[root@node2 html]# ls
[root@node2 html]# vim index.htmlfrom 192.168.236.102[root@node2 html]# service httpd start
Starting httpd: httpd: Could not reliably determine the server's fully qualified domain name, using 192.168.236.102 for ServerName[  OK  ]


? 此時,訪問www.sxthenhao.com/aabb也可以跳轉到http://192.168.236.102/。
修改 nginx.conf
[root@nginx1 ~]# vim /opt/nginx/conf/nginx.confserver {listen       80;server_name  www.sxthenhao.com;access_log   logs/myfmt.log myfmt;location / {root   /mnt;autoindex on;}location /aabb {proxy_pass http://192.168.236.102/;}location /baidu {proxy_pass https://www.baidu.com/;  #盡量在服務器端跳轉,不要在客戶端跳轉,這里是https}}[root@nginx1 ~]# service nginx restart
nginx: the configuration file /opt/nginx/conf/nginx.conf syntax is ok
nginx: configuration file /opt/nginx/conf/nginx.conf test is successful
Stopping nginx:                                            [  OK  ]
Starting nginx:
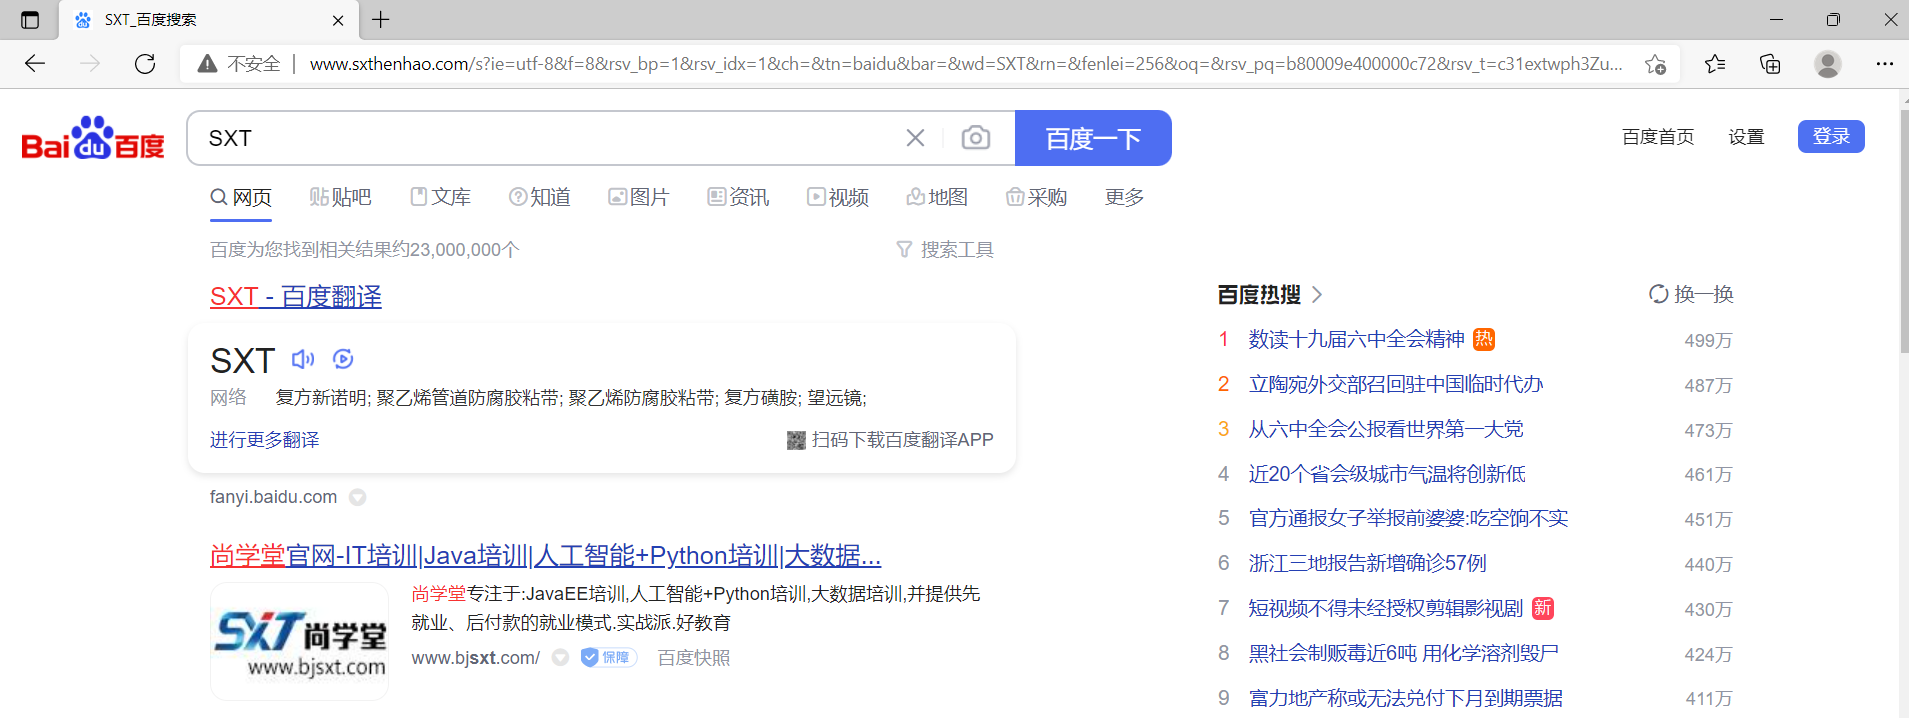
此時,瀏覽器中訪問[www.sxthenhao.com/aabb](http://www.sxthenhao.com/baidu,即可以跳到百度首頁!
但是當我們查詢(比如:ssd)時出現

所以,修改nginx.conf
[root@nginx1 ~]# vim /opt/nginx/conf/nginx.confserver {listen       80;server_name  www.sxthenhao.com;access_log   logs/myfmt.log myfmt;location / {root   /mnt;autoindex on;}location /aabb {proxy_pass http://192.168.236.102/;}location /baidu {proxy_pass https://www.baidu.com/;}location ~* /s.* {proxy_pass https://www.baidu.com; }}[root@nginx1 ~]# service nginx restart
nginx: the configuration file /opt/nginx/conf/nginx.conf syntax is ok
nginx: configuration file /opt/nginx/conf/nginx.conf test is successful
Stopping nginx:                                            [  OK  ]
Starting nginx:                                            [  OK  ]
[root@nginx1 conf]# service nginx reload
nginx: [emerg] https protocol requires SSL support in /opt/nginx/conf/nginx.conf:45
nginx: configuration file /opt/nginx/conf/nginx.conf test failed
當初編譯的時候沒有啟用 SSL 支持,在配置反向代理到 https 的網站時,編輯配置文件報錯,無法啟動 nginx。
解決辦法:先將 nginx.conf 備份/root/目錄下,刪除/opt/nginx 和/opt/apps/nginx-1.16.1,然后在解壓一份,最后編譯安裝。
[root@nginx1 nginx-1.16.1]# ./configure --prefix=/opt/nginx --with-http_ssl_module
[root@nginx1 nginx-1.16.1]# make && make install
[root@nginx1 nginx-1.16.1]# cd /opt/nginx/conf/
[root@nginx1 conf]# cp /root/nginx.conf ./
cp: overwrite `./nginx.conf'? yes
[root@nginx1 conf]# service
nginx reload nginx: the configuration file /opt/nginx/conf/nginx.conf syntax is ok
nginx: configuration file /opt/nginx/conf/nginx.conf test is successful Reloading nginx:
然后再訪問 http://www.sxthenhao.com/sxt,即可正常訪問!
??代理服務器根據其代理對象的不同,可以分為正向代理服務器與反向代理服務器。這里 的“正”與“反”均是站在客戶端角度來說的。
??正向代理是對客戶端的代理。客戶端 C 想要從服務端 S 獲取資源,但由于某些原因 ,不能直接訪問服務端,而是通過另外一臺主機 P 向服務端發送請求。當服務端處理完畢請求后,將響應發送給主機 P,主機 P 在接收到來自服務端的響應后,將響應又轉給了客戶端 C。此時的主機 P,就稱為客戶端 C 的正向代理服務器。
??客戶端在使用正向代理服務器時是知道其要訪問的目標服務器的地址等信息的。正向代理服務器是為服務用戶(客戶端)而架設的主機,與服務端無關,對服務器端透明。
正向代理架構圖:

代理服務器

代理服務器-緩存

??反向代理(Reverse Proxy)方式是指以代理服務器來接受 internet 上的連接請求,然后將請求轉發給內部網絡上的服務器,并將從服務器上得到的結果返回給 internet上請求連接的客戶端,此時代理服務器對外就表現為一個反向代理服務器。


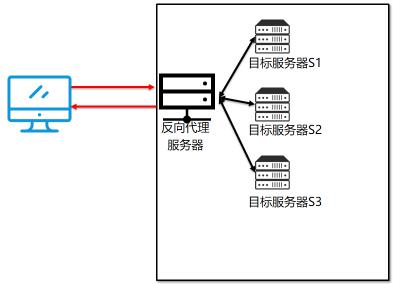
??負載均衡(Load Balancing):就是將對請求的處理分攤到多個操作單元上進行。這個均衡是指在大批量訪問前提下的一種基本均衡,并非是絕對的平均。對于 Web 工程中的負載均衡,就是將相同的 Web 應用部署到多個不同的 Web 服務器上,形成多個 Web 應用服務器。當請求到來時,由負載均衡服務器負責將請求按照事先設定好的比例向 Web 應用服務器進行分發,從而增加系統的整體吞吐量。
??負載均衡可以通過負載均衡軟件實現,也可通過硬件負載均衡器實現
硬件負載均衡
硬件負載均衡器的性能穩定,且有生產廠商作為專業的服務團隊。但其成本很高,一臺硬件負載均衡器的價格一般都在十幾萬到幾十萬,甚至上百萬。知名的負載均衡器有 F5、Array、 深信服、梭子魚等

軟件負載均衡
軟件負載均衡成本幾乎為零,基本都是開源軟件。例如:LVS、HAProxy、Nginx 等。
實例:該機群包含一臺 nginx1 服務器,兩臺 Web 服務器(node2 和 node3)。
一種方式是:
在nginx1中,修改nginx.conf文件
[root@nginx1 ~]# cd /opt/nginx/conf/
[root@nginx1 conf]# vim nginx.confgzip  on;upstream rss {server 192.168.236.102;server 192.168.236.103;}server {listen       80;server_name  www.sxthenhao.com;access_log   logs/myfmt.log myfmt;location / {root   /mnt;autoindex on;}location /toms {proxy_pass http://rss/;}location /aabb {proxy_pass http://192.168.236.102/;}location /baidu {proxy_pass https://www.baidu.com/;}location ~* /s.* {proxy_pass https://www.baidu.com;}}
重啟 nginx
[root@nginx1 conf]# service nginx restart
nginx: the configuration file /opt/nginx/conf/nginx.conf syntax is ok
nginx: configuration file /opt/nginx/conf/nginx.conf test is successful
Stopping nginx:                                            [  OK  ]
Starting nginx:
在node2與node3服務器上,同時啟動httpd服務
[root@node2 ~]# service httpd start
Starting httpd: httpd: Could not reliably determine the server's fully qualified domain name, using 192.168.236.102 for ServerName[  OK  ]
[root@node3 html]# service httpd start
Starting httpd: httpd: Could not reliably determine the server's fully qualified domain name, using 192.168.236.103 for ServerName[  OK  ]
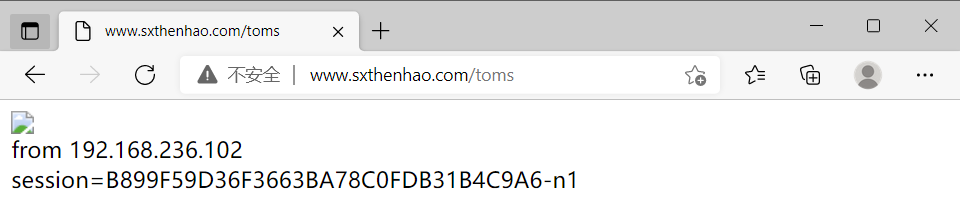
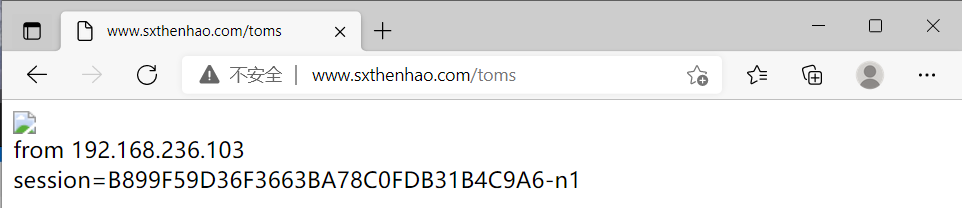
請求測試:http://www.sxthenhao.com/toms,發現已經實現了負載均衡。(中小企業一般使用該方式)
[外鏈圖片轉存失敗,源站可能有防盜鏈機制,建議將圖片保存下來直接上傳(img-rvtZ9lMX-1639662151718)(01 Nginx的高并發處理/image-20211216133134346.png)]
[外鏈圖片轉存失敗,源站可能有防盜鏈機制,建議將圖片保存下來直接上傳(img-1Kc01eja-1639662151718)(01 Nginx的高并發處理/image-20211216133156204.png)]
另一種方式是:
通過在 Nginx 服務器上配置 hosts 本地域名解析:
[root@nginx1 conf]# vim /etc/hosts 192.168.20.101 node1
192.168.20.102 node2 xxx
192.168.20.103 node3 xxx
192.168.20.104 node4
修改 nginx.conf 配置文件,添加如下配置
location /cats { proxy_pass http://xxx/;
}
重啟 nginx,測試:http://www.sxthenhao.com/cats
一樣能夠實現負載均衡的目的(大型企業使用該方式,一般還會搭建一個 DNS 域名解析服
務器,只需要修改 DNS 域名解析服務器就 ok 了)
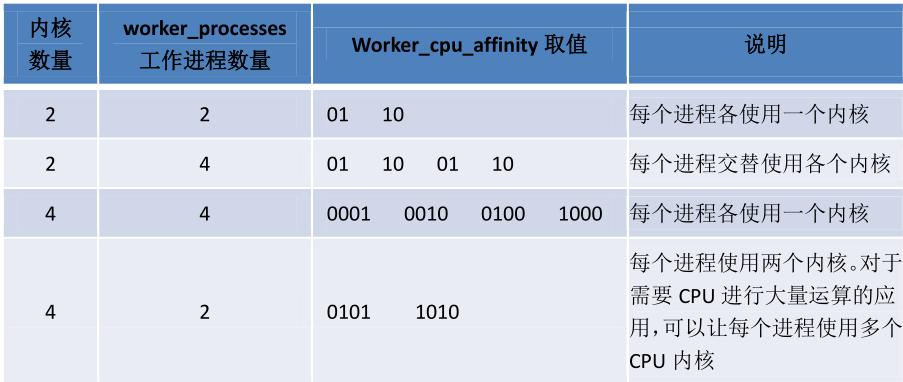
??打開 nginx.conf 配置文件,可以看到 worker_processes 的默認值為 1。
[root@nginx1 conf]# vim nginx.conf#user  nobody;
worker_processes  auto;
??worker_processes,工作進程,用于指定 Nginx 的工作進程數量。該值應該設置為多少合適呢?其數值一般設置為 CPU 內核數量,或內核數量的整數倍。注意,現代的CPU 一般都是多核的,即一塊 CPU 中包含多個內核。若當前系統具有 2 塊 CPU,而每塊CPU 中包含 2 個內核,那么,worker_processes 的值一般可以設置為 4 或 8。當然,也可以設置為 2。 不過需要注意,該值不僅僅取決于 CPU 內核數量,還與硬盤數量及負載均衡模式相關。 在不確定時可以指定其值為auto。
??為了進一步提高系統性能,我們會將 worker 進程與具體的內核進行綁定。該綁定操作是通過 worker_cpu_affinity 屬性進行設置的。不過,若指定worker_processes 的值為 auto,則無法設置 worker_cpu_affinity。
??該設置是通過二進制進行的。每個內核使用一個二進制位表示,0 代表內核關閉,1 代表內核開啟。也就是說,有幾個內核,就需要使用幾個二進制位。下面通過幾個例子來增進對worker_processes 與 worker_cpu_affinity 的理解。

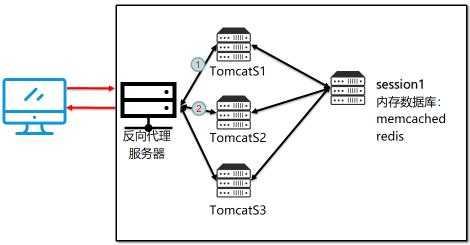
??http 協議是無狀態的,即你連續訪問某個網頁 100 次和訪問 1 次對服務器來說是沒有區別對待的,因為它記不住你。那么,在一些場合,確實需要服務器記住當前用戶怎么辦?比如用戶登錄郵箱后,接下來要收郵件、寫郵件,總不能每次操作都讓用戶輸入用戶名和密碼吧,為了解決這個問題,session 的方案就被提了出來,事實上它并不是什么新技術, 而且也不能脫離 http 協議以及任何現有的 web 技術 。
??session 的常見實現形式是會話 cookie(session cookie),即未設置過期時間的 cookie,這個 cookie 的默認生命周期為瀏覽器會話期間,只要關閉瀏覽器窗口,cookie 就消失了。實現機制是當用戶發起一個請求的時候,服務器會檢查該請求中是否包含 sessionid,如果未包含,則系統會創造一個名為 JSESSIONID 的輸出 cookie 返回給瀏覽器(只放入內存,并不存在硬盤中),并將其以 HashTable 的形式寫到服務器的內存里面;**當已經包含 sessionid時,服務端會檢查找到與該 session 相匹配的信息,如果存在則直接使用該 sessionid,若不存在則重新生成新的 session。**這里需要注意的是 session 始終是由服務端創建的,并非瀏覽器自己生成的。 但是瀏覽器的 cookie 被禁止后 session 就需要用 get 方法的 URL 重寫的機制或使用 POST 方法提交隱藏表單的形式來實現 。
??首先我們應該明白,為什么要實現共享,如果你的網站是存放在一個機器上,那么是不存在這個問題的,因為會話數據就在這臺機器,但是如果你使用了負載均衡把請求分發到不同的機器呢?這個時候會話 id 在客戶端是沒有問題的,但是如果用戶的兩次請求到了兩臺不同的機器,而它的 session 數據可能存在其中一臺機器,這個時候就會出現取不到 session 數據的情況,于是 session 的共享就成了一個問題。
??共享session,專門管理session的軟件:memcached緩存服務,可以和tomat整合,幫助tomat共享管理session。
[root@node2 apps]# ls
apache-tomcat-7.0.69.tar.gz  jdk-7u80-linux-x64.rpm  nginx-1.8.1.tar.gz[root@node2 ~]# cd /opt/apps/[root@node2 apps]# rpm -ivh jdk-7u80-linux-x64.rpm[root@node2 jdk1.7.0_80]# vim /etc/profile  export JAVA_HOME=/usr/java/jdk1.7.0_80
export PATH=$PATH:$JAVA_HOME/bin
[root@node2 apps]# source /etc/profile
[root@node2 apps]# jps[root@node2 apps]# tar -zxvf apache-tomcat-7.0.69.tar.gz -C /opt/[root@node2 opt]# mv apache-tomcat-7.0.69/ tomcat-7.0.69/
[root@node2 opt]# ls
apps  tomcat-7.0.69
[root@node2 opt]# cd tomcat-7.0.69/
[root@node2 tomcat-7.0.69]# ls
bin  conf  lib  LICENSE  logs  NOTICE  RELEASE-NOTES  RUNNING.txt  temp  webapps  work
[root@node2 tomcat-7.0.69]# cd webapps/ROOT/# 修改 ROOT/index.jsp,dG 全刪后,添加:
[root@node2 ROOT]# vim index.jsp from node2 session=<%=session.getId()%>[root@node2 ROOT]# cd /opt/tomcat-7.0.69/bin/
[root@node2 bin]# ls
bootstrap.jar       commons-daemon-native.tar.gz  digest.sh         startup.bat           tool-wrapper.sh
catalina.bat        configtest.bat                setclasspath.bat  startup.sh            version.bat
catalina.sh         configtest.sh                 setclasspath.sh   tomcat-juli.jar       version.sh
catalina-tasks.xml  daemon.sh                     shutdown.bat      tomcat-native.tar.gz
commons-daemon.jar  digest.bat                    shutdown.sh       tool-wrapper.bat
[root@node2 bin]# ./startup.sh
Using CATALINA_BASE:   /opt/tomcat-7.0.69
Using CATALINA_HOME:   /opt/tomcat-7.0.69
Using CATALINA_TMPDIR: /opt/tomcat-7.0.69/temp
Using JRE_HOME:        /usr/java/jdk1.7.0_80
Using CLASSPATH:       /opt/tomcat-7.0.69/bin/bootstrap.jar:/opt/tomcat-7.0.69/bin/tomcat-juli.jar
Tomcat started.


修改 nginx.conf
[root@nginx1 conf]# vim nginx.confupstream rss { server 192.168.236.102:8080; server 192.168.236.103:8080; } [root@nginx1 conf]# service nginx restart
nginx: the configuration file /opt/nginx/conf/nginx.conf syntax is ok
nginx: configuration file /opt/nginx/conf/nginx.conf test is successful
Stopping nginx:                                            [  OK  ]
Starting nginx:                                            [  OK  ]
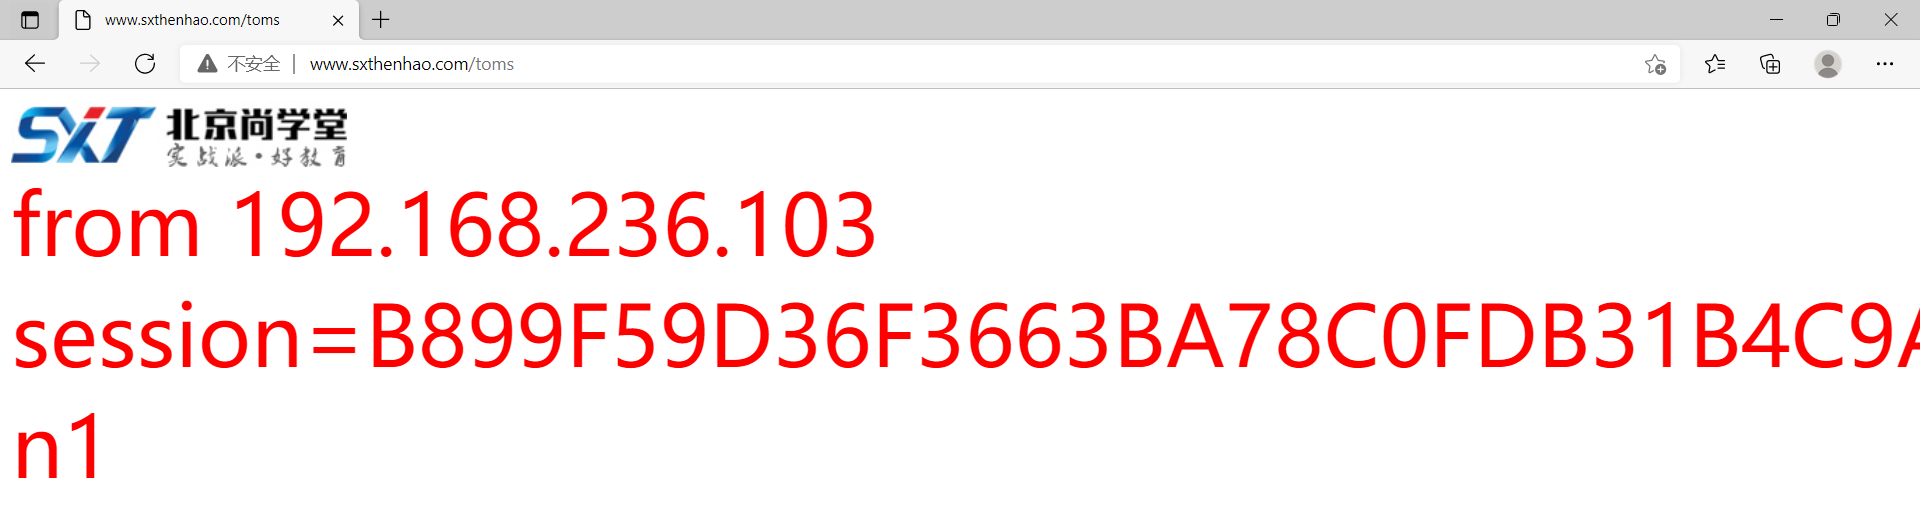
訪問測試 http://www.sxthenhao.com/toms,刷新 session 一直改變。


[root@nginx1 conf]# yum install libevent -y[root@nginx1 conf]# yum install memcached -y[root@nginx1 conf]# memcached -d -m 128m -p 11211 -l 192.168.236.105 -u root -P /tmp/
-d:后臺啟動服務
-m:緩存大小
-p:端口
-l:IP
-P:服務器啟動后的系統進程 ID,存儲的文件
-u:服務器啟動是以哪個用戶名作為管理用戶
[root@nginx1 conf]# ps aux|grep memcached
root       1390  0.0  0.0 330844   888 ?        Ssl  15:24   0:00 memcached -d -m 128m -p 11211 -l 192.168.236.105 -u root -P /tmp/
root       1397  0.0  0.0 103256   868 pts/0    S+   15:26   0:00 grep memcached
拷貝 jar 到 tomcat 的 lib 下,jar 包見附件
配置 tomcat,每個 tomcat 里面的 context.xml 中加入
[root@node3 bin]# cd /opt/
[root@node3 opt]# ls
apps  tomcat-7.0.69
[root@node3 opt]# cd tomcat-7.0.69/
[root@node3 tomcat-7.0.69]# ls
bin  conf  lib  LICENSE  logs  NOTICE  RELEASE-NOTES  RUNNING.txt  temp  webapps  work
[root@node3 tomcat-7.0.69]# cd conf/
[root@node3 conf]# ls
Catalina         catalina.properties  logging.properties  tomcat-users.xml
catalina.policy  context.xml          server.xml          web.xml
[root@node3 conf]# vim context.xml <Manager
className="de.javakaffee.web.msm.MemcachedBackupSessionManager"
memcachedNodes="n1:192.168.236.105:11211"
sticky="false"
lockingMode="auto"
sessionBackupAsync="false"
requestUriIgnorePattern=".*\.(ico|png|gif|jpg|css|js)$"
sessionBackupTimeout="1000"
transcoderFactoryClass="de.javakaffee.web.msm.serializer.kryo.KryoTranscoderFactory"/>
tomcat 添加 jar 包和配置信息之后需要重啟
[root@node3 conf]# cd ../bin/
[root@node3 bin]# ls
bootstrap.jar       commons-daemon-native.tar.gz  digest.sh         startup.bat           tool-wrapper.sh
catalina.bat        configtest.bat                setclasspath.bat  startup.sh            version.bat
catalina.sh         configtest.sh                 setclasspath.sh   tomcat-juli.jar       version.sh
catalina-tasks.xml  daemon.sh                     shutdown.bat      tomcat-native.tar.gz
commons-daemon.jar  digest.bat                    shutdown.sh       tool-wrapper.bat
[root@node3 bin]# ./shutdown.sh
Using CATALINA_BASE:   /opt/tomcat-7.0.69
Using CATALINA_HOME:   /opt/tomcat-7.0.69
Using CATALINA_TMPDIR: /opt/tomcat-7.0.69/temp
Using JRE_HOME:        /usr/java/jdk1.7.0_80
Using CLASSPATH:       /opt/tomcat-7.0.69/bin/bootstrap.jar:/opt/tomcat-7.0.69/bin/tomcat-juli.jar
[root@node3 bin]# ./startup.sh
Using CATALINA_BASE:   /opt/tomcat-7.0.69
Using CATALINA_HOME:   /opt/tomcat-7.0.69
Using CATALINA_TMPDIR: /opt/tomcat-7.0.69/temp
Using JRE_HOME:        /usr/java/jdk1.7.0_80
Using CLASSPATH:       /opt/tomcat-7.0.69/bin/bootstrap.jar:/opt/tomcat-7.0.69/bin/tomcat-juli.jar
Tomcat started.
[root@node2 opt]# cd tomcat-7.0.69/bin/
[root@node2 bin]# ls
bootstrap.jar       commons-daemon-native.tar.gz  digest.sh         shutdown.sh           tool-wrapper.bat
catalina.bat        configtest.bat                index.jsp         startup.bat           tool-wrapper.sh
catalina.sh         configtest.sh                 setclasspath.bat  startup.sh            version.bat
catalina-tasks.xml  daemon.sh                     setclasspath.sh   tomcat-juli.jar       version.sh
commons-daemon.jar  digest.bat                    shutdown.bat      tomcat-native.tar.gz
[root@node2 bin]# ./ shutdown.sh
-bash: ./: is a directory
[root@node2 bin]# ./shutdown.sh
Using CATALINA_BASE:   /opt/tomcat-7.0.69
Using CATALINA_HOME:   /opt/tomcat-7.0.69
Using CATALINA_TMPDIR: /opt/tomcat-7.0.69/temp
Using JRE_HOME:        /usr/java/jdk1.7.0_80
Using CLASSPATH:       /opt/tomcat-7.0.69/bin/bootstrap.jar:/opt/tomcat-7.0.69/bin/tomcat-juli.jar
[root@node2 bin]# ./startup.sh
Using CATALINA_BASE:   /opt/tomcat-7.0.69
Using CATALINA_HOME:   /opt/tomcat-7.0.69
Using CATALINA_TMPDIR: /opt/tomcat-7.0.69/temp
Using JRE_HOME:        /usr/java/jdk1.7.0_80
Using CLASSPATH:       /opt/tomcat-7.0.69/bin/bootstrap.jar:/opt/tomcat-7.0.69/bin/tomcat-juli.jar
Tomcat started.
最后實現的效果是共享session,


??Nginx 動靜分離簡單來說就是把動態和靜態請求分開,不能理解成知識單純的把動態頁面和靜態頁面物理分離。嚴格意義上說應該是動態請求和靜態請求分開,可以理解成使用 Nginx 處理靜態請求,Tomcat 處理動態請求。 將動態的資源交給tomcat來做響應,將靜態資源單獨作成靜態資源服務器,由nginx來提供響應,這樣可以減輕tomcat的負載,靜態資源也方便統一的管理與存儲。當網站規模比較小時,動態資源與靜態資源整到一起由tomcat來處理也是可以的。當并發比較多時,如果仍然由tomcat處理,對于tomcat的系統消耗非常大。主流趨勢是將動態資源與靜態資源做一個分離。(建議閱讀:《淘寶技術這十年》)
動靜分離從目前實現方式大致分為兩種:
一是純粹的把靜態文件獨立成單獨的域名,放在獨立的服務器上,也是目前主流推崇的方案。
二是動態和靜態文件混合在一起發布,通過 nginx 分開。通過 location 指定不同的后綴名實現不同的請求轉發。
修改node2、node3上的index.jsp
node2:
[root@node2 bin]# cd /opt/tomcat-7.0.69/webapps/ROOT/
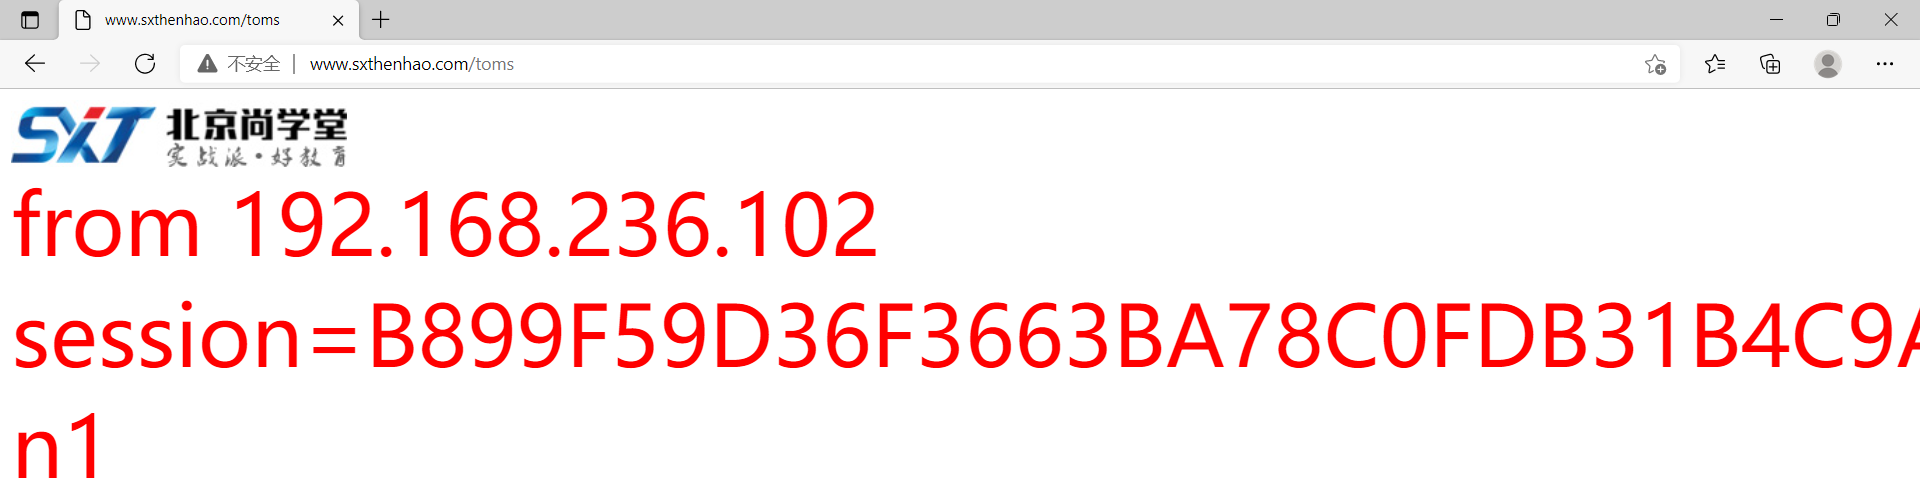
[root@node2 ROOT]# vim index.jsp <link rel="stylesheet" type="text/css" href="/css/index.css"> #鏈接使用css樣式
<img src="/image/logo.jpg" ><br/> # 通過img到這個標簽
<font class="myfont"> # 字體
from 192.168.236.102 <br/>
session=<%=session.getId()%></font>
node3:
[root@node3 bin]# cd /opt/tomcat-7.0.69/webapps/ROOT/
[root@node3 ROOT]# vim index.jsp <link rel="stylesheet" type="text/css" href="/css/index.css">
<img src="/image/logo.jpg" ><br/>
<font class="myfont">
from 192.168.236.103 <br/>
session=<%=session.getId()%></font>
從 nginx1 克 隆 nginx2, nginx2中修改主機名與IP地址
vim /etc/sysconfig/network

vim /etc/sysconfig/network-scripts/ifcfg-eth0
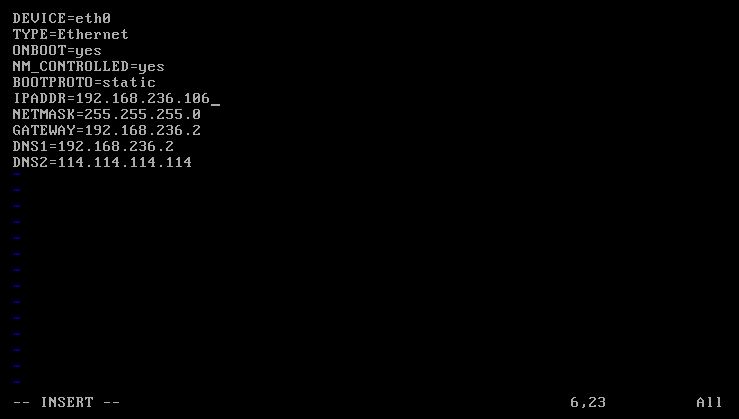
修 改 /etc/udev/ rules.d/70-persistent-net.rules
[root@nginx2 rules.d]# pwd
/etc/udev/rules.d
[root@nginx2 rules.d]# vim 70-persistent-net.rules
將原來的 eth0 一行刪掉(dd),并將 eth0,改為 eth1
如果nginx1中memcached未開啟,則需要先開啟;如果開啟,則忽略這一步.
[root@nginx1 ~]# memcached -d -m 128m -p 11211 -l 192.168.236.105 -u root -P /tmp/
[root@nginx1 ~]# ps aux|grep memcached
root       1201  0.0  0.0 330844   884 ?        Ssl  21:09   0:00 memcached -d -m 128m -p 11211 -l 192.168.236.105 -u root -P /tmp/
root       1208  0.0  0.0 103256   868 pts/0    S+   21:10   0:00 grep memcached
同時,node2與node3中的tomcat保持開啟
此時,
在 nginx2 服務器上創建目錄 /data/image 和/data/css,然后將 logo.jpg 和 index.css 上傳到對應的目錄
[root@nginx2 ~]# mkdir -p /data/image /data/css或者[root@nginx2 ~]# mkdir -p /data/{image,css}
將 logo.jpg 和 index.css 上傳到對應的目錄

修改 nginx2 服務器上的 nginx.conf 配置文件
[root@nginx2 ~]# vim /opt/nginx/conf/nginx.conf keepalive_timeout  0;#keepalive_timeout  65;gzip  on;server {listen       80;server_name  192.168.236.106;location / {root   /mnt;autoindex on; }location /image {root /data;}location /css {root /data;}}
}[root@nginx2 data]# service nginx restart
nginx: the configuration file /opt/nginx/conf/nginx.conf syntax is ok
nginx: configuration file /opt/nginx/conf/nginx.conf test is successful
Stopping nginx:                                            [  OK  ]
Starting nginx:                                            [  OK  ]
修改 nginx1 服務器上的 nginx.conf 配置文件
[root@nginx1 ~]# vim /opt/nginx/conf/nginx.conf ... keepalive_timeout 0;#keepalive_timeout 65;gzip on;upstream rss {server 192.168.236.102:8080;server 192.168.236.103:8080;}server {listen 80;server_name www.sxthenhao.com;access_log logs/myfmt.log myfmt;location / {root /mnt;autoindex on;}location /image {proxy_pass http://192.168.236.106;}location /css {proxy_pass http://192.168.236.106;}location /toms {proxy_pass http://rss/;}location /aabb {proxy_pass http://192.168.236.102/;}location /baidu {proxy_pass https://www.baidu.com/;...然后重新加載 nginx
[root@nginx1 ~]# service nginx restart
nginx: the configuration file /opt/nginx/conf/nginx.conf syntax is ok
nginx: configuration file /opt/nginx/conf/nginx.conf test is successful
Stopping nginx:                                            [  OK  ]
Starting nginx:                                            [  OK  ]
瀏覽器測試 http://www.sxthenhao.com
版权声明:本站所有资料均为网友推荐收集整理而来,仅供学习和研究交流使用。

工作时间:8:00-18:00
客服电话
电子邮件
admin@qq.com
扫码二维码
获取最新动态