前提:先搭建好本地的單機運行項目:http://www.cnblogs.com/EasonJim/p/7643630.html
說明:下面的示例是基于Spring Boot搭建的,對于Spring項目基本通用。遷移舊項目的配置下一篇說明,這里先就如何快速的集成Client和獲取配置的值進行實踐。
0、下面的示例都是基于官方提供的教程去實踐的,可以參考如下網址:
https://github.com/ctripcorp/apollo/wiki/Java%E5%AE%A2%E6%88%B7%E7%AB%AF%E4%BD%BF%E7%94%A8%E6%8C%87%E5%8D%97
https://github.com/ctripcorp/apollo/wiki/Apollo%E5%BC%80%E5%8F%91%E6%8C%87%E5%8D%97#23-java%E6%A0%B7%E4%BE%8B%E5%AE%A2%E6%88%B7%E7%AB%AF%E5%90%AF%E5%8A%A8
apollo配置中心?1、先新建好Spring Boot項目,這里使用了Web做測試,所以引用了Thymeleaf模板。
搭建參考:http://www.cnblogs.com/EasonJim/p/7519854.html
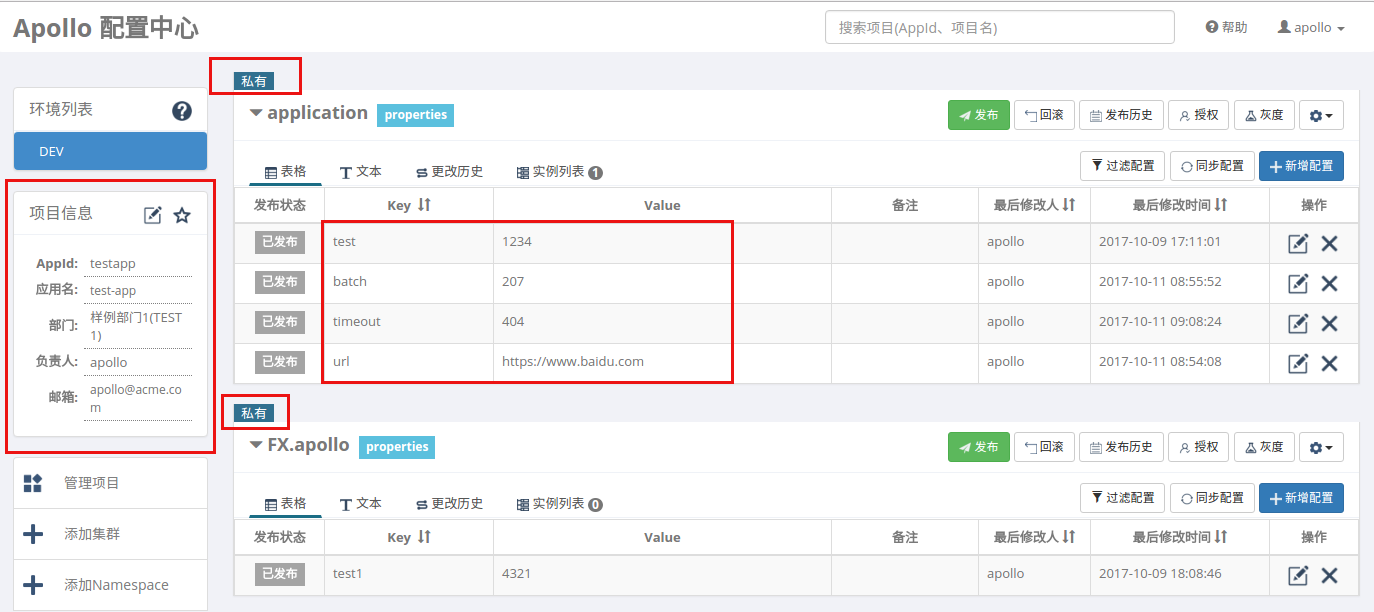
2、登錄Apollo上新建App和相關的配置項,可以參考如下配置:
3、在POM上引入Client的依賴,此時會有兩個包引入Client和Core。
<dependency><groupId>com.ctrip.framework.apollo</groupId><artifactId>apollo-client</artifactId><version>0.8.0</version></dependency>
4、在項目上配置上面設置的app.id,注意此時是通過新建META-INF/app.properties文件實現的。
阿波羅配置系統。
5、代碼實現
實現的功能是通過配置中心修改后,再次刷新頁面而不重啟應用的情況下能看到值的改變。
實現方式主要幾種在兩種,1為通過API的形式增加監聽回調函數來監聽值的改變后直接修改,2為通過注入Bean的方式使用Bean下的專用監聽注解實現回調監聽。
5.1、通過API的方式
代碼實現如下:
package com.jsoft.springboottest.springboottest1.controller;import org.slf4j.Logger;
import org.slf4j.LoggerFactory;import org.springframework.beans.factory.annotation.Value;
import org.springframework.stereotype.Controller;
import org.springframework.ui.Model;
import org.springframework.web.bind.annotation.RequestMapping;
import org.springframework.web.bind.annotation.RequestMethod;import com.ctrip.framework.apollo.Config;
import com.ctrip.framework.apollo.ConfigChangeListener;
import com.ctrip.framework.apollo.ConfigService;
import com.ctrip.framework.apollo.model.ConfigChange;
import com.ctrip.framework.apollo.model.ConfigChangeEvent;
import com.ctrip.framework.apollo.spring.annotation.EnableApolloConfig;@Controller
public class IndexController {private static final Logger logger = LoggerFactory.getLogger(IndexController.class);private Config config;private int timeout;private int batch;private String url;@RequestMapping(value = "/index", method = RequestMethod.GET)public String index(Model model) {Entry entry = new Entry();entry.setText("Text");entry.setTitle("Title");model.addAttribute("entries", entry);model.addAttribute("entry", new Entry());model.addAttribute("url", url);model.addAttribute("timeout",timeout);model.addAttribute("batch",batch);logger.info("timeout:{}", timeout);logger.info("batch:{}", batch);logger.info("url:{}", url);return "index";}public IndexController() {config = ConfigService.getAppConfig();config.addChangeListener(new ConfigChangeListener() {@Overridepublic void onChange(ConfigChangeEvent changeEvent) {logger.info("Changes for namespace {}", changeEvent.getNamespace());for (String key : changeEvent.changedKeys()) {ConfigChange change = changeEvent.getChange(key);logger.info("Change - key: {}, oldValue: {}, newValue: {}, changeType: {}", change.getPropertyName(), change.getOldValue(), change.getNewValue(), change.getChangeType());if (key.equals("url")) {url = change.getNewValue();}if(key.equals("batch")) {batch = Integer.valueOf(change.getNewValue());}if (key.equals("timeout")) {timeout = Integer.valueOf(change.getNewValue());}}                    }});}}
apollo具體配置哪些參數。說明:
通過新建Config對象,使用的是ConfigService.getAppConfig()獲取默認配置,也就是配置中心中的application.properties的,當然,getAppConfig可以指定不能的namespage。
通過獲取Config對象增加監聽回調函數addChangeListener。監聽指定的值變化后,重新賦值變量。
這種方式應該是最簡單的,不用寫特殊的注解去實現,但是可能在運行時也會發現,程序在一啟動時不會去獲取默認的配置值,比如timeout這些是空的,要解決這個問題時需要在Class上增加@EnableApolloConfig的注解,然后在屬性上增加@Value的值即可,改動如下:
package com.jsoft.springboottest.springboottest1.controller;import org.slf4j.Logger;
import org.slf4j.LoggerFactory;import org.springframework.beans.factory.annotation.Value;
import org.springframework.stereotype.Controller;
import org.springframework.ui.Model;
import org.springframework.web.bind.annotation.RequestMapping;
import org.springframework.web.bind.annotation.RequestMethod;import com.ctrip.framework.apollo.Config;
import com.ctrip.framework.apollo.ConfigChangeListener;
import com.ctrip.framework.apollo.ConfigService;
import com.ctrip.framework.apollo.model.ConfigChange;
import com.ctrip.framework.apollo.model.ConfigChangeEvent;
import com.ctrip.framework.apollo.spring.annotation.EnableApolloConfig;@Controller
@EnableApolloConfig
public class IndexController {private static final Logger logger = LoggerFactory.getLogger(IndexController.class);private Config config;@Value("${timeout:200}")private int timeout; @Value("${batch:200}")private int batch;@Value("${url:http://easonjim.com}")private String url;@RequestMapping(value = "/index", method = RequestMethod.GET)public String index(Model model) {Entry entry = new Entry();entry.setText("Text");entry.setTitle("Title");model.addAttribute("entries", entry);model.addAttribute("entry", new Entry());model.addAttribute("url", url);model.addAttribute("timeout",timeout);model.addAttribute("batch",batch);logger.info("timeout:{}", timeout);logger.info("batch:{}", batch);logger.info("url:{}", url);return "index";}public IndexController() {config = ConfigService.getAppConfig();config.addChangeListener(new ConfigChangeListener() {@Overridepublic void onChange(ConfigChangeEvent changeEvent) {logger.info("Changes for namespace {}", changeEvent.getNamespace());for (String key : changeEvent.changedKeys()) {ConfigChange change = changeEvent.getChange(key);logger.info("Change - key: {}, oldValue: {}, newValue: {}, changeType: {}", change.getPropertyName(), change.getOldValue(), change.getNewValue(), change.getChangeType());if (key.equals("url")) {url = change.getNewValue();}if(key.equals("batch")) {batch = Integer.valueOf(change.getNewValue());}if (key.equals("timeout")) {timeout = Integer.valueOf(change.getNewValue());}}                    }});}}
說明:約定俗成,在@Value上獲取值時記得增加默認值,以防止獲取為空。
上面代碼或許有些冗余,可以再提煉一下,因為config對象的值會實時更新,所以也不需要監聽onChange事件,也不需要自己創建一個變量,最后代碼實現如下:
package com.jsoft.springboottest.springboottest1.controller;import org.slf4j.Logger;
import org.slf4j.LoggerFactory;import org.springframework.beans.factory.annotation.Value;
import org.springframework.stereotype.Controller;
import org.springframework.ui.Model;
import org.springframework.web.bind.annotation.RequestMapping;
import org.springframework.web.bind.annotation.RequestMethod;import com.ctrip.framework.apollo.Config;
import com.ctrip.framework.apollo.ConfigChangeListener;
import com.ctrip.framework.apollo.ConfigService;
import com.ctrip.framework.apollo.model.ConfigChange;
import com.ctrip.framework.apollo.model.ConfigChangeEvent;
import com.ctrip.framework.apollo.spring.annotation.EnableApolloConfig;@Controller
public class IndexController2 {private static final Logger logger = LoggerFactory.getLogger(IndexController2.class);private Config config = ConfigService.getAppConfig();@RequestMapping(value = "/index2", method = RequestMethod.GET)public String index(Model model) {Entry entry = new Entry();entry.setText("Text");entry.setTitle("Title");model.addAttribute("entries", entry);model.addAttribute("entry", new Entry());model.addAttribute("url", config.getProperty("url", ""));model.addAttribute("timeout",config.getProperty("timeout", ""));model.addAttribute("batch",config.getProperty("batch", ""));logger.info("timeout:{}", config.getProperty("timeout", ""));logger.info("batch:{}", config.getProperty("batch", ""));logger.info("url:{}", config.getProperty("url", ""));return "index";}}
阿波羅平臺?5.2、通過注入Bean的方式
5.2.1、新建的Bean如下:
package com.jsoft.springboottest.springboottest1.controller;import com.ctrip.framework.apollo.Config;
import com.ctrip.framework.apollo.model.ConfigChange;
import com.ctrip.framework.apollo.model.ConfigChangeEvent;
import com.ctrip.framework.apollo.spring.annotation.ApolloConfig;
import com.ctrip.framework.apollo.spring.annotation.ApolloConfigChangeListener;import org.slf4j.Logger;
import org.slf4j.LoggerFactory;
import org.springframework.beans.factory.annotation.Value;import javax.annotation.PostConstruct;public class AnnotatedBean {private static final Logger logger = LoggerFactory.getLogger(AnnotatedBean.class);@Value("${timeout:200}")private int timeout;private int batch;@ApolloConfigprivate Config config;@ApolloConfig("FX.apollo")private Config anotherConfig;@PostConstructvoid initialize() {logger.info("timeout is {}", timeout);logger.info("batch is {}", batch);logger.info("Keys for config: {}", config.getPropertyNames());logger.info("Keys for anotherConfig: {}", anotherConfig.getPropertyNames());}@Value("${batch:100}")public void setBatch(int batch) {this.batch = batch;}public int getBatch() {return batch;}public int getTimeout() {return timeout;}@ApolloConfigChangeListener("application")private void someChangeHandler(ConfigChangeEvent changeEvent) {logger.info("[someChangeHandler]Changes for namespace {}", changeEvent.getNamespace());if (changeEvent.isChanged("timeout")) {refreshTimeout();}if (changeEvent.isChanged("batch")) {setBatch(Integer.valueOf(changeEvent.getChange("batch").getNewValue()));}}@ApolloConfigChangeListener({ "application", "FX.apollo" })private void anotherChangeHandler(ConfigChangeEvent changeEvent) {logger.info("[anotherChangeHandler]Changes for namespace {}", changeEvent.getNamespace());for (String key : changeEvent.changedKeys()) {ConfigChange change = changeEvent.getChange(key);logger.info("[anotherChangeHandler]Change - key: {}, oldValue: {}, newValue: {}, changeType: {}", change.getPropertyName(), change.getOldValue(), change.getNewValue(), change.getChangeType());}}private void refreshTimeout() {// do some custom logic to update placeholder valuetimeout = config.getIntProperty("timeout", timeout);logger.info("Refreshing timeout to {}", timeout);}
}
5.2.2、通過@Configuration注入這個Bean,代碼如下:
package com.jsoft.springboottest.springboottest1.controller;import org.springframework.context.annotation.Bean;
import org.springframework.context.annotation.Configuration;import com.ctrip.framework.apollo.spring.annotation.EnableApolloConfig;@Configuration
@EnableApolloConfig
public class AnnotatedConfig {@Beanpublic AnnotatedBean annotatedBean() {return new AnnotatedBean();}
}
注意:要增加@EnableApolloConfig和@Configuration,不然不會生效。并且留意到@Bean的注解,如果沒有這個時,@ApolloConfigChangeListener不會生效。這個是關鍵所在,@ApolloConfigChangeListener只能用于Bean注入上,這個和API的方式有明顯區別。
在代碼上使用:
package com.jsoft.springboottest.springboottest1.controller;import org.slf4j.Logger;
import org.slf4j.LoggerFactory;
import org.springframework.beans.factory.annotation.Autowired;
import org.springframework.web.bind.annotation.RequestMapping;
import org.springframework.web.bind.annotation.RestController;@RestController
public class TestController {private static final Logger logger = LoggerFactory.getLogger(TestController.class);@Autowiredprivate AnnotatedBean annotatedBean;@RequestMapping("/show")public String show(){logger.info("batch:{}",annotatedBean.getBatch());logger.info("timeout:{}",annotatedBean.getTimeout());return "Hello World"+" batch:"+annotatedBean.getBatch()+" timeout:"+annotatedBean.getTimeout();        }
}
說明:可以看出,只要@Autowired注入剛才的Bean就可以直接使用。
apache apollo。6、運行,一般只需要在/opt/settings/server.properties中配置了env=DEV就可以直接直接啟動(因為Client在本地倉庫的包上已經有了meta_server的信息),但是在IDE上也可以通過指定VM的參數,增加系統屬性變量-D來實現調試,配置如下:
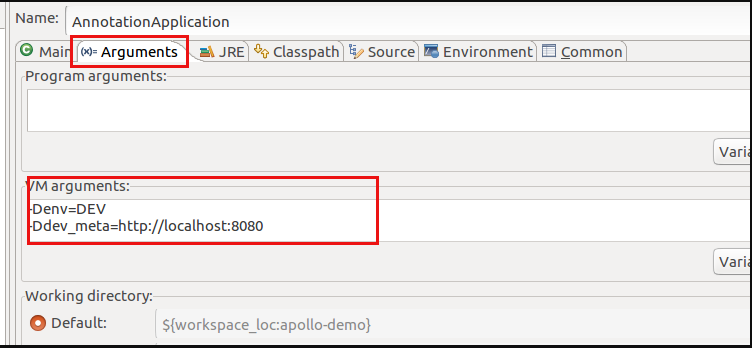
如果到處JAR運行,直接java -jar Spring-Boot-Demo.jar即可,不需要增加什么參數(但前提是配置了/opt/settings/server.properties的env的值)。
?
測試代碼:https://github.com/easonjim/5_java_example/tree/master/apollotest/test1?