前段时间杂事很多,这几天突然觉得自己有段时间没有碰Qt了,手有点生了。心血来潮,花了两个小时(是真的手生了),利用Qt和OpenCV写了个用于图像二值化的程序。由于我个人习惯的原因,我是在VS2013中直接写代码进行编译的,不是在Qt中写的代码。好了话不多说,开始吧!
在VS2013中首先新建一个Qt项目,然后将OpenCV的包含目录、库目录以及库名添加到项目属性中(这一步,我就不多讲了,怎么配置工程环境,大家应该都清楚)。因为要使用工具栏,所以创建项目时,基类使用的是QMainWindow。
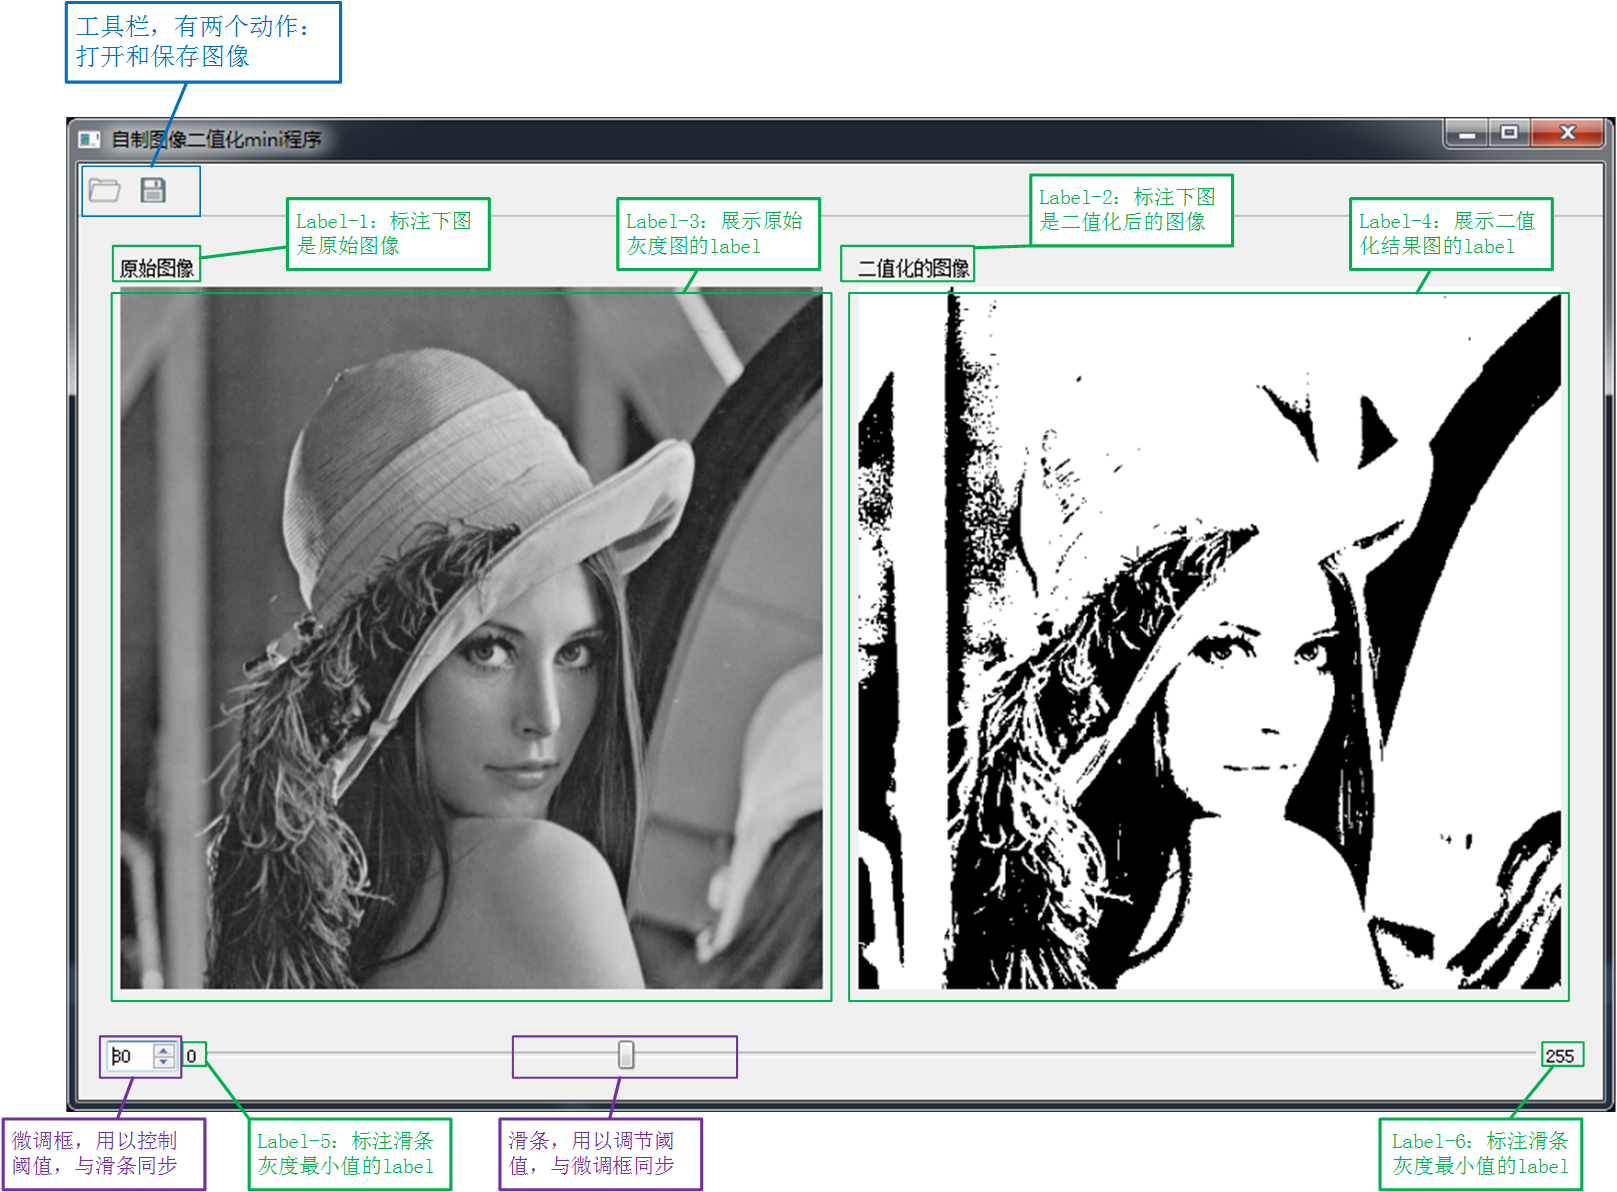
opencv二值化, 为了方便讲解,这里先把软件界面展示给大家,图中详细标注了我所放置的控件。
上图左上角的读入、保存按键是用以读入原始图像和保存二值化的结果图的,图中公有6个label。label1和label2用来标注下方图像为原始图与二值化图像,label3和label4 用于显示图像,label5和label6分别标注滑条的最大值与最小值。此外还有一个微调框和滑条用以控制图像二值化阈值。
视频转换成gif搞了半天还是不清晰,大家凑合看吧!意思是那个个意思,打开图片,调节阈值,选取合适的阈值,输出二值化后的结果图。
照例先贴出代码;
需要说明,我将软件界面中心的四个label单独在一个类中实现了,这需要右键项目属性,添加类,并且选择Qt5Class,基类选择的是QWidget,类名为ShowWidget,同时自动生成了一个头文件一个源文件,代码如下,十分简单,不做讲解。
//--------showwidgets.h
//--------潘正宇 2018.04.02#pragma once
#include <QWidget>
#include <QLabel>
#include <QImage>#pragma execution_character_set("utf-8")
class ShowWidget :public QWidget
{Q_OBJECTpublic:explicit ShowWidget(QWidget *parent = 0);QImage img;QLabel *originLabel;     //label1QLabel *binaryLabel;     //label2QLabel *imageLabel1;     //label3QLabel *imageLabel2;     //label4QWidget *Widget1;        //存放label1与label3的widgetQWidget *Widget2;        //存放label2与label5的widgetsignals:public slots :private:};
//--------showwidgets.cpp
//--------潘正宇 2018.04.02#include "showwidgets.h"
#include <QBoxLayout>
#include <QLineEdit>
#include <QPushButton>
#include<opencv2/opencv.hpp>
#include<opencv2/highgui/highgui.hpp>
#include<opencv2/imgproc/imgproc.hpp>using namespace std;
using namespace cv;ShowWidget::ShowWidget(QWidget *parent) :QWidget(parent)
{originLabel = new QLabel;originLabel->setText(QStringLiteral("原始图像"));binaryLabel = new QLabel;binaryLabel->setText(QStringLiteral("二值化的图像"));imageLabel1 = new QLabel;imageLabel1->setFixedSize(400, 400);           //固定label的大小;imageLabel1->setScaledContents(true);          //按比例自动调整图像大小以在label中显示imageLabel2 = new QLabel;imageLabel2->setFixedSize(400, 400);imageLabel2->setScaledContents(true);if (img.load("white.jpg")){imageLabel1->setPixmap(QPixmap::fromImage(img));imageLabel2->setPixmap(QPixmap::fromImage(img));}Widget1 = new QWidget;Widget2 = new QWidget;QVBoxLayout *originLayout = new QVBoxLayout(Widget1);originLayout->addWidget(originLabel);originLayout->addWidget(imageLabel1);QVBoxLayout *binaryLayout = new QVBoxLayout(Widget2);binaryLayout->addWidget(binaryLabel);binaryLayout->addWidget(imageLabel2);QHBoxLayout  *mainLayout = new QHBoxLayout(this);mainLayout->addWidget(Widget1);mainLayout->addWidget(Widget2);mainLayout->setSpacing(5);                           //在各个区域之间设置间隔。
}
主窗口实现的头文件及源文件如下;
//--------qt_threshold.h
//--------潘正宇 2018.04.02#ifndef QT_THRESHOLD_H
#define QT_THRESHOLD_H#include "showwidgets.h"
#include <QtWidgets/QMainWindow>
#include <QPixmap>
#include <QSlider>
#include <QFileDialog>
#include <QMessageBox>
#include <QAction>
#include <QToolBar>
#include <opencv2/opencv.hpp>
#include <opencv2/highgui/highgui.hpp>
#include <opencv2/imgproc/imgproc.hpp>
#include <QLabel>
#include <QSpinBox>
#include <QImage>using namespace cv;class Qt_threshold : public QMainWindow
{Q_OBJECTpublic:Qt_threshold(QWidget *parent = 0);~Qt_threshold();private:QImage originImg;                //存储原始图像QImage binaryImg;                //存储二值化后的图像ShowWidget *showwidget;          //定义一个ShowWidget对象QWidget *mainWidget;             //中心部件窗体QWidget *Change;                 //放置滑条、微调框、label5、label6的窗体QSlider *slider;                 //滑条QSpinBox *pSpinBox;              //微调框QLabel *minVauleLabel;           //label5QLabel *maxVauleLabel;           //label6QToolBar *fileTool;              //工具栏QString fileName;Mat originImage;Mat binaryImage;void createAction();             //创建工具栏的函数void createChanges();            //创建滑条和微调框的函数signals://--------------槽函数public slots :void SaveFile();                //保存文件的槽函数void OpenFile();                //打开文件的槽函数void SpinBoxChangeImageshow();  //spinBox改变时触发的槽函数void SliderChangeImageshow();   //slider改变时触发的槽函数
};#endif // QT_THRESHOLD_H //--------qt_threshold.cpp
//--------潘正宇 2018.04.02#include "qt_threshold.h"
#include <QToolBar>
#include <QHBoxLayout>
#include <QSpinBox>
#include <QSlider>
#include <string>
#include "showwidgets.h"
#include<opencv2/opencv.hpp>using namespace std;
using namespace cv;Qt_threshold::Qt_threshold(QWidget *parent): QMainWindow(parent)
{setWindowTitle(QStringLiteral("自制图像二值化mini程序"));createAction();showwidget = new ShowWidget(this); // 创建一个ShowWidget类型的区域,用于展示载入的图片mainWidget = new QWidget; // 创建中心部件区域Change = new QWidget;createChanges();QVBoxLayout *mainLayout = new QVBoxLayout(mainWidget); //在mainWidget内构件一个垂直的布局,放入mainLayout->addWidget(showwidget);mainLayout->addWidget(Change);setCentralWidget(mainWidget); //将mainWidget置于MainWindow的中心区域 }Qt_threshold::~Qt_threshold()
{}void Qt_threshold::createChanges()
{slider = new QSlider;slider->setOrientation(Qt::Horizontal); // 水平方向slider->setMinimum(0); // 最小值slider->setMaximum(255); // 最大值slider->setSingleStep(1); // 步长slider->setValue(80); //初始值pSpinBox = new QSpinBox(this);pSpinBox->setMinimum(0); pSpinBox->setMaximum(255); pSpinBox->setSingleStep(1);pSpinBox->setValue(80);minVauleLabel = new QLabel;maxVauleLabel = new QLabel;minVauleLabel->setText("0"); //滑条两端的label,放置最大值以及最小值;maxVauleLabel->setText("255");QHBoxLayout *HLayout = new QHBoxLayout(Change);HLayout->addWidget(pSpinBox); //水平布局HLayout->addWidget(minVauleLabel);HLayout->addWidget(slider);HLayout->addWidget(maxVauleLabel);///--------------信号槽连接;connect(slider, SIGNAL(valueChanged(int)), this, SLOT(SliderChangeImageshow()));connect(pSpinBox, SIGNAL(valueChanged(int)), this, SLOT(SpinBoxChangeImageshow()));
}void Qt_threshold::createAction()
{QAction *openFileAction = new QAction(QIcon("open.png"), tr("open file"), this); //设置打开文件的动作openFileAction->setShortcut(tr("Ctrl+O"));openFileAction->setStatusTip(tr("open a tiff picture"));QAction *saveFileAction = new QAction(QIcon("save.png"), tr("save file"), this); //设置保存文件的动作saveFileAction->setShortcut(tr("Ctrl+S"));saveFileAction->setStatusTip(tr("save the result picture"));fileTool = addToolBar("File"); //利用QMainWindow的addToolBar()函数增加工具条fileTool->addAction(openFileAction);fileTool->addAction(saveFileAction);fileTool->setAllowedAreas(Qt::TopToolBarArea | Qt::LeftToolBarArea); //限定文件工具条出现的位置,并且不能移动fileTool->setMovable(false);connect(openFileAction, SIGNAL(triggered()), this, SLOT(OpenFile()));connect(saveFileAction, SIGNAL(triggered()), this, SLOT(SaveFile()));
}///----------------------------槽函数//----打开图像---
void Qt_threshold::OpenFile()
{fileName = QFileDialog::getOpenFileName(this, tr("Select Tiff picture"), ".", tr("Image Files(*.tif *.jpg *.bmp)"));if (!fileName.isEmpty()){//-------将QString转换成const char[];string trans = fileName.toLocal8Bit().toStdString(); const char *FileName = trans.c_str();//------使用OpenCV读图originImage = imread(FileName); //-----如果图像是彩色图,转为灰度图if (originImage.channels()== 3){QMessageBox::information(this, QStringLiteral("提示"), QStringLiteral("图像为彩色图,将转换为灰度图像显示"));cvtColor(originImage, originImage, CV_RGB2GRAY);}if (originImage.depth()!=CV_8U){QMessageBox::information(this, QStringLiteral("提示"), QStringLiteral("图像不是8bit图像,本软件只接受8bit图像"));return;}//------将Mat格式的图像传递到QImage的图像中;QImage originImg = QImage((const unsigned char*)(originImage.data),originImage.cols, originImage.rows, QImage::Format_Grayscale8);//------传递原始灰度图显示showwidget->imageLabel1->setPixmap(QPixmap::fromImage(originImg));//-------初始的二值化阈值为80threshold(originImage, binaryImage, 80, 255.0, CV_THRESH_BINARY);QImage binaryImg = QImage((const unsigned char*)(binaryImage.data),binaryImage.cols, binaryImage.rows, QImage::Format_Grayscale8);//-------传递二值化图像显示showwidget->imageLabel2->setPixmap(QPixmap::fromImage(binaryImg));}else{QMessageBox::information(NULL, tr("Path"), QStringLiteral("未选中任何图像")); //提示未选中任何路径}}//----------保存图像------//
void Qt_threshold::SaveFile()
{QString savePath = QFileDialog::getSaveFileName(this, tr("Select picture save path"), ".", tr("Image Files(*.bmp)"));if (savePath.isEmpty()){QMessageBox::information(NULL, tr("Path"), tr("You have not select any path."));}string trans = savePath.toLocal8Bit().toStdString();const char *path = trans.c_str();if (imwrite(path, this->binaryImage)){QMessageBox::information(this, QStringLiteral("提示"), QStringLiteral("图像写出完毕"));}}//----------spinBox改变时触发的槽函数-----
void Qt_threshold::SpinBoxChangeImageshow()
{int thres = pSpinBox->value();slider->setValue(thres); //slider值与spinbox值同步threshold(originImage, binaryImage, thres, 255.0, CV_THRESH_BINARY);//------修改imageLabel2中的图像;QImage binaryImg = QImage((const unsigned char*)(binaryImage.data),binaryImage.cols, binaryImage.rows, QImage::Format_Grayscale8);showwidget->imageLabel2->setPixmap(QPixmap::fromImage(binaryImg));
}//----------slider改变时触发的槽函数-----
void Qt_threshold::SliderChangeImageshow()
{int thres = slider->value();pSpinBox->setValue(thres); //slider值与spinbox值同步threshold(originImage, binaryImage, thres, 255.0, CV_THRESH_BINARY);//------修改imageLabel2中的图像;QImage binaryImg = QImage((const unsigned char*)(binaryImage.data),binaryImage.cols, binaryImage.rows, QImage::Format_Grayscale8);showwidget->imageLabel2->setPixmap(QPixmap::fromImage(binaryImg));
}//--------main.cpp
//--------潘正宇 2018.04.02#include "qt_threshold.h"
#include <QtWidgets/QApplication>int main(int argc, char *argv[])
{QApplication a(argc, argv);Qt_threshold w;w.show();return a.exec();
}因为代码标注的非常清楚,很容易理解,我这里就不多讲解了,主要说一下主窗口实现的构造函数。一行一行的来看;
已完;
版权声明:本站所有资料均为网友推荐收集整理而来,仅供学习和研究交流使用。

工作时间:8:00-18:00
客服电话
电子邮件
admin@qq.com
扫码二维码
获取最新动态