为什么要使用 Spring Boot
因为Spring, SpringMVC 需要使用的大量的配置文件 (xml文件)
动力节点java怎么样,还需要配置各种对象,把使用的对象放入到spring容器中才能使用对象
需要了解其他框架配置规则。
SpringBoot 就相当于 不需要配置文件的Spring+SpringMVC。 常用的框架和第三方库都已经配置好了。拿来就可以使用了。
动力节点老杜。SpringBoot开发效率高,使用方便多了
Spring 使用 Xml 作为容器配置文件, 在 3.0 以后加入了 JavaConfig. 使用 java 类做配置文件使用。
JavaConfig: 是 Spring 提供的使用 java 类配置容器。 配置 Spring IOC 容器的纯 Java 方法。
优点:
1.可以使用面像对象的方式, 一个配置类可以继承配置类,可以重写方法
2.避免繁琐的 xml 配置
Springboot、JavaConfig: 使用java类作为xml配置文件的替代, 是配置spring容器的纯java的方式。 在这个java类这可以创建java对象,把对象放入spring容器中(注入到容器)。
使用两个注解:1)@Configuration : 放在一个类的上面,表示这个类是作为配置文件使用的。
2)@Bean:声明对象,把对象注入到容器中。
动力节点java、pom文件
<dependencies><dependency><groupId>org.springframework</groupId><artifactId>spring-context</artifactId><version>5.3.1</version></dependency><dependency><groupId>junit</groupId><artifactId>junit</artifactId><version>4.12</version></dependency></dependencies><build><plugins><!-- 编译插件 --><plugin><artifactId>maven-compiler-plugin</artifactId><!-- 插件的版本 --><version>3.1</version><!-- 编译级别 --><configuration><source>1.8</source><target>1.8</target><!-- 编码格式 --><encoding>UTF-8</encoding></configuration></plugin></plugins></build>
创建数据类 Student
public class Student {String name;Integer age;String sex;
resources 目录下创建 Spring 的配置文件 applicationContext.xml
<?xml version="1.0" encoding="UTF-8"?>
<beans xmlns="http://www.springframework.org/schema/beans"xmlns:xsi="http://www.w3.org/2001/XMLSchema-instance"xmlns:context="http://www.springframework.org/schema/context"xsi:schemaLocation="http://www.springframework.org/schema/beans http://www.springframework.org/schema/beans/spring-beans.xsd http://www.springframework.org/schema/context https://www.springframework.org/schema/context/spring-context.xsd"><bean id="myCat" class="com.link.vo.Cat"><property name="name" value="tom猫"/><property name="age" value="2" /><property name="cardId" value="uw532423422"/></bean>
<!--   <context:property-placeholder location="classpath:config.properties" />-->
<!--    <context:component-scan base-package="com.link.vo" />-->
<!--    <import resource="classpath:beans.xml" />-->
</beans>
单元测试:
/*** 使用xml作为容器配置文件*/@Testpublic void test01(){String config="beans.xml";ApplicationContext context = new ClassPathXmlApplicationContext(config);Student myStudent = context.getBean("myStudent", Student.class);System.out.println("容器中的对象:"+myStudent);}
JavaConfig 主要使用的注解
@Configuration:放在类的上面, 这个类相当于 xml 配置文件,可以在其中声明 bean
@Bean:放在方法的上面, 方法的返回值是对象类型, 这个对象注入到 spring ioc 容器
创建配置类(等同于 xml 配置文件)
/*** Configuration:表示当前类是作为配置文件使用的。 就是用来配置容器的*       位置:在类的上面**  SpringConfig这个类就相当于beans.xml*/
@Configuration
@ImportResource(value = {"classpath:applicationContext.xml","classpath:beans.xml"})
@PropertySource(value = "classpath:config.properties")
@ComponentScan(value = "com.link.vo")
public class SpringConfig {/**/**/**/*** 创建方法,方法的返回值是对象。 在方法的上面加入@Bean* 方法的返回值对象就注入到容器中。** @Bean: 把对象注入到spring容器中。 作用相当于<bean>*     位置:方法的上面*     说明:@Bean,不指定对象的名称,默认是方法名是 id*/@Beanpublic Student createStudent(){Student s1 = new Student();s1.setName("张三");s1.setAge(20);s1.setSex("男");return s1;}/**** 指定对象在容器中的名称(指定<bean>的id属性)* @Bean的name属性,指定对象的名称(id)*/@Bean(name="lisiStudent")public Student makeStudent(){Student s2 = new Student();s2.setName("李四");s2.setAge(25);s2.setSex("男");return s2;}
}
测试方法:
/*** 使用JavaConfig*/@Testpublic void test02(){ApplicationContext ctx = new AnnotationConfigApplicationContext(SpringConfig.class);Student student = ctx.getBean("createStudent", Student.class);System.out.println("使用JavaConfig创建的bean对象:"+student);}@Testpublic void test03(){ApplicationContext ctx = new AnnotationConfigApplicationContext(SpringConfig.class);Student student = (Student) ctx.getBean("lisiStudent");System.out.println("使用JavaConfig创建的bean对象:"+student);}
@ImportResource 作用导入其他的xml配置文件, 等同于 xml 文件的 resources
<import resources="其他配置文件"/>
创建数据类:
public class Cat {private String cardId;private String name;private Integer age;
创建配置文件 applicationContext.xml
<bean id="myCat" class="com.link.vo.Cat"><property name="name" value="tom猫"/><property name="age" value="2" /><property name="cardId" value="uw532423422"/></bean>
创建配置类:
/*** Configuration:表示当前类是作为配置文件使用的。 就是用来配置容器的*       位置:在类的上面**  SpringConfig这个类就相当于beans.xml*/
@Configuration
@ImportResource(value = {"classpath:applicationContext.xml","classpath:beans.xml"})
@PropertySource(value = "classpath:config.properties")
@ComponentScan(value = "com.link.vo")
public class SpringConfig {/**/**/**/*** 创建方法,方法的返回值是对象。 在方法的上面加入@Bean* 方法的返回值对象就注入到容器中。** @Bean: 把对象注入到spring容器中。 作用相当于<bean>*     位置:方法的上面*     说明:@Bean,不指定对象的名称,默认是方法名是 id*/@Beanpublic Student createStudent(){Student s1 = new Student();s1.setName("张三");s1.setAge(20);s1.setSex("男");return s1;}/**** 指定对象在容器中的名称(指定<bean>的id属性)* @Bean的name属性,指定对象的名称(id)*/@Bean(name="lisiStudent")public Student makeStudent(){Student s2 = new Student();s2.setName("李四");s2.setAge(25);s2.setSex("男");return s2;}
}
创建测试方法:
@Testpublic void test04(){ApplicationContext ctx=new AnnotationConfigApplicationContext(SpringConfig.class);Cat myCat = ctx.getBean("myCat", Cat.class);System.out.println("容器中使用ImportResource从xml文件导入的对象:"+myCat);Student student = ctx.getBean("myStudent", Student.class);System.out.println("容器中使用ImportResource从xml文件导入的对象:"+student);}
@PropertyResource: 读取properties属性配置文件。 使用属性配置文件可以实现外部化配置 .
步骤:
1.在resources目录下,创建properties文件, 使用k=v的格式提供数据
tiger.name="大老虎"
tiger.age=3
创建数据类 Tiger
@Component("tiger")
public class Tiger {@Value("${tiger.name}")private String name;@Value("${tiger.age}")private Integer age;@Overridepublic String toString() {return "Tiger{" +"name='" + name + '\'' +", age=" + age +'}';}
}
2.在PropertyResource 指定properties文件的位置
/*** Configuration:表示当前类是作为配置文件使用的。 就是用来配置容器的*       位置:在类的上面**  SpringConfig这个类就相当于beans.xml*/
@Configuration
@ImportResource(value = {"classpath:applicationContext.xml","classpath:beans.xml"})
@PropertySource(value = "classpath:config.properties")
@ComponentScan(value = "com.link.vo")
public class SpringConfig {/**/**/**/*** 创建方法,方法的返回值是对象。 在方法的上面加入@Bean* 方法的返回值对象就注入到容器中。** @Bean: 把对象注入到spring容器中。 作用相当于<bean>*     位置:方法的上面*     说明:@Bean,不指定对象的名称,默认是方法名是 id*/@Beanpublic Student createStudent(){Student s1 = new Student();s1.setName("张三");s1.setAge(20);s1.setSex("男");return s1;}/**** 指定对象在容器中的名称(指定<bean>的id属性)* @Bean的name属性,指定对象的名称(id)*/@Bean(name="lisiStudent")public Student makeStudent(){Student s2 = new Student();s2.setName("李四");s2.setAge(25);s2.setSex("男");return s2;}
}
测试
@Testpublic void test05(){ApplicationContext ctx = new AnnotationConfigApplicationContext(SpringConfig.class);Tiger tiger = (Tiger) ctx.getBean("tiger");System.out.println("tiger=="+tiger);}
注解的方式和xml的方式对比
@PropertySource(value = "classpath:config.properties")读取配置文件,
@Component("tiger") 使用注解的方式创建javabean
@ComponentScan(value = "com.link.vo") 扫描vo下所有使用注解方式创建的javabean
@ImportResource(value = {"classpath:applicationContext.xml","classpath:beans.xml"}) 导入其他xml文件
<context:property-placeholder location="classpath:config.properties" />
<context:component-scan base-package="com.link.vo" /><import resource="classpath:beans.xml" />
第一种方式, 使用Spring提供的初始化器, 就是向导创建SpringBoot应用
使用 spring boot 提供的初始化器。 向导的方式,完成 spring boot 项目的创建: 使用方便。
step 1: 新建项目

step 2

step 3 选择依赖

step 4 : 最后创建项目,设置项目的目录位置
step 5: Spring Boot 项目目录结构


国内地址: https://start.springboot.io
创建项目的步骤同上

创建一个普通 maven 项目


点击 finish 创建,完成项目创建。

添加 Spring Boot 依赖
<dependencies><dependency><groupId>org.springframework.boot</groupId><artifactId>spring-boot-starter-web</artifactId></dependency><dependency><groupId>org.springframework.boot</groupId><artifactId>spring-boot-starter-test</artifactId><scope>test</scope></dependency></dependencies>
<build><plugins><plugin><groupId>org.springframework.boot</groupId><artifactId>spring-boot-maven-plugin</artifactId></plugin></plugins>
</build>
创建启动类:加入@SpringBootApplication 注解
package com.bjpowernode;
@SpringBootApplication
public class MySpringBootMain {public static void main(String[] args) {SpringApplication.run(MySpringBootMain.class,args);}
}
@SpringBootApplication : @SpringBootApplication 是 一 个 复 合 注 解 , 是 由@SpringBootConfiguration,@EnableAutoConfiguration ,@ComponentScan 联合在一起组成的。
@SpringBootConfiguration : 就 是 @Configuration 这 个 注 解 的 功 能 , 使 用@SpringBootConfiguration 这个注解的类就是配置文件的作用。
@EnableAutoConfiguration:开启自动配置, 把一些对象加入到 spring 容器中。
@ComponentScan:组件扫描器, 扫描注解,根据注解的功能,创建 java bean,给属性赋值等等。组件扫描器默认扫描的是 @ComponentScan 注解所在的类, 类所在的包和子包。
Spring Boot 的核心配置文件用于配置 Spring Boot 程序,名字必须以 application 开始
配置文件名称: application
扩展名有: properties( k=v) ; yml ( k: v)
使用application.properties, application.yml
通过修改 application.properties 配置文件,在修改默认 tomcat 端口号及项目上下文件根键值对的 properties 属性文件配置方式
#设置端口号
server.port=8082
#设置访问应用的上下文路径 context
server.servlet.context-path=/myboot
启动应用, 在浏览器访问 http://localhost:8082/myboot/
yml 是一种 yaml 格式的配置文件,主要采用一定的空格、换行等格式排版进行配置。
yaml 是一种直观的能够被计算机识别的的数据序列化格式,容易被人类阅读,yaml 类似于 xml,但是语法比 xml 简洁很多,值与前面的冒号配置项必须要有一个空格, yml 缀也可以使用 yaml 后缀
server:port: 8083servlet:context-path: /myboot
注意 : 当两种格式配置文件同时存在 ,在 SpringBoot2.4 开始, 使用的是 yml 配置文件.修改配置名称都为 application。
当properties、yaml和yml三种文件路径相同时,三个文件中的配置信息都会生效,但是当三个文件中有配置信息冲突时,加载顺序是:yml > yaml > properties
yml的优先级会大于properties,所以如果同时存在这两种配置,因为properties是后加载的,所以此时yml就没有生效。由里向外加载,所以最外层的最后被加载,会覆盖里层的属性,最后被加载。所以最后生效的是properties 。
推荐使用 yml 格式配置文件
在实际开发的过程中,我们的项目会经历很多的阶段(开发->测试->上线),每个阶段的配置也会不同,例如:端口、上下文根、数据库等,那么这个时候为了方便在不同的环境之间切换,SpringBoot 提供了多环境配置,具体步骤如下
为每个环境创建一个配置文件,命名必须以 application-环境标识.properties|yml

application.properties
#激活使用哪个配置文件#使用dev
#spring.profiles.active=dev#使用test
spring.profiles.active=test
application-dev.yml
server:port: 8081servlet:context-path: /mydev
application-online.yml
server:port: 9002servlet:context-path: /myonline
application-test.yml
server:port: 9001servlet:context-path: /mytest
SpringBoot 的核心配置文件中,除了使用内置的配置项之外,我们还可以在自定义配置,然后采用如下注解去读取配置的属性值
@Value("${key}") , key 来自 application.properties(yml)
application.properties:添加两个自定义配置项 school.name 和 school.website。
server.port=8082
server.servlet.context-path=/myboot#自定义k-v
school.name=linkacademy
school.website=www.linkacademy.com
school.address=成都市site=www.baidu.com
读取配置文件数据


启动应用 Application , 访问浏览器
@ConfigurationProperties: 把配置文件的数据映射为java对象。
属性:prefix 配置文件中的某些key的开头的内容。
@Component
@ConfigurationProperties(prefix = "school")
public class Academy {private String name;private String website;private String address;public String getName() {return name;}public void setName(String name) {this.name = name;}public String getWebsite() {return website;}public void setWebsite(String website) {this.website = website;}public String getAddress() {return address;}public void setAddress(String address) {this.address = address;}@Overridepublic String toString() {return "Academy{" +"name='" + name + '\'' +", website='" + website + '\'' +", address='" + address + '\'' +'}';}
}
@Controller
public class HelloController {@Value("${server.port}")private Integer port;@Value("${server.servlet.context-path}")private String contextPath;@Value("${site}")private String site;@Resourceprivate Academy academy;@RequestMapping(value = "/data")@ResponseBodypublic String QueryDate(){return "prot:"+port+",contextPath:"+contextPath+",site:"+site+",site:"+site+",academy:"+academy;}}
执行 Application , 访问浏览器查看数据
在 SchoolInfo 类中使用了 ConfigurationProperties 注解,IDEA 会出现一个警告,不影响程序的执行
点击 open documentnation 跳转到网页,在网页中提示需要加一个依赖,我们将这个依赖拷贝,粘贴到 pom.xml 文件中
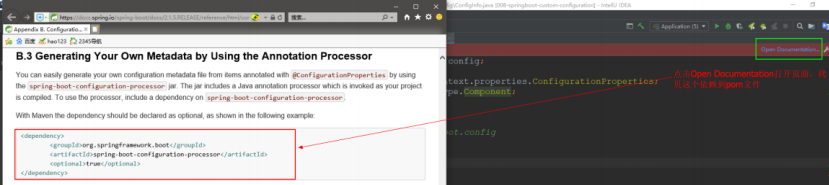
<!--解决使用@ConfigurationProperties 注解出现警告问题-->
<dependency><groupId>org.springframework.boot</groupId><artifactId>spring-boot-configuration-processor</artifactId><optional>true</optional>
</dependency>
如果在 SpringBoot 核心配置文件中有中文信息,会出现乱码:
◼ 一般在配置文件中,不建议出现中文(注释除外)
◼ 如果有,可以先转化为 ASCII 码

1.2.5.1 在 pom.xml 文件中配置以下依赖项
<dependencies><!--处理jsp依赖--><dependency><groupId>org.apache.tomcat.embed</groupId><artifactId>tomcat-embed-jasper</artifactId></dependency><dependency><groupId>org.springframework.boot</groupId><artifactId>spring-boot-starter-web</artifactId></dependency><dependency><groupId>org.springframework.boot</groupId><artifactId>spring-boot-starter-test</artifactId><scope>test</scope></dependency></dependencies>
SpringBoot 要求 jsp 文件必须编译到指定的 META-INF/resources 目录下才能访问,否则访问不到。其实官方已经更建议使用模板技术(后面会讲模板技术)
<!--指定jsp编译后的存放目录--><resources><resource><!--jsp原来的目录--><directory>src/main/webapp</directory><!--指定编译后的存放目录--><targetPath>META-INF/resources</targetPath><!--指定处理的目录和文件--><includes><include>**/*.*</include></includes></resource></resources><plugins><plugin><groupId>org.springframework.boot</groupId><artifactId>spring-boot-maven-plugin</artifactId></plugin></plugins></build>
jsp,这里相当于 Spring MVC 的配置
spring.mvc.view.prefix=/
spring.mvc.view.suffix=.jsp
@Controller
public class JspController {/*public String doJsp(HttpServletRequest request){request.setAttribute("data","SpringBoot使用Jsp");//视图的逻辑名称return "index";}*//*** ModelAndView:* @param model* @return*/@RequestMapping("/myjsp")public String doJsp(Model model){//把数据放入到request作用域model.addAttribute("data","SpringBoot使用Jsp");//request.setAttribute("data","SpringBoot使用Jsp");//视图的逻辑名称return "index";}
}
如果在webapp目录下右键,没有创建jsp的选项,可以在Project Structure中指定webapp
为 Web Resource Directory

<%@ page contentType="text/html;charset=UTF-8" language="java" %>
<html>
<head><title>jsp文件</title>
</head>
<body><h3>使用jsp,显示Controller中的数据 ${data}</h3>
</body>
</html>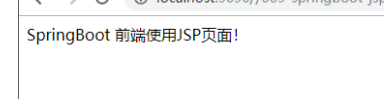
在 main 方法中 SpringApplication.run()方法获取返回的 Spring 容器对象,再获取业务 bean进行调用.
本质上是通过SpringApplication.run(Application.class, args); 返回值获取容器。
1.创建一个接口 UserService 和他的实现类
public interface UserService {void sayHello(String name);
}
2.创建启动类, main 方法中创建ConfigurableApplicationContext对象获取容器对象
@SpringBootApplication
public class Ch10SpringbootContainerApplication {public static void main(String[] args) {ConfigurableApplicationContext ctx= SpringApplication.run(Ch10SpringbootContainerApplication.class, args);UserService userService = ctx.getBean("userService", UserService.class);userService.sayHello("李四");}}
开发中可能会有这样的情景。需要在容器启动后执行一些内容。比如读取配置文件,数据库连接之类的。SpringBoot 给我们提供了两个接口来帮助我们实现这种需求。这两个接口分别为 CommandLineRunner 和 ApplicationRunner。他们的执行时机为容器启动完成的时候。
public interface HelloService {String sayHello(String name);
}
@Service("helloService")
public class HelloServiceImpl implements HelloService {@Overridepublic String sayHello(String name) {return "你好:"+name;}
}
@SpringBootApplication
public class Ch11SpringbootCommandlinerunnerApplication implements CommandLineRunner {@Resourceprivate HelloServiceImpl helloService;public static void main(String[] args) {System.out.println("准备创建容器对象");//创建容器对象ConfigurableApplicationContext ctx = SpringApplication.run(Ch11SpringbootCommandlinerunnerApplication.class, args);System.out.println("容器对象创建之后");}@Overridepublic void run(String... args) throws Exception {String str  = helloService.sayHello("lisi");System.out.println("调用容器中的对象="+str);//可做自定义的操作,比如读取文件, 数据库等等System.out.println("在容器对象创建好,执行的方法");}}
注意:@SpringBootApplication 启动类必须放在项目的根目录与所有包平级,一般在main方法内部通过执行
main方法启动类位于项目根目录的原因
@ComponentScan注解有个特性:如果不指定需要扫描的包或者需要注册的类,则默认是扫描该使用@ComponentScan注解的类所在的包以及子包,所以将使用了@SpringBootApplication注解的包含main方法的启动类放在项目根目录,则会扫描项目的所有包。
除了@ComponentScan注解之外,@EnableAutoConfiguration注解也是扫描使用了这个注解的类所在的包及其子包,故放在项目根目录,则可以扫描项目所有的包,对所有的类(具体为使用Spring容器管理的)进行检测,从而决定是否需要自动创建功能组件类的bean对象到spring的IOC容器中。
SpringMVC 使用拦截器
1)自定义拦截器类,实现 HandlerInterceptor 接口
2)注册拦截器类
//拦截器类:拦截用户的请求。
public class MyInterceptor implements HandlerInterceptor {@Overridepublic boolean preHandle(HttpServletRequest request, HttpServletResponse response, Object handler) throws Exception {System.out.println("111111-拦截器的MyInterceptor的preHandle()");return false;}@Overridepublic void postHandle(HttpServletRequest request,HttpServletResponse response,Object handler, ModelAndView mv) throws Exception {System.out.println("111111-拦截器的MyInterceptor的postHandle()");}@Overridepublic void afterCompletion(HttpServletRequest request, HttpServletResponse response,Object handler, Exception ex) throws Exception {System.out.println("111111-拦截器的MyInterceptor的afterCompletion()");}
}
<!--声明拦截器: 拦截器可以有0或多个在框架中保存多个拦截器是ArrayList,按照声明的先后顺序放入到ArrayList--><mvc:interceptors><!--声明第一个拦截器--><mvc:interceptor><mvc:mapping path="/**"/><!--声明拦截器对象--><bean class="com.link.handler.MyInterceptor" /></mvc:interceptor><!--声明第二个拦截器--><mvc:interceptor><mvc:mapping path="/**"/><bean class="com.link.handler.MyInterceptor2" /></mvc:interceptor></mvc:interceptors>
1. 创建类实现 HandlerInterceptor 接口
public class LoginInterceptor implements HandlerInterceptor {@Overridepublic boolean preHandle(HttpServletRequest request,HttpServletResponse response,Object handler) throws Exception {System.out.println("执行了LoginInterceptor的preHandle");return true;}
}
2. 注册拦截器对象
@Configuration
public class MyAppConfig implements WebMvcConfigurer {//添加拦截器对象, 注入到容器中@Overridepublic void addInterceptors(InterceptorRegistry registry) {//创建拦截器对象HandlerInterceptor interceptor = new LoginInterceptor();//指定拦截的请求uri地址String path []= {"/user/**"};//指定不拦截的地址String excludePath  [] = {"/user/login"};registry.addInterceptor(interceptor).addPathPatterns(path).excludePathPatterns(excludePath);}}
3. 创建测试使用的 Controller
@Controller
public class BootController {@RequestMapping("/user/account")@ResponseBodypublic String userAccount(){return "访问user/account地址";}@RequestMapping("/user/login")@ResponseBodypublic String userLogin(){return "访问user/login地址";}
}
4. 主启动类
5. 启动主类, 运行浏览器
访问 user/account , user/login 观察拦截的输出语句

ServletRegistrationBean 用来做在 servlet 3.0+容器中注册 servlet 的功能,但更具有SpringBean 友好性。
1.创建 Servlet
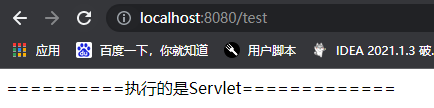
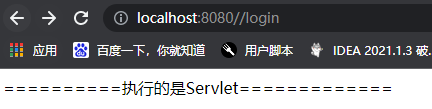
//创建Servlet类
public class MyServlet extends HttpServlet{@Overrideprotected void doGet(HttpServletRequest req, HttpServletResponse resp) throws ServletException, IOException {doPost(req, resp);}@Overrideprotected void doPost(HttpServletRequest req, HttpServletResponse resp) throws ServletException, IOException {//使用HttpServletResponse输出数据,应答结果resp.setContentType("text/html;charset=utf-8");PrintWriter out = resp.getWriter();out.println("==========执行的是Servlet=============");out.flush();out.close();}
}
2.注册 Servlet
@Configuration
public class WebApplictionConfig{//定义方法, 注册Servlet对象@Beanpublic ServletRegistrationBean servletRegistrationBean(){//第一种初始化方式ServletRegistrationBean bean = new ServletRegistrationBean(new MyServlet(),"/login","/test");//第二种初始化方式
//        ServletRegistrationBean bean = new ServletRegistrationBean();
//        bean.setServlet(new MyServlet());
//        bean.addUrlMappings("/login","/test");return bean;}
}
3.主启动类
4.启动主类,在浏览器中访问 loginServlet
FilterRegistrationBean 用来注册 Filter 对象
实现步骤:
1.创建 Filter 对象
public class MyFilter implements Filter {@Overridepublic void doFilter(ServletRequest servletRequest, ServletResponse servletResponse, FilterChain filterChain) throws IOException, ServletException {System.out.println("执行了MyFilter,doFilter ");filterChain.doFilter(servletRequest,servletResponse);}
}
2.注册 Filter
@Configuration
public class WebApplicationConfig {@Beanpublic FilterRegistrationBean filterRegistrationBean(){FilterRegistrationBean bean=new FilterRegistrationBean();bean.setFilter(new MyFilter());bean.addUrlPatterns("/user/*");return bean;}}
3.创建 Controller
@Controller
public class CustomFilterController {@RequestMapping("/user/account")@ResponseBodypublic String userAccount(){return "user/account";}@RequestMapping("/query")@ResponseBodypublic String queryAccount(){return "/query";}}
4.启动应用, 在浏览器访问 user/account, /query 查看浏览器运行结果
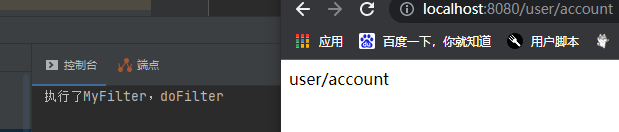
/query 则不会经过过滤器
实现步骤:
1.创建 Servlet,输出中文数据
public class MyServlet extends HttpServlet {@Overrideprotected void doGet(HttpServletRequest req, HttpServletResponse resp) throws ServletException, IOException {doPost(req, resp);}@Overrideprotected void doPost(HttpServletRequest req, HttpServletResponse resp) throws ServletException, IOException {resp.setContentType("text/html");PrintWriter out = resp.getWriter();out.println("===在Servlet输出中文,默认编码ISO-8859-1===");out.flush();out.close();}
}
2)注册 Servlet 和 Filter
@Configuration
public class WebSystemConfig{//注册servlet@Beanpublic ServletRegistrationBean servletRegistrationBean(){ServletRegistrationBean bean=new ServletRegistrationBean(new MyServlet(),"/myservlet");return bean;}//注册filter@Beanpublic FilterRegistrationBean filterRegistrationBean(){FilterRegistrationBean bean = new FilterRegistrationBean();//使用框架中的过滤器类CharacterEncodingFilter filter=new CharacterEncodingFilter();//指定使用的编码方式filter.setEncoding("utf-8");//指定request response都使用encoding中的值filter.setForceEncoding(true);bean.setFilter(filter);//指定 过滤的url地址bean.addUrlPatterns("/*");return bean;}
}
3.在 application.properties , 禁用 Spring Boot 中默认启用的过滤器
server.servlet.encoding.enabled=false
4.启动主类,运行浏览器
Spring Boot 项目默认启用了 CharacterEncodingFilter, 设置他的属性就可以
#设置 spring boot 中 CharacterEncodingFitler 的属性值
server.servlet.encoding.enabled=true
server.servlet.encoding.charset=utf-8
#强制 request, response 使用 charset 他的值 utf-8
server.servlet.encoding.force=true

1.创建拦截器 ,注意需要使用@Component 或者在注册拦截器import拦截器的包 最好都加上
@Component
public class LoginInterceptor implements HandlerInterceptor {@Overridepublic boolean preHandle(HttpServletRequest request,HttpServletResponse response,Object handler) throws Exception {System.out.println("执行了LoginInterceptor的preHandle");return true;}
}
2.注册拦截器
@Configuration
public class MyAppConfig implements WebMvcConfigurer {//添加拦截器对象, 注入到容器中@Overridepublic void addInterceptors(InterceptorRegistry registry) {//创建拦截器对象HandlerInterceptor interceptor = new LoginInterceptor();//指定拦截的请求uri地址String path []= {"/user/**"};//指定不拦截的地址String excludePath  [] = {"/user/login"};registry.addInterceptor(interceptor).addPathPatterns(path).excludePathPatterns(excludePath);}}
3.注册过滤器 需要@Import(MyAppConfig.class) 需要import其他javaconfig
@Configuration
@Import(MyAppConfig.class)
public class WebSystemConfig{//注册servlet@Beanpublic ServletRegistrationBean servletRegistrationBean(){ServletRegistrationBean bean=new ServletRegistrationBean(new MyServlet(),"/myservlet");return bean;}//注册filter@Beanpublic FilterRegistrationBean filterRegistrationBean(){FilterRegistrationBean bean = new FilterRegistrationBean();//使用框架中的过滤器类CharacterEncodingFilter filter=new CharacterEncodingFilter();//指定使用的编码方式filter.setEncoding("utf-8");//指定request response都使用encoding中的值filter.setForceEncoding(true);bean.setFilter(filter);//指定 过滤的url地址//bean.addUrlPatterns("/*");bean.addUrlPatterns("/user");return bean;}
}
讲解 MyBatis 框架,读写 MySQL 数据。通过 SpringBoot +MyBatis 实现对数据库学生表的查询操作。
创建数据库:数据库 springdb,指定数据库字符编码为 utf-8
CREATE TABLE `student` (`id` INT(10) NOT NULL AUTO_INCREMENT,`name` VARCHAR(256) DEFAULT NULL,`age` INT(10) DEFAULT NULL,PRIMARY KEY (`id`)) ENGINE=INNODB DEFAULT CHARSET=utf8
INSERT INTO student(`name`,`age`)
VALUES("小红",23),("小白",24),("张三",28),("李四",34)
pom.xml
<dependencies><dependency><groupId>org.springframework.boot</groupId><artifactId>spring-boot-starter-web</artifactId></dependency><dependency><groupId>org.mybatis.spring.boot</groupId><artifactId>mybatis-spring-boot-starter</artifactId><version>2.2.0</version></dependency><dependency><groupId>mysql</groupId><artifactId>mysql-connector-java</artifactId><scope>runtime</scope></dependency><dependency><groupId>org.springframework.boot</groupId><artifactId>spring-boot-starter-test</artifactId><scope>test</scope></dependency></dependencies><build><plugins><plugin><groupId>org.springframework.boot</groupId><artifactId>spring-boot-maven-plugin</artifactId></plugin></plugins></build>
加入 resources 插件
<resources><resource><directory>src/main/java</directory><includes><include>**/*.xml</include></includes></resource>
</resources>
配置数据源:application.properties
server.port=9001
server.servlet.context-path=/ormspring.datasource.driver-class-name=com.mysql.cj.jdbc.Driver
spring.datasource.url=jdbc:mysql://localhost:3306/springdb?useUnicode=true&characterEncoding=UTF-8&serverTimezone=GMT%2B8
spring.datasource.username=root
spring.datasource.password=123456
创建数实体 bean, dao 接口,mapper 文件

实体类
public class Student {private Integer id;private String name;private Integer age;创建 Dao 接口
/*** @Mapper: 找到接口和他的 xml 文件* 位置:在接口的上面*/
@Mapper
public interface StudentMapper {Student selectStudentById(@Param("stuid") Integer id);}
mapper 文件:
<?xml version="1.0" encoding="UTF-8" ?>
<!DOCTYPE mapperPUBLIC "-//mybatis.org//DTD Mapper 3.0//EN""http://mybatis.org/dtd/mybatis-3-mapper.dtd"><mapper namespace="com.link.dao.StudentMapper"><select id="selectStudentById" resultType="com.link.domain.Student">select id name age from student where id=#{stuid}</select></mapper>
service 接口
public interface StudentService {Student queryStudent(Integer id);
}
service 接口实现类
public class StudentServiceImpl implements StudentService {@Resourceprivate StudentMapper studentDao;@Overridepublic Student queryStudent(Integer id) {Student student = studentDao.selectStudentById(id);return student;}
}
controller 类
@Controller
public class StudentController {@Resourceprivate StudentService studentService;@RequestMapping("/query")@ResponseBodypublic String queryStudent(Integer id){Student student=studentService.queryStudent(id);return "查询的结果id是"+id+",学生:"+student.toString();}
}
启动 Application 类, 浏览器访问 http://localhost:9090/myboot/query
发现无法连接数据库
报错:
Failed to obtain JDBC Connection; nested exception is java.sql.SQLNonTransientConnectionException:
是mysql-connecter-java版本太高,自己安装的mysql数据库版本低的问题,把mysql的jar包降低到适合自己mysql数据库的版本就好了

降低mysql-connector-java这个jar包的版本号,重新启动项目就可以正常访问了。

在 Dao 接口上面加入@Mapper,需要在每个接口都加入注解。当 Dao 接口多的时候不方便。
可以使用如下的方式解决。
主类上添加注解包扫描:@MapperScan(“com.link.dao”)
/**
* @MapperScan: 扫描所有的 mybatis 的 dao 接口
* 位置:在主类的上面
* 属性:basePackages:指定 dao 接口的所在的包名。
* dao 接口和 mapper 文件依然在同一目录
*/
@SpringBootApplication
@MapperScan(basePackages = "com.link.dao")
public class MyBatisApplication2 {public static void main(String[] args) {SpringApplication.run(MyBatisApplication2.class,args);}
}
这种方式比较推荐,mapper 文件放在 resources 目录下, java 代码放在 src/main/java。
在 resources 创建自定义目录,例如 mapper, 存放 xml 文件
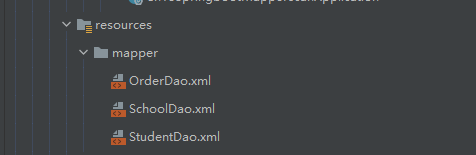
在 application.properties 配置文件中指定映射文件的位置,这个配置只有接口和映射文件不在同一个包的情况下,才需要指定。
 #指定 mybatis 的配置, 相当于 mybatis 主配置文件的作用
mybatis.mapper-locations=classpath:mapper/*.xml
mybatis.configuration.log-impl=org.apache.ibatis.logging.stdout.StdOutImpl
Spring Boot 使用事务非常简单,底层依然采用的是 Spring 本身提供的事务管理
在入口类中使用注解 @EnableTransactionManagement 开启事务支持
在访问数据库的 Service 方法上添加注解 @Transactional 即可
通过 SpringBoot +MyBatis 实现对数据库学生表的更新操作,在 service 层的方法中构建异常,查看事务是否生效。
@Service
public class StudentServiceImpl implements StudentService {@Resourceprivate StudentMapper studentMapper;/*** @Transactional: 表示方法的有事务支持*       默认:使用库的隔离级别, REQUIRED 传播行为; 超时时间  -1*       抛出运行时异常,回滚事务*/@Override@Transactionalpublic int addStudent(Student student) {System.out.println("业务方法addStudent");int rows = studentMapper.insert(student);System.out.println("执行SQL语句");//抛出运行时异常,目的是回滚事物//int num = 5/0;return rows;}
}
在 Application 主类上,@EnableTransactionManagement 开启事务支持
@EnableTransactionManagement 可选,但是@Service 必须添加事务才生效
@SpringBootApplication
@EnableTransactionManagement
@MapperScan(basePackages = "com.link.dao")
public class Application {public static void main(String[] args) {SpringApplication.run(Application.class, args);}
}
版权声明:本站所有资料均为网友推荐收集整理而来,仅供学习和研究交流使用。

工作时间:8:00-18:00
客服电话
电子邮件
admin@qq.com
扫码二维码
获取最新动态


![[vijos1162]波浪数](https://images.cnblogs.com/OutliningIndicators/ContractedBlock.gif)