之前学习过springboot,但是由于很长一段时间没有用到springboot,想重新学习一遍,决定用一段时间来写一系列深入学习springboot的博客,将会从一些注解,官方文档等多个方面来深入理解springboot的运行机制。
首先从pom文件中的parent来开始:
<parent><groupId>org.springframework.boot</groupId><artifactId>spring-boot-starter-parent</artifactId><version>2.2.0.RELEASE</version><relativePath/> <!-- lookup parent from repository -->
</parent>
这是springboot中管理版本的方法,我们进入spring-boot-starter-parent中看看它的parent:
<parent><groupId>org.springframework.boot</groupId><artifactId>spring-boot-dependencies</artifactId><version>2.2.0.RELEASE</version><relativePath>../../spring-boot-dependencies</relativePath>
</parent>
继续进入 spring-boot-dependencies 可以看到如下的代码(这里只截取部分的代码):
<properties><activemq.version>5.15.10</activemq.version><antlr2.version>2.7.7</antlr2.version><appengine-sdk.version>1.9.76</appengine-sdk.version><artemis.version>2.10.1</artemis.version><aspectj.version>1.9.4</aspectj.version><assertj.version>3.13.2</assertj.version><atomikos.version>4.0.6</atomikos.version>....<mongodb.version>3.11.1</mongodb.version>........
</properties>
SpringBoot项目,springboot2.2帮我们配置好了,springboot2.2它对应哪些版本,比如说你要用mongodb,只需要在pom中引入它的依赖,不需要指定版本,版本会自动到properties中帮你匹配好。这是它的实现机制。
我们再看一下Application启动函数的注解 @SpringBootApplication,同样的,我们去它的源码中去看看:
@Target(ElementType.TYPE)
@Retention(RetentionPolicy.RUNTIME)
@Documented
@Inherited
@SpringBootConfiguration
@EnableAutoConfiguration
@ComponentScan(excludeFilters = { @Filter(type = FilterType.CUSTOM, classes = TypeExcludeFilter.class),@Filter(type = FilterType.CUSTOM, classes = AutoConfigurationExcludeFilter.class) })
@ConfigurationPropertiesScan
它相当于为我们封装了一大批的注解,我们只需要用这一个注解就实现了这么多注解的功能,我们再仔细研究一下这些注解都有些什么功能。
对 @SpringBootConfiguration这个注解,它同样也是一个俄罗斯套娃,它也封装了一系列的注解,包括一些@configuration
@Target({ElementType.TYPE})
@Retention(RetentionPolicy.RUNTIME)
@Documented
@Configuration(proxyBeanMethods = false
)
它是springboot的配置类,标注在某个类上就表示这个类是配置类。和 @Configuration的作用是差不多的,只不过@Configuration是spring定义的,而 @SpringBootConfiguration是springboot定义的,它除此之外比spring定义的更完善(包含其他的一些springboot注解)。它们都是属于@Component,可以点开看一下。
再看一下,@EnableAutoConfiguration,这是开启自动配置功能,帮我们自动配置。
@AutoConfigurationPackage
@Import(AutoConfigurationImportSelector.class)
我们继续看看这个@AutoConfigurationPackage,它包含下面的这一项:
@Import(AutoConfigurationPackages.Registrar.class)
Springboot的优点、@import 标签是属于 springboot 底层,它表示给容器中导入组件,调用AutoConfigurationPackages.Registrar.class这个类,这个类中可能包括一些配置的方法等等。
@EnableAutoConfiguration 实际上,它会把SpringBootApplication标注的类,及所在的包下面的所有子包里面所有的组件都扫描到spring容器中。
学到这里,我们可以做一个实验,下面是我的包结构:
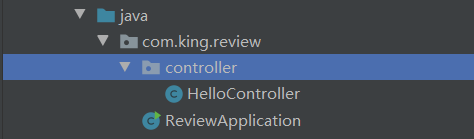
我的启动类是ReviewApplication,我在com.king.review下面建立一个子包controller,接下来在controller下面建立一个类,下面是它的内容:
package com.king.review.controller;import org.springframework.stereotype.Controller;
import org.springframework.web.bind.annotation.RequestMapping;
import org.springframework.web.bind.annotation.ResponseBody;@Controller
public class HelloController {@ResponseBody@RequestMapping("/hello")public String Hello(){return "hello world";}
}
当我们启动之后,可以正常在本地 http://localhost:8080/hello,访问到hello world,但是当我们把controller类放在com.king.review 之外,它就不能访问到了。
我们有了一些自动配置类,就省去了我们手动编写配置注入功能等组件。
总结: SpringBoot在启动的时候在类路径下META-INF/spring.factories获取@EnableAutoConfiguration 指定的值,将这些值作为自动配置类导入容器中,自动配置类就会生效,自动帮我们配置好。
对于上面的controller,我们可以换一个Rest风格的写法:
@RestController
public class HelloController {@RequestMapping("/hello")public String Hello(){return "hello world";}
}
@RestController它相当于@Controller+@RequestBody,我们可以点击进入看一下@RestController就知道了
Springboot原理。接下来介绍一下YAML,application.yml它是springboot中的配置文件,怎么用这个配置文件,下面来介绍一下,我会以例子的形式进行相应的介绍。这里我先建立一个person类:等会再来解释这一堆注解
@ConfigurationProperties(prefix = "person")
@EnableConfigurationProperties(Person.class)
@Component
public class Person {private Integer age;private String name;private Dog dog;// 此处省去了 get/set方法@Overridepublic String toString() {return "Person{" +"age=" + age +", name='" + name + '\'' +", dog=" + dog +'}';}
}// 下面是 Dog类public class Dog {private String name;private Integer age;@Overridepublic String toString() {return "Dog{" +"name='" + name + '\'' +", age=" + age +'}';}// 此处省去了 get/set方法
}
我们再定义一个yaml文件:
# application.yml
person:age: 19name: kingDog:name: fogage: 2
上面那个注解:
@ConfigurationProperties(prefix = “person”)
@EnableConfigurationProperties(Person.class)
@Component
第二个是开启配置属性,不开启的话,第一个注解就会用不了,再来看第一个注解,它是指定扫描配置文件application.yml中的 以person开头的那个那些信息,赋值给这个类,这里的yml文件中person需要小写,不然会报错不规范。最后的@Component,这个是必须要的,把它注册成spring容器中的组件,才能被扫描到,也就是说,只有这个组件是容器中的组件,才能使用容器中提供的@ConfigurationProperties。
最后,我们可以在Test中测试,我们的效果:
@SpringBootTest
class ReviewApplicationTests {@AutowiredPerson person;@Testvoid contextLoads() {System.out.println(person);}
}
Springboot教程,
和我们的预期是一样的,我们把它换到application.properties中,效果同样也不错,只不过语法不一样。
下面提供另一种注入方式——@Value
这个和之前spring的用法差不多,只不过是换了一种形式,以前,我们是用XML的方式实现的注入。例如我们对属性name赋值为sam:
<bean Class="Person"><property name="name" value="sam"></property>
</bean>
现在,我们换了一种注解的方式在 springboot 中,下面来演示一下:
@Component
public class Person {@Value("#{12+11}")private Integer age;@Value("${person.name}")private String name;private Dog dog;// 此处省去了set/get方法@Overridepublic String toString() {return "Person{" +"age=" + age +", name='" + name + '\'' +", dog=" + dog +'}';}
}
下面是两种方式的比较:
| @ConfigurationProperties | @Value | |
|---|---|---|
| 功能 | 批量注入配置文件中的属性 | 一个个指定 |
| 松散绑定 | 支持 | 不支持 |
| spEL | 不支持 | 支持 |
| JSR303 | 支持 | 不支持 |
| 复杂类型封装 | 支持 | 不支持 |
下面是JSR303的例子:
@Validated
public class Person {@Emailprivate Integer age;   // 这是jsr303校验,表示这个数据段只能填email格式,否则报错
}
Spring Boot。下面是@PropertySource 的一些用法,这是一个指定的属性注入注解,如果不好理解的话,下面有个例子可以看一下,还是针对的上面那个person类:
@PropertySource(value={"classpath:person.properties"})  //不指定会默认application.properties
@ConfigurationProperties(prefix = "person")
@EnableConfigurationProperties(Person.class)
@Component
public class Person {private Integer age;private String name;private Dog dog;
}
注意到这里的@PropertySource(value={"classpath:person.properties"}),我这是指定用resource下面的person.properties文件夹,这是为了管理注入文件,如果我们不指定,系统会默认使用application.properties/yml作为默认的注入属性文件 ,如果属性过多,管理会十分的混乱,所以有必要分离出来,这里我们要注意,参数value可以传入多个文件,用的是{ }。
# 这是 person,propertiesperson.age= 19
person.name=kingsssss
person.Dog.name=fog
person.Dog.age=2
@ImportResource : 导入spring的配置文件,让里面的内容生效:
首先,我们在新建一个service.HelloService,然后再新建一个beans.xml,在resource下面,如下:
<?xml version="1.0" encoding="UTF-8"?>
<beans xmlns="http://www.springframework.org/schema/beans"xmlns:xsi="http://www.w3.org/2001/XMLSchema-instance"xsi:schemaLocation="http://www.springframework.org/schema/beans http://www.springframework.org/schema/beans/spring-beans.xsd">
<bean id="helloservice" class="com.king.review.service.HelloService"></bean>
</beans>
下面我们测试一下,springboot能不能识别这个bean,我们在刚才的测试类中加入如下的这些内容:
@AutowiredApplicationContext ioc;
@Test
void contextLoads2() {System.out.println(ioc.containsBean("helloservice"));// helloservice 这个是刚才标注的bean的id,检验容器中是否包含了helloservice这个bean}
//  运行结果为false
Springboot常用注解。springboot里面没有spring的配置文件,我们自己编写的配置文件也不能识别,要想要spring的配置文件生效,加载进来 @ImportResource 标注在配置类上面
@ImportResource(locations = {"classpath:beans.xml"})
@SpringBootApplication
public class ReviewApplication {public static void main(String[] args) {SpringApplication.run(ReviewApplication.class, args);}
}
@ImportResource 以上是spring的用法,但是springboot不推荐这种做法,有它的推荐的给容器中添加组件的方法,就是配置类的方法。下面介绍配置类的方法:新建一个config.MyAppConfig类
@Configuration    // 相当于之前的spring配置文件,如上面的beans.xml文件一样
public class MyAppConfig {// 将方法的返回值添加到容器中,容器中这个默认的ID就是方法名@Beanpublic HelloService helloservice(){System.out.println("给容器中添加组件");return new HelloService();}
}// 它的作用和之前的beans.xml其实是一样的,只不过springboot推荐用这种
版权声明:本站所有资料均为网友推荐收集整理而来,仅供学习和研究交流使用。

工作时间:8:00-18:00
客服电话
电子邮件
admin@qq.com
扫码二维码
获取最新动态