一、Redis簡介
1.1?NoSQL
NoSQL,泛指非關系型數據庫,NoSQL數據庫分為四大類:鍵值存儲數據庫(Redis,Voldemort,Oracle BDB)、列存儲數據庫(HBase,Riak)、文檔型數據庫(CouchDB,MongoDB)、圖形數據庫(Neo4J,InfoGrid,Infinite Graph)。
1.2 非關系型數據庫特點
- 數據模型比較簡單
- 需要靈活性更強的IT系統
- 對數據庫性能要求較高
- 不需要高度的數據一致性
- 對于給定key,比較容易映射復雜值的環境
1.3?Redis
是以key-value形式存儲,和傳統的關系型數據庫不一樣,不一定遵循傳統數據庫的一些基本要求。
優點:
- 對數據高并發讀寫
- 對海量數據的高效率存儲和訪問
- 對數據的可擴展性和高可用性
缺點:
- Redis(ACID處理非常簡單)
- 無法做到太復雜的關系數據庫模型
redis菜鳥教程。Redis是以key-value存儲的,鍵可以包含:字符串(string)、哈希、鏈表(list)、集合(set)、有序集合(zet)。這些數據集合都支持push/pop、add/remove及取交集和并集以及更豐富的操作,Redis支持各種不同的方式排序,為了保證效率,數據都是緩存在內存中,它可以周期性的把更新的數據寫入磁盤或者把修改操作寫入追加到文件。
?Redis有三種集群方式,主從模式、哨兵模式、集群模式。
二、Redis安裝與部署
下載地址:http://redis.io/download
首先說明一下,以下安裝是在CentOS 7環境下進行的。
安裝步驟:
-
首先需要安裝gcc,把下載好的redis-4.0.1.tar.gz?放到自己指定的文件夾下(/usr/software)
- 進行解壓,將Redis解壓到/usr/local/文件夾下
[root@localhost software]# tar -zxvf redis-4.0.1.tar.gz -C /usr/local/
-
進入到redis-4.0.1目錄下,進行編譯make
[root@localhost local]# cd redis-4.0.1/
[root@localhost redis-4.0.1]# make
-
redis使用手冊 pdf?進入到src下進行安裝 make install ?驗證(ll?查看src下的目錄,有redis-server 、redis-cil即可)
[root@localhost redis-4.0.1]# cd src/
[root@localhost src]# make install
-
建立倆個文件夾存放redis命令和配置文件
[root@localhost local]# mkdir -p /usr/local/redis/etc
[root@localhost local]# mkdir -p /usr/local/redis/bin
-
把redis-4.0.1下的redis.conf 復制到/usr/local/redis/etc下
[root@localhost local]# cp /usr/local/redis-4.0.1/redis.conf /usr/local/redis/etc/
-
把redis-4.0.1/src里的mkreleasehdr.sh、redis-benchmark、redis-check-aof、redis-check-dump、redis-cli、redis-server
文件移動到bin下
[root@localhost local]# cd redis-4.0.1/src/
[root@localhost src]# mv mkreleasehdr.sh redis-benchmark redis-check-aof redis-check-rdb redis-cli redis-server /usr/local/redis/bin
-
redis快速入門、啟動時并指定配置文件:./redis-server /usr/local/redis/etc/redis.conf(注意要使用后臺啟動,所以修改redis.conf里的 daemonize 改為yes)
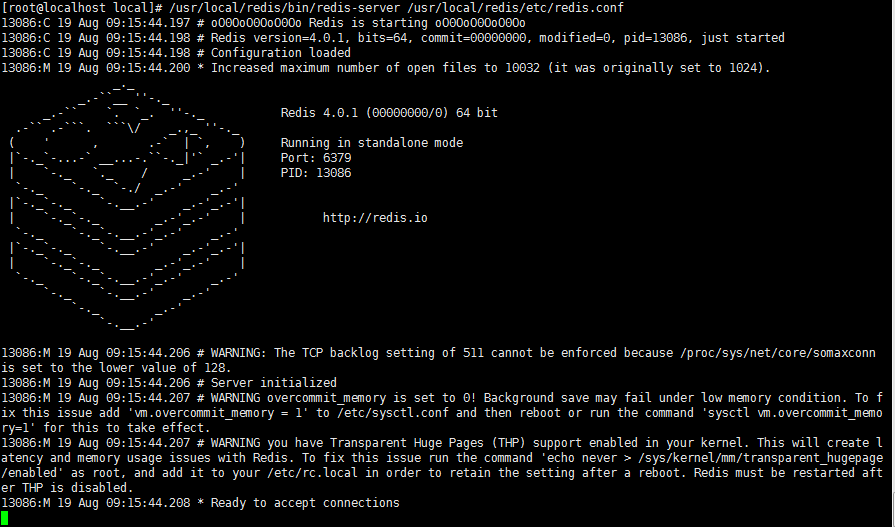
[root@localhost local]# /usr/local/redis/bin/redis-server /usr/local/redis/etc/redis.conf
或者進入/usr/local/redis/bin/目錄下
[root@localhost local]# ./redis-server /usr/local/redis/etc/redis.conf
?前臺啟動成功:
進入/usr/local/redis/etc/目錄下,修改redis.conf配置文件,將daemonize選項改為yes,表示默認為后臺啟動
################################# GENERAL ###################################### By default Redis does not run as a daemon. Use 'yes' if you need it.
# Note that Redis will write a pid file in /var/run/redis.pid when daemonized.
daemonize yes
redis文檔、?設置將數據文件放到指定的目錄文件夾:
# The filename where to dump the DB
dbfilename dump.rdb# The working directory.
#
# The DB will be written inside this directory, with the filename specified
# above using the 'dbfilename' configuration directive.
#
# The Append Only File will also be created inside this directory.
#
# Note that you must specify a directory here, not a file name.
dir /usr/local/redis/etc/
- 再次啟動,則為后臺啟動
[root@localhost local]# cd redis/bin/
[root@localhost bin]# ./redis-server /usr/local/redis/etc/redis.conf
13322:C 19 Aug 09:37:02.450 # oO0OoO0OoO0Oo Redis is starting oO0OoO0OoO0Oo
13322:C 19 Aug 09:37:02.450 # Redis version=4.0.1, bits=64, commit=00000000, modified=0, pid=13322, just started
13322:C 19 Aug 09:37:02.450 # Configuration loaded
[root@localhost bin]#
-
使用命令 ps -ef | grep redis 查看是否有redis服務 或者 查看端口:netstat -tunpl | grep 6379
[root@localhost bin]# ps -ef|grep 6379
root      13323      1  0 09:37 ?        00:00:00 ./redis-server 127.0.0.1:6379
root      13345   2732  0 09:38 pts/0    00:00:00 grep --color=auto 6379
只要顯示為以上情況則為啟動成功。
-
進入redis客戶端 ./redis-cli 退出客戶端quit
[root@localhost bin]# ./redis-cli
127.0.0.1:6379>
-
退出redis服務
redis命令手冊、(1)pkill redis-server?
(2)kill 進程號
(3)/usr/local/redis/bin/redis-cli shutdown
?三、使用Redis Desktop Manager連接Redis
如果就以上面的配置情況使用Desktop Manager連接Redis的話,發現根本連接不上:
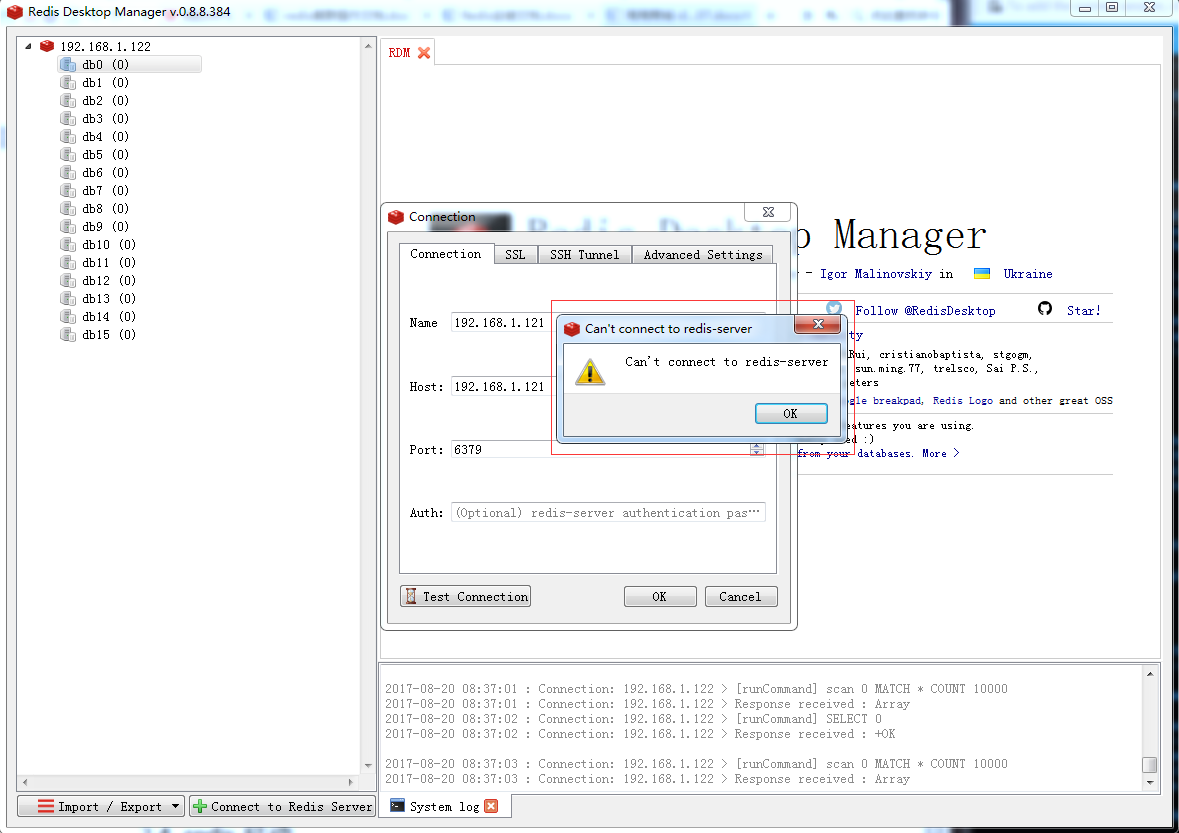
redis的使用,1、因為Redis默認端口是6379,所以首先查看6379端口是否開啟
[root@localhost bin]# firewall-cmd --query-port=6379/tcp
yes
如果返回結果為no,那么證明6379端口確實沒有開啟,需要使用命令開啟6379端口
[root@localhost bin]# firewall-cmd --add-port=6379/tcp
success
返回success表示已經成功開啟該端口。
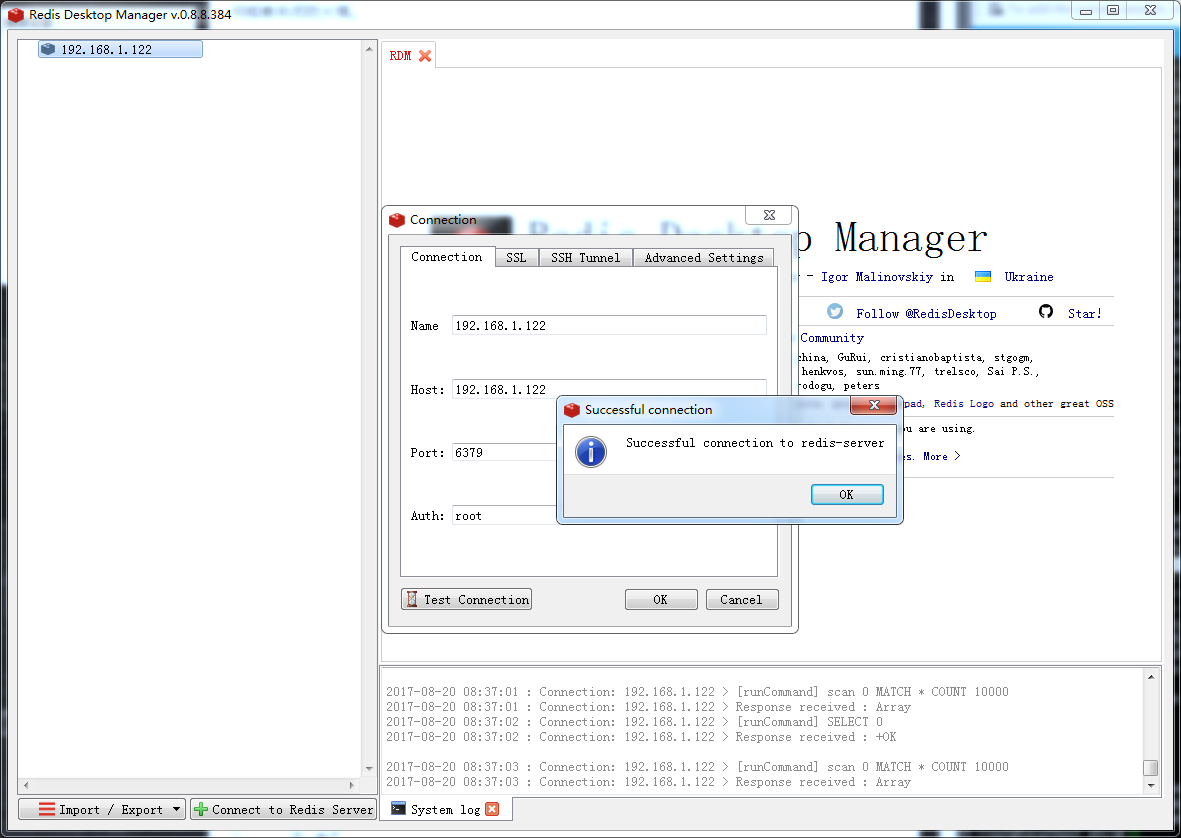
2、修改redis.conf配置文件,注釋掉?bind 127.0.0.1以及設置自己的密碼?requirepass "root",這里的密碼是自己隨便設置的。
################################## NETWORK ###################################### By default, if no "bind" configuration directive is specified, Redis listens
# for connections from all the network interfaces available on the server.
# It is possible to listen to just one or multiple selected interfaces using
# the "bind" configuration directive, followed by one or more IP addresses.
#
# Examples:
#
# bind 192.168.1.100 10.0.0.1
# bind 127.0.0.1 ::1
################################## SECURITY #################################### Require clients to issue AUTH <PASSWORD> before processing any other
# commands.  This might be useful in environments in which you do not trust
# others with access to the host running redis-server.
#
# This should stay commented out for backward compatibility and because most
# people do not need auth (e.g. they run their own servers).
#
# Warning: since Redis is pretty fast an outside user can try up to
# 150k passwords per second against a good box. This means that you should
# use a very strong password otherwise it will be very easy to break.
#
requirepass "root"
注:設置密碼 為了安全一定要設,而且這里如果不綁定ip也不設密碼的話,redis是默認保護模式,只能本虛擬機訪問,不允許其他ip訪問
重新啟動Redis服務
[root@localhost bin]# ./redis-server /usr/local/redis/etc/redis.conf
再次使用Redis Desktop Manager 連接Redis服務,可以成功連接。
但是現在又會有另外一個問題,當我們想使用 ./redis-cli命令登陸客戶端使用Redis命令時,發現會沒有權限操作。
[root@localhost bin]# ./redis-cli
127.0.0.1:6379> keys *
(error) NOAUTH Authentication required.
127.0.0.1:6379>
這是因為我們給Redis添加了密碼保護,需要輸入密碼登陸才能對其進行操作。
方式一:
[root@localhost bin]# ./redis-cli -a root
127.0.0.1:6379> keys *
(empty list or set)
127.0.0.1:6379>
方式二:
[root@localhost bin]# ./redis-cli
127.0.0.1:6379> auth root
OK
127.0.0.1:6379> keys *
(empty list or set)
127.0.0.1:6379>
到此為止,使用Redis Desktop Manager連接Redis的問題已經全部解決。
redis.conf 的配置信息
1、daemonize 如果需要在后臺運行,把該項改為yes
2、pidfile 配置多個pid的地址 默認在/var/run/redis.pid
3、bind 綁定ip,設置后只接受來自該ip的請求
4、port 監聽端口,默認是6379
5、loglevel 分為4個等級:debug verbose notice warning
6、logfile 用于配置log文件地址
7、databases 設置數據庫個數,默認使用的數據庫為0
8、save 設置redis進行數據庫鏡像的頻率。
9、rdbcompression 在進行鏡像備份時,是否進行壓縮
10、dbfilename 鏡像備份文件的文件名
11、Dir 數據庫鏡像備份的文件放置路徑
12、Slaveof 設置數據庫為其他數據庫的從數據庫
13、Masterauth 主數據庫連接需要的密碼驗證
14、Requriepass 設置 登陸時需要使用密碼
15、Maxclients 限制同時使用的客戶數量
16、Maxmemory 設置redis能夠使用的最大內存
17、Appendonly 開啟append only模式
18、Appendfsync 設置對appendonly.aof文件同步的頻率(對數據進行備份的第二種方式)
19、vm-enabled 是否開啟虛擬內存支持 (vm開頭的參數都是配置虛擬內存的)
20、vm-swap-file 設置虛擬內存的交換文件路徑
21、vm-max-memory 設置redis使用的最大物理內存大小
22、vm-page-size 設置虛擬內存的頁大小
23、vm-pages 設置交換文件的總的page數量
24、vm-max-threads 設置VM IO同時使用的線程數量
25、Glueoutputbuf 把小的輸出緩存存放在一起
26、hash-max-zipmap-entries 設置hash的臨界值
27、Activerehashing 重新hash
四、Redis集群搭建
?第一步:創建文件夾
?在/usr/local下,創建存放redis集群的文件夾(redis-cluster)
[root@localhost local]# mkdir redis-cluster
[root@localhost local]# cd redis-cluster/
然后進入redis-cluster文件夾下創建留個集群文件夾,分別存放各個節點自己的配置文件
[root@localhost local]# cd redis-cluster/
[root@localhost redis-cluster]# mkdir 7001
[root@localhost redis-cluster]# mkdir 7002
[root@localhost redis-cluster]# mkdir 7003
[root@localhost redis-cluster]# mkdir 7004
[root@localhost redis-cluster]# mkdir 7005
[root@localhost redis-cluster]# mkdir 7006
[root@localhost redis-cluster]# ls
7001  7002  7003  7004  7005  7006
第二步:修改配置文件
拷貝redis.conf配置文件到 700* 文件夾中:
[root@localhost redis-cluster]# cd ../redis-4.0.1/
[root@localhost 7001]# cp redis.conf /usr/local/redis-cluster/7001
[root@localhost 7001]# cp redis.conf /usr/local/redis-cluster/7002
[root@localhost 7001]# cp redis.conf /usr/local/redis-cluster/7003
[root@localhost 7001]# cp redis.conf /usr/local/redis-cluster/7004
[root@localhost 7001]# cp redis.conf /usr/local/redis-cluster/7005
[root@localhost 7001]# cp redis.conf /usr/local/redis-cluster/7006
修改配置文件:
- daemonize yes
- port 700* (分別對每臺機器的端口進行設置)
- bind 192.168.1.122 (必須要綁定當前機器的ip)
- dir /usr/local/redis-cluster/700*/ (指定數據文件存放位置,必須要指定不同的目錄位置,不然會丟失數據)
- cluster-enabled yes(啟動集群模式)
- cluster-config-file nodes-700*.conf(這里700*最好和port對應上)
- cluster-node-timeout 5000
- appendonly yes
第三步:修改各個對應結點的配置文件
按照以上的配置,修改對應的ip和port(700*)端口號和cluster-config-file nodes-700*.conf配置文件即可。
第四步:由于redis集群需要使用ruby命令,所以我們需要安裝ruby
[root@localhost redis-cluster]# yum install ruby
[root@localhost redis-cluster]# yum install rubygems
[root@localhost redis-cluster]# gem install redis
第五步:分別啟動6個redis實例,然后檢查是否啟動成功
[root@localhost local]# /usr/local/redis/bin/redis-server /usr/local/redis-cluster/700*/redis.conf
查看是否啟動成功?
[root@localhost local]# ps aux|grep redis
第六步:首先到redis4.0.1的安裝目錄下,然后執行redis-trib.rb命令
[root@localhost local]# cd redis-4.0.1/src/
[root@localhost src]# ./redis-trib.rb create --replicas 1 192.168.1.122:7001 192.168.1.122:7002 192.168.1.122:7003 192.168.1.122:7004 192.168.1.122:7005 192.168.1.122:7006
第七步:進行驗證
- 連接任意一個客戶端即可:./redis-cli -c -h -p(-c表示集群模式,指定IP地址和端口號),如:/usr/local/redis/bin/redis-cli -c -h 192.168.1.122 -p 700*
- 進行驗證cluster info(查看集群信息)、cluster nodes(查看節點列表)
- 進行數據操作驗證
- 關閉集群則需要逐個關閉,使用命令:
[root@localhost 7001]# /usr/local/redis/bin/redis-cli -c -h 192.168.1.122 -p 700* shutdown
友情提示:當出現集群無法啟動時,刪除臨時的數據文件,再次重新啟動每一個redis服務,然后重新構造集群環境。
第八步:創建快速啟動腳本和快速關閉腳本
創建快速全部開啟腳本 startall.sh:
[root@localhost redis-cluster]# vim startall.sh

cd /usr/local/redis/bin/redis-server
./redis-server /usr/local/redis-cluster/7001/redis.conf
cd /usr/local/redis/bin/redis-server
./redis-server /usr/local/redis-cluster/7002/redis.conf
cd /usr/local/redis/bin/redis-server
./redis-server /usr/local/redis-cluster/7003/redis.conf
cd /usr/local/redis/bin/redis-server
./redis-server /usr/local/redis-cluster/7004/redis.conf
cd /usr/local/redis/bin/redis-server
./redis-server /usr/local/redis-cluster/7005/redis.conf
cd /usr/local/redis/bin/redis-server
./redis-server /usr/local/redis-cluster/7006/redis.conf
創建快速全部關閉腳本shutdown.sh:
[root@localhost redis-cluster]# vim shutdown.sh

cd /usr/local/redis/bin/
redis-cli -p 7001 shutdown
redis-cli -p 7002 shutdown
redis-cli -p 7003 shutdown
redis-cli -p 7004 shutdown
redis-cli -p 7005 shutdown
redis-cli -p 7006 shutdown
給兩個新建的腳本賦可執行權限:
[root@localhost redis-cluster]# chmod +x startall.sh
[root@localhost redis-cluster]# chmod +x shutdown.sh
之后直接啟動腳本即可:
[root@localhost redis-cluster]# ./startall.sh
[root@localhost redis-cluster]# ./shutdown.sh
五、Redis基礎數據類型詳解
參考:https://www.cnblogs.com/lizhenghn/p/5322887.html
Redis目前支持5種數據類型,分別是:
- String(字符串)
- List(列表)
- Hash(字典)
- Set(集合)
- Sorted Set(有序集合)
1、String(字符串)
String是簡單的 key-value 鍵值對,value 不僅可以是 String,也可以是數字。String在redis內部存儲默認就是一個字符串,被redisObject所引用,當遇到incr,decr等操作時會轉成數值型進行計算,此時redisObject的encoding字段為int。
String在redis內部存儲默認就是一個字符串,被redisObject所引用,當遇到incr,decr等操作時會轉成數值型進行計算,此時redisObject的encoding字段為int。
應用場景
String是最常用的一種數據類型,普通的key/value存儲都可以歸為此類,這里就不所做解釋了。
相關命令
SET key value                   設置key=value
GET key                         或者鍵key對應的值
GETRANGE key start end          得到字符串的子字符串存放在一個鍵
GETSET key value                設置鍵的字符串值,并返回舊值
GETBIT key offset               返回存儲在鍵位值的字符串值的偏移
MGET key1 [key2..]              得到所有的給定鍵的值
SETBIT key offset value         設置或清除該位在存儲在鍵的字符串值偏移
SETEX key seconds value         鍵到期時設置值
SETNX key value                 設置鍵的值,只有當該鍵不存在
SETRANGE key offset value       覆蓋字符串的一部分從指定鍵的偏移
STRLEN key                      得到存儲在鍵的值的長度
MSET key value [key value...]   設置多個鍵和多個值
MSETNX key value [key value...] 設置多個鍵多個值,只有在當沒有按鍵的存在時
PSETEX key milliseconds value   設置鍵的毫秒值和到期時間
INCR key                        增加鍵的整數值一次
INCRBY key increment            由給定的數量遞增鍵的整數值
INCRBYFLOAT key increment       由給定的數量遞增鍵的浮點值
DECR key                        遞減鍵一次的整數值
DECRBY key decrement            由給定數目遞減鍵的整數值
APPEND key value                追加值到一個鍵
使用示例
redis 127.0.0.1:6379> set baidu http://www.baidu
OK
redis 127.0.0.1:6379> append baidu .com
(integer) 20
redis 127.0.0.1:6379> get baidu
"http://www.baidu.com"
redis 127.0.0.1:6379> set visitors 0
OK
redis 127.0.0.1:6379> incr visitors
(integer) 1
redis 127.0.0.1:6379> incr visitors
(integer) 2
redis 127.0.0.1:6379> get visitors
"2"
redis 127.0.0.1:6379> incrby visitors 100
(integer) 102
redis 127.0.0.1:6379> get visitors
"102"
redis 127.0.0.1:6379> type baidu
string
redis 127.0.0.1:6379> type visitors
string
redis 127.0.0.1:6379> ttl baidu
(integer) -1
redis 127.0.0.1:6379> rename baidu baidu-site
OK
redis 127.0.0.1:6379> get baidu
(nil)
redis 127.0.0.1:6379> get baidu-site
"http://www.baidu.com"
2、Hash(哈希)
Redis Hash對應Value內部實際就是一個HashMap,實際這里會有2種不同實現,這個Hash的成員比較少時Redis為了節省內存會采用類似一維數組的方式來緊湊存儲,而不會采用真正的HashMap結構,對應的value redisObject的encoding為zipmap,當成員數量增大時會自動轉成真正的HashMap,此時encoding為ht。
應用場景
假設有多個用戶及對應的用戶信息,可以用來存儲以用戶ID為key,將用戶信息序列化為比如json格式做為value進行保存。
相關命令
HDEL key field[field...] 刪除對象的一個或幾個屬性域,不存在的屬性將被忽略
HEXISTS key field 查看對象是否存在該屬性域
HGET key field 獲取對象中該field屬性域的值
HGETALL key 獲取對象的所有屬性域和值
HINCRBY key field value 將該對象中指定域的值增加給定的value,原子自增操作,只能是integer的屬性值可以使用
HINCRBYFLOAT key field increment 將該對象中指定域的值增加給定的浮點數
HKEYS key 獲取對象的所有屬性字段
HVALS key 獲取對象的所有屬性值
HLEN key 獲取對象的所有屬性字段的總數
HMGET key field[field...] 獲取對象的一個或多個指定字段的值
HSET key field value 設置對象指定字段的值
HMSET key field value [field value ...] 同時設置對象中一個或多個字段的值
HSETNX key field value 只在對象不存在指定的字段時才設置字段的值
HSTRLEN key field 返回對象指定field的value的字符串長度,如果該對象或者field不存在,返回0.
HSCAN key cursor [MATCH pattern] [COUNT count] 類似SCAN命令
使用示例
127.0.0.1:6379> hset person name jack
(integer) 1
127.0.0.1:6379> hset person age 20
(integer) 1
127.0.0.1:6379> hset person sex famale
(integer) 1
127.0.0.1:6379> hgetall person
1) "name"
2) "jack"
3) "age"
4) "20"
5) "sex"
6) "famale"
127.0.0.1:6379> hkeys person
1) "name"
2) "age"
3) "sex"
127.0.0.1:6379> hvals person
1) "jack"
2) "20"
3) "famale"
3、List(列表)
Redis列表是簡單的字符串列表,可以類比到C++中的std::list,簡單的說就是一個鏈表或者說是一個隊列。可以從頭部或尾部向Redis列表添加元素。列表的最大長度為2^32 - 1,也即每個列表支持超過40億個元素。
Redis list的實現為一個雙向鏈表,即可以支持反向查找和遍歷,更方便操作,不過帶來了部分額外的內存開銷,Redis內部的很多實現,包括發送緩沖隊列等也都是用的這個數據結構。
應用場景
Redis list的應用場景非常多,也是Redis最重要的數據結構之一,比如twitter的關注列表、粉絲列表等都可以用Redis的list結構來實現,再比如有的應用使用Redis的list類型實現一個簡單的輕量級消息隊列,生產者push,消費者pop/bpop。
相關命令
BLPOP key1 [key2 ] timeout 取出并獲取列表中的第一個元素,或阻塞,直到有可用
BRPOP key1 [key2 ] timeout 取出并獲取列表中的最后一個元素,或阻塞,直到有可用
BRPOPLPUSH source destination timeout 從列表中彈出一個值,它推到另一個列表并返回它;或阻塞,直到有可用
LINDEX key index 從一個列表其索引獲取對應的元素
LINSERT key BEFORE|AFTER pivot value 在列表中的其他元素之后或之前插入一個元素
LLEN key 獲取列表的長度
LPOP key 獲取并取出列表中的第一個元素
LPUSH key value1 [value2] 在前面加上一個或多個值的列表
LPUSHX key value 在前面加上一個值列表,僅當列表中存在
LRANGE key start stop 從一個列表獲取各種元素
LREM key count value 從列表中刪除元素
LSET key index value 在列表中的索引設置一個元素的值
LTRIM key start stop 修剪列表到指定的范圍內
RPOP key 取出并獲取列表中的最后一個元素
RPOPLPUSH source destination 刪除最后一個元素的列表,將其附加到另一個列表并返回它
RPUSH key value1 [value2] 添加一個或多個值到列表
RPUSHX key value 添加一個值列表,僅當列表中存在
使用示例
redis 127.0.0.1:6379> lpush list1 redis
(integer) 1
redis 127.0.0.1:6379> lpush list1 hello
(integer) 2
redis 127.0.0.1:6379> rpush list1 world
(integer) 3
redis 127.0.0.1:6379> llen list1
(integer) 3
redis 127.0.0.1:6379> lrange list1 0 3
1) "hello"
2) "redis"
3) "world"
redis 127.0.0.1:6379> lpop list1
"hello"
redis 127.0.0.1:6379> rpop list1
"world"
redis 127.0.0.1:6379> lrange list1 0 3
1) "redis"
4、Set(集合)
可以理解為一堆值不重復的列表,類似數學領域中的集合概念,且Redis也提供了針對集合的求交集、并集、差集等操作。
set 的內部實現是一個 value永遠為null的HashMap,實際就是通過計算hash的方式來快速排重的,這也是set能提供判斷一個成員是否在集合內的原因。
應用場景
Redis set對外提供的功能與list類似是一個列表的功能,特殊之處在于set是可以自動排重的,當你需要存儲一個列表數據,又不希望出現重復數據時,set是一個很好的選擇,并且set提供了判斷某個成員是否在一個set集合內的重要接口,這個也是list所不能提供的。
又或者在微博應用中,每個用戶關注的人存在一個集合中,就很容易實現求兩個人的共同好友功能。
相關命令
SADD key member [member ...] 添加一個或者多個元素到集合(set)里
SCARD key 獲取集合里面的元素數量
SDIFF key [key ...] 獲得隊列不存在的元素
SDIFFSTORE destination key [key ...] 獲得隊列不存在的元素,并存儲在一個關鍵的結果集
SINTER key [key ...] 獲得兩個集合的交集
SINTERSTORE destination key [key ...] 獲得兩個集合的交集,并存儲在一個集合中
SISMEMBER key member 確定一個給定的值是一個集合的成員
SMEMBERS key 獲取集合里面的所有key
SMOVE source destination member 移動集合里面的一個key到另一個集合
SPOP key [count] 獲取并刪除一個集合里面的元素
SRANDMEMBER key [count] 從集合里面隨機獲取一個元素
SREM key member [member ...] 從集合里刪除一個或多個元素,不存在的元素會被忽略
SUNION key [key ...] 添加多個set元素
SUNIONSTORE destination key [key ...] 合并set元素,并將結果存入新的set里面
SSCAN key cursor [MATCH pattern] [COUNT count] 迭代set里面的元素
使用示例
redis> SADD myset "Hello"
(integer) 1
redis> SADD myset "World"
(integer) 1
redis> SMEMBERS myset
1) "World"
2) "Hello"
redis> SADD myset "one"
(integer) 1
redis> SISMEMBER myset "one"
(integer) 1
redis> SISMEMBER myset "two"
(integer) 0
使用集合數據結構的典型用例是朋友名單的實現:
redis 127.0.0.1:6379> sadd friends:leto ghanima paul chani jessica
(integer) 4
redis 127.0.0.1:6379> sadd friends:duncan paul jessica alia
(integer) 3
redis 127.0.0.1:6379> sismember friends:leto jessica
(integer) 1   #不管一個用戶有多少個朋友,我們都能高效地(O(1)時間復雜度)識別出用戶X是不是用戶Y的朋友
redis 127.0.0.1:6379> sismember friends:leto vladimir
(integer) 0
redis 127.0.0.1:6379> sinter friends:leto friends:duncan    #我們可以查看兩個或更多的人是不是有共同的朋友
1) "paul"
2) "jessica"
redis 127.0.0.1:6379> sinterstore friends:leto_duncan friends:leto friends:duncan # 可以在一個新的關鍵字里存儲結果
(integer) 2
5、zset(sorted set:有序集合)
Redis有序集合類似Redis集合,不同的是增加了一個功能,即集合是有序的。一個有序集合的每個成員帶有分數,用于進行排序。
Redis有序集合添加、刪除和測試的時間復雜度均為O(1)(固定時間,無論里面包含的元素集合的數量)。列表的最大長度為2^32- 1元素(4294967295,超過40億每個元素的集合)。
Redis sorted set的內部使用HashMap和跳躍表(SkipList)來保證數據的存儲和有序,HashMap里放的是成員到score的映射,而跳躍表里存放的是所有的成員,排序依據是HashMap里存的score,使用跳躍表的結構可以獲得比較高的查找效率,并且在實現上比較簡單。
使用場景
Redis sorted set的使用場景與set類似,區別是set不是自動有序的,而sorted set可以通過用戶額外提供一個優先級(score)的參數來為成員排序,并且是插入有序的,即自動排序。當你需要一個有序的并且不重復的集合列表,那么可以選擇sorted set數據結構,比如twitter 的public timeline可以以發表時間作為score來存儲,這樣獲取時就是自動按時間排好序的。
又比如用戶的積分排行榜需求就可以通過有序集合實現。還有上面介紹的使用List實現輕量級的消息隊列,其實也可以通過Sorted Set實現有優先級或按權重的隊列。
相關命令
ZADD key score1 member1 [score2 member2] 添加一個或多個成員到有序集合,或者如果它已經存在更新其分數
ZCARD key 得到的有序集合成員的數量
ZCOUNT key min max 計算一個有序集合成員與給定值范圍內的分數
ZINCRBY key increment member 在有序集合增加成員的分數
ZINTERSTORE destination numkeys key [key ...] 多重交叉排序集合,并存儲生成一個新的鍵有序集合。
ZLEXCOUNT key min max 計算一個給定的字典范圍之間的有序集合成員的數量
ZRANGE key start stop [WITHSCORES] 由索引返回一個成員范圍的有序集合(從低到高)
ZRANGEBYLEX key min max [LIMIT offset count]返回一個成員范圍的有序集合(由字典范圍)
ZRANGEBYSCORE key min max [WITHSCORES] [LIMIT] 返回有序集key中,所有 score 值介于 min 和 max 之間(包括等于 min 或 max )的成員,有序集成員按 score 值遞增(從小到大)次序排列
ZRANK key member 確定成員的索引中有序集合
ZREM key member [member ...] 從有序集合中刪除一個或多個成員,不存在的成員將被忽略
ZREMRANGEBYLEX key min max 刪除所有成員在給定的字典范圍之間的有序集合
ZREMRANGEBYRANK key start stop 在給定的索引之內刪除所有成員的有序集合
ZREMRANGEBYSCORE key min max 在給定的分數之內刪除所有成員的有序集合
ZREVRANGE key start stop [WITHSCORES] 返回一個成員范圍的有序集合,通過索引,以分數排序,從高分到低分
ZREVRANGEBYSCORE key max min [WITHSCORES] 返回一個成員范圍的有序集合,以socre排序從高到低
ZREVRANK key member 確定一個有序集合成員的索引,以分數排序,從高分到低分
ZSCORE key member 獲取給定成員相關聯的分數在一個有序集合
ZUNIONSTORE destination numkeys key [key ...] 添加多個集排序,所得排序集合存儲在一個新的鍵
ZSCAN key cursor [MATCH pattern] [COUNT count] 增量迭代排序元素集和相關的分數
使用示例
redis 127.0.0.1:6379> zadd dbs 100 redis
(integer) 1
redis 127.0.0.1:6379> zadd dbs 98 memcached
(integer) 1
redis 127.0.0.1:6379> zadd dbs 99 mongodb
(integer) 1
redis 127.0.0.1:6379> zadd dbs 99 leveldb
(integer) 1
redis 127.0.0.1:6379> zcard dbs
(integer) 4
redis 127.0.0.1:6379> zcount dbs 10 99
(integer) 3
redis 127.0.0.1:6379> zrank dbs leveldb
(integer) 1
redis 127.0.0.1:6379> zrank dbs other
(nil)
redis 127.0.0.1:6379> zrangebyscore dbs 98 100
1) "memcached"
2) "leveldb"
3) "mongodb"
4) "redis"
六、Redis高級命令
DEL key                         如果存在刪除鍵
DUMP key                        返回存儲在指定鍵的值的序列化版本
EXISTS key                      此命令檢查該鍵是否存在
EXPIRE key seconds              指定鍵的過期時間
EXPIREAT key timestamp          指定的鍵過期時間。在這里,時間是在Unix時間戳格式
PEXPIRE key milliseconds        設置鍵以毫秒為單位到期
PEXPIREAT key milliseconds-timestamp        設置鍵在Unix時間戳指定為毫秒到期
KEYS pattern                    查找與指定模式匹配的所有鍵
MOVE key db                     移動鍵到另一個數據庫
PERSIST key                     移除過期的鍵
PTTL key                        以毫秒為單位獲取剩余時間的到期鍵。
TTL key                         獲取鍵到期的剩余時間。
RANDOMKEY                       從Redis返回隨機鍵
RENAME key newkey               更改鍵的名稱
RENAMENX key newkey             重命名鍵,如果新的鍵不存在
TYPE key                        返回存儲在鍵的數據類型的值。
七、Redis與Java的使用
?1、單機版API測試
package com.taotao.rest.jedis;import java.util.HashMap;
import java.util.Iterator;
import java.util.List;
import java.util.Map;import org.junit.Test;import redis.clients.jedis.Jedis;public class TestRedis
{private static Jedis jedis = new Jedis("192.168.1.122", 6379);@Testpublic void testRedis(){jedis.auth("root"); // 如果設置了密碼才需要這一行,沒有設置密碼則不需要這行jedis.set("sex", "man");System.out.println(jedis);List<String> list = jedis.mget("name", "age", "sex");for (Iterator iterator = list.iterator(); iterator.hasNext();){String string = (String)iterator.next();System.out.println(string);}Map<String, String> user = new HashMap<String, String>();user.put("name", "huangyuxuan");user.put("age", "0.5");user.put("sex", "男");jedis.hmset("user", user);List<String> rsmap = jedis.hmget("user", "name", "age", "sex");System.out.println(rsmap);jedis.hdel("user", "age");System.out.println(jedis.hmget("user", "age")); // 因為刪除了,所以返回的是nullSystem.out.println(jedis.hlen("user")); // 返回key為user的鍵中存放的值的個數2System.out.println(jedis.exists("user"));// 是否存在key為user的記錄 返回trueSystem.out.println(jedis.hkeys("user"));// 返回map對象中的所有keySystem.out.println(jedis.hvals("user"));// 返回map對象中的所有value
        testStr();testList();testSet();Iterator<String> iter = jedis.hkeys("user").iterator();while (iter.hasNext()){String key = iter.next();System.out.println(key + ":" + jedis.hmget("user", key));}}public static void testStr(){// -----添加數據----------jedis.set("name", "treee");// 向key-->name中放入了value-->xinxinSystem.out.println(jedis.get("name"));// 執行結果:xinxin
        jedis.append("name", " is my lover"); // 拼接System.out.println(jedis.get("name"));jedis.del("name"); // 刪除某個鍵System.out.println(jedis.get("name"));// 設置多個鍵值對jedis.mset("name", "treee", "age", "27", "qq", "174754613");jedis.incr("age"); // 進行加1操作System.out.println(jedis.get("name") + "-" + jedis.get("age") + "-" + jedis.get("qq"));}public static void testList(){// 開始前,先移除所有的內容jedis.del("java framework");System.out.println(jedis.lrange("java framework", 0, -1));// 先向key java framework中存放三條數據jedis.lpush("java framework", "spring");jedis.lpush("java framework", "struts");jedis.lpush("java framework", "hibernate");// 再取出所有數據jedis.lrange是按范圍取出,// 第一個是key,第二個是起始位置,第三個是結束位置,jedis.llen獲取長度 -1表示取得所有System.out.println(jedis.lrange("java framework", 0, -1));jedis.del("java framework");jedis.rpush("java framework", "spring");jedis.rpush("java framework", "struts");jedis.rpush("java framework", "hibernate");System.out.println(jedis.lrange("java framework", 0, -1));}public static void testSet(){// 添加jedis.sadd("user1", "liuling");jedis.sadd("user1", "xinxin");jedis.sadd("user1", "ling");jedis.sadd("user1", "zhangxinxin");jedis.sadd("user1", "who");// 移除nonamejedis.srem("user1", "who");System.out.println(jedis.smembers("user1"));// 獲取所有加入的valueSystem.out.println(jedis.sismember("user1", "who"));// 判斷 who 是否是user集合的元素System.out.println(jedis.srandmember("user1"));System.out.println(jedis.scard("user1"));// 返回集合的元素個數
    }
}
2、單機版連接池
package com.taotao.rest.jedis;import java.util.Arrays;
import java.util.HashMap;
import java.util.Iterator;
import java.util.List;
import java.util.Map;import org.apache.commons.pool2.impl.GenericObjectPoolConfig;
import org.junit.AfterClass;
import org.junit.BeforeClass;
import org.junit.Test;import redis.clients.jedis.Jedis;
import redis.clients.jedis.JedisShardInfo;
import redis.clients.jedis.Pipeline;
import redis.clients.jedis.ShardedJedis;
import redis.clients.jedis.ShardedJedisPipeline;
import redis.clients.jedis.ShardedJedisPool;
import redis.clients.jedis.Transaction;public class TestSingleRedis
{private static Jedis jedis;private static ShardedJedis shard;private static ShardedJedisPool pool;@BeforeClasspublic static void setUpBeforeClass() throws Exception{// 單個節點jedis = new Jedis("192.168.1.122", 6379);jedis.auth("root"); // 設置密碼了才需要添加這一行// 分片List<JedisShardInfo> shards = Arrays.asList(new JedisShardInfo("192.168.1.122", 6379));shard = new ShardedJedis(shards);GenericObjectPoolConfig goConfig = new GenericObjectPoolConfig();goConfig.setMaxTotal(100);goConfig.setMaxIdle(20);goConfig.setMaxWaitMillis(-1);goConfig.setTestOnBorrow(true);pool = new ShardedJedisPool(goConfig, shards);}@AfterClasspublic static void tearDownAfterClass() throws Exception{jedis.disconnect();shard.disconnect();pool.destroy();}@Testpublic void testString(){// -----添加數據----------jedis.set("name", "treee");// 向key-->name中放入了value-->xinxinSystem.out.println(jedis.get("name"));// 執行結果:xinxin
        jedis.append("name", " is my lover"); // 拼接System.out.println(jedis.get("name"));jedis.del("name"); // 刪除某個鍵System.out.println(jedis.get("name"));// 設置多個鍵值對jedis.mset("name", "treee", "age", "27", "qq", "174754613");jedis.incr("age"); // 進行加1操作System.out.println(jedis.get("name") + "-" + jedis.get("age") + "-" + jedis.get("qq"));}/*** redis操作Map*/@Testpublic void testMap(){// -----添加數據----------Map<String, String> map = new HashMap<String, String>();map.put("name", "xinxin");map.put("age", "22");map.put("qq", "123456");jedis.hmset("user", map);// 取出user中的name,執行結果:[minxr]-->注意結果是一個泛型的List// 第一個參數是存入redis中map對象的key,后面跟的是放入map中的對象的key,后面的key可以跟多個,是可變參數List<String> rsmap = jedis.hmget("user", "name", "age", "qq");System.out.println(rsmap);// 刪除map中的某個鍵值jedis.hdel("user", "age");System.out.println(jedis.hmget("user", "age")); // 因為刪除了,所以返回的是nullSystem.out.println(jedis.hlen("user")); // 返回key為user的鍵中存放的值的個數2System.out.println(jedis.exists("user"));// 是否存在key為user的記錄 返回trueSystem.out.println(jedis.hkeys("user"));// 返回map對象中的所有keySystem.out.println(jedis.hvals("user"));// 返回map對象中的所有value
        Iterator<String> iter = jedis.hkeys("user").iterator();while (iter.hasNext()){String key = iter.next();System.out.println(key + ":" + jedis.hmget("user", key));}}/*** jedis操作List*/@Testpublic void testList(){// 開始前,先移除所有的內容jedis.del("java framework");System.out.println(jedis.lrange("java framework", 0, -1));// 先向key java framework中存放三條數據jedis.lpush("java framework", "spring");jedis.lpush("java framework", "struts");jedis.lpush("java framework", "hibernate");// 再取出所有數據jedis.lrange是按范圍取出,// 第一個是key,第二個是起始位置,第三個是結束位置,jedis.llen獲取長度 -1表示取得所有System.out.println(jedis.lrange("java framework", 0, -1));jedis.del("java framework");jedis.rpush("java framework", "spring");jedis.rpush("java framework", "struts");jedis.rpush("java framework", "hibernate");System.out.println(jedis.lrange("java framework", 0, -1));}/*** jedis操作Set*/@Testpublic void testSet(){// 添加jedis.sadd("user", "liuling");jedis.sadd("user", "xinxin");jedis.sadd("user", "ling");jedis.sadd("user", "zhangxinxin");jedis.sadd("user", "who");// 移除nonamejedis.srem("user", "who");System.out.println(jedis.smembers("user"));// 獲取所有加入的valueSystem.out.println(jedis.sismember("user", "who"));// 判斷 who 是否是user集合的元素System.out.println(jedis.srandmember("user"));System.out.println(jedis.scard("user"));// 返回集合的元素個數
    }@Testpublic void testRLpush() throws InterruptedException{// jedis 排序// 注意,此處的rpush和lpush是List的操作。是一個雙向鏈表(但從表現來看的)jedis.del("a");// 先清除數據,再加入數據進行測試jedis.rpush("a", "1");jedis.lpush("a", "6");jedis.lpush("a", "3");jedis.lpush("a", "9");System.out.println(jedis.lrange("a", 0, -1));// [9, 3, 6, 1]System.out.println(jedis.sort("a")); // [1, 3, 6, 9] //輸入排序后結果System.out.println(jedis.lrange("a", 0, -1));}@Testpublic void testTrans(){long start = System.currentTimeMillis();Transaction tx = jedis.multi();for (int i = 0; i < 1000; i++){tx.set("t" + i, "t" + i);}// System.out.println(tx.get("t1000").get());
        List<Object> results = tx.exec();long end = System.currentTimeMillis();System.out.println("Transaction SET: " + ((end - start) / 1000.0) + " seconds");}@Testpublic void testPipelined(){Pipeline pipeline = jedis.pipelined();long start = System.currentTimeMillis();for (int i = 0; i < 1000; i++){pipeline.set("p" + i, "p" + i);}// System.out.println(pipeline.get("p1000").get());List<Object> results = pipeline.syncAndReturnAll();long end = System.currentTimeMillis();System.out.println("Pipelined SET: " + ((end - start) / 1000.0) + " seconds");}@Testpublic void testPipelineTrans(){long start = System.currentTimeMillis();Pipeline pipeline = jedis.pipelined();pipeline.multi();for (int i = 0; i < 100000; i++){pipeline.set("" + i, "" + i);}pipeline.exec();List<Object> results = pipeline.syncAndReturnAll();long end = System.currentTimeMillis();System.out.println("Pipelined transaction SET: " + ((end - start) / 1000.0) + " seconds");}@Testpublic void testShard(){long start = System.currentTimeMillis();for (int i = 0; i < 100000; i++){String result = shard.set("shard" + i, "n" + i);}long end = System.currentTimeMillis();System.out.println("shard SET: " + ((end - start) / 1000.0) + " seconds");}@Testpublic void testShardpipelined(){ShardedJedisPipeline pipeline = shard.pipelined();long start = System.currentTimeMillis();for (int i = 0; i < 100000; i++){pipeline.set("sp" + i, "p" + i);}List<Object> results = pipeline.syncAndReturnAll();long end = System.currentTimeMillis();System.out.println("shardPipelined SET: " + ((end - start) / 1000.0) + " seconds");}@Testpublic void testShardPool(){ShardedJedis sj = pool.getResource();long start = System.currentTimeMillis();for (int i = 0; i < 100000; i++){String result = sj.set("spn" + i, "n" + i);}long end = System.currentTimeMillis();pool.returnResource(sj);System.out.println("shardPool SET: " + ((end - start) / 1000.0) + " seconds");}
}
3、集群Java操作
package com.taotao.rest.jedis;import java.util.HashSet;
import java.util.Set;import org.junit.Test;import redis.clients.jedis.HostAndPort;
import redis.clients.jedis.JedisCluster;
import redis.clients.jedis.JedisPoolConfig;public class TestClusterRedis
{@Testpublic void testCluster(){Set<HostAndPort> jedisClusterNode = new HashSet<HostAndPort>();jedisClusterNode.add(new HostAndPort("192.168.1.122", 7001));jedisClusterNode.add(new HostAndPort("192.168.1.122", 7002));jedisClusterNode.add(new HostAndPort("192.168.1.122", 7003));jedisClusterNode.add(new HostAndPort("192.168.1.122", 7004));jedisClusterNode.add(new HostAndPort("192.168.1.122", 7005));jedisClusterNode.add(new HostAndPort("192.168.1.122", 7006));// GenericObjectPoolConfig goConfig = new GenericObjectPoolConfig();// JedisCluster jc = new JedisCluster(jedisClusterNode,2000,100, goConfig);JedisPoolConfig cfg = new JedisPoolConfig();cfg.setMaxTotal(100);cfg.setMaxIdle(20);cfg.setMaxWaitMillis(-1);cfg.setTestOnBorrow(true);JedisCluster jc = new JedisCluster(jedisClusterNode, 6000, 1000, cfg);System.out.println(jc.set("age", "20"));System.out.println(jc.set("sex", "男"));System.out.println(jc.get("name"));System.out.println(jc.get("name"));System.out.println(jc.get("name"));System.out.println(jc.get("name"));System.out.println(jc.get("name"));System.out.println(jc.get("name"));System.out.println(jc.get("name"));System.out.println(jc.get("name"));System.out.println(jc.get("age"));System.out.println(jc.get("sex"));jc.close();}
}
?
八、Redis集群與Spring的整合
?1、redis單機版與Spring整合
<beans xmlns="http://www.springframework.org/schema/beans"xmlns:context="http://www.springframework.org/schema/context" xmlns:p="http://www.springframework.org/schema/p"xmlns:aop="http://www.springframework.org/schema/aop" xmlns:tx="http://www.springframework.org/schema/tx"xmlns:xsi="http://www.w3.org/2001/XMLSchema-instance"xsi:schemaLocation="http://www.springframework.org/schema/beans http://www.springframework.org/schema/beans/spring-beans-4.0.xsdhttp://www.springframework.org/schema/context http://www.springframework.org/schema/context/spring-context-4.0.xsdhttp://www.springframework.org/schema/aop http://www.springframework.org/schema/aop/spring-aop-4.0.xsd http://www.springframework.org/schema/tx http://www.springframework.org/schema/tx/spring-tx-4.0.xsdhttp://www.springframework.org/schema/util http://www.springframework.org/schema/util/spring-util-4.0.xsd"><!-- 連接池配置 --><bean id="jedisPoolConfig" class="redis.clients.jedis.JedisPoolConfig"><!-- 最大連接數 --><property name="maxTotal" value="30" /><!-- 最大空閑連接數 --><property name="maxIdle" value="10" /><!-- 每次釋放連接的最大數目 --><property name="numTestsPerEvictionRun" value="1024" /><!-- 釋放連接的掃描間隔(毫秒) --><property name="timeBetweenEvictionRunsMillis" value="30000" /><!-- 連接最小空閑時間 --><property name="minEvictableIdleTimeMillis" value="1800000" /><!-- 連接空閑多久后釋放, 當空閑時間>該值 且 空閑連接>最大空閑連接數 時直接釋放 --><property name="softMinEvictableIdleTimeMillis" value="10000" /><!-- 獲取連接時的最大等待毫秒數,小于零:阻塞不確定的時間,默認-1 --><property name="maxWaitMillis" value="1500" /><!-- 在獲取連接的時候檢查有效性, 默認false --><property name="testOnBorrow" value="false" /><!-- 在空閑時檢查有效性, 默認false --><property name="testWhileIdle" value="true" /><!-- 連接耗盡時是否阻塞, false報異常,ture阻塞直到超時, 默認true --><property name="blockWhenExhausted" value="false" /></bean><!-- redis單機 通過連接池 --><bean id="jedisPool" class="redis.clients.jedis.JedisPool" destroy-method="close"><constructor-arg name="poolConfig" ref="jedisPoolConfig" /><constructor-arg name="host" value="192.168.1.122" /><constructor-arg name="port" value="6379" /></bean></beans>
使用Java測試:
@Testpublic void testSpringJedisSingle(){ApplicationContext ac = new ClassPathXmlApplicationContext("classpath:spring/applicationContext-*.xml");JedisPool pool = (JedisPool)ac.getBean("jedisPool");Jedis jedis = pool.getResource();jedis.auth("root");String str = jedis.get("key1");System.out.println(str);jedis.close();pool.close();}
2、Redis集群版與Spring整合
<beans xmlns="http://www.springframework.org/schema/beans"xmlns:context="http://www.springframework.org/schema/context" xmlns:p="http://www.springframework.org/schema/p"xmlns:aop="http://www.springframework.org/schema/aop" xmlns:tx="http://www.springframework.org/schema/tx"xmlns:xsi="http://www.w3.org/2001/XMLSchema-instance"xsi:schemaLocation="http://www.springframework.org/schema/beans http://www.springframework.org/schema/beans/spring-beans-4.0.xsdhttp://www.springframework.org/schema/context http://www.springframework.org/schema/context/spring-context-4.0.xsdhttp://www.springframework.org/schema/aop http://www.springframework.org/schema/aop/spring-aop-4.0.xsd http://www.springframework.org/schema/tx http://www.springframework.org/schema/tx/spring-tx-4.0.xsdhttp://www.springframework.org/schema/util http://www.springframework.org/schema/util/spring-util-4.0.xsd"><!-- 連接池配置 --><bean id="jedisPoolConfig" class="redis.clients.jedis.JedisPoolConfig"><!-- 最大連接數 --><property name="maxTotal" value="30" /><!-- 最大空閑連接數 --><property name="maxIdle" value="10" /><!-- 每次釋放連接的最大數目 --><property name="numTestsPerEvictionRun" value="1024" /><!-- 釋放連接的掃描間隔(毫秒) --><property name="timeBetweenEvictionRunsMillis" value="30000" /><!-- 連接最小空閑時間 --><property name="minEvictableIdleTimeMillis" value="1800000" /><!-- 連接空閑多久后釋放, 當空閑時間>該值 且 空閑連接>最大空閑連接數 時直接釋放 --><property name="softMinEvictableIdleTimeMillis" value="10000" /><!-- 獲取連接時的最大等待毫秒數,小于零:阻塞不確定的時間,默認-1 --><property name="maxWaitMillis" value="1500" /><!-- 在獲取連接的時候檢查有效性, 默認false --><property name="testOnBorrow" value="false" /><!-- 在空閑時檢查有效性, 默認false --><property name="testWhileIdle" value="true" /><!-- 連接耗盡時是否阻塞, false報異常,ture阻塞直到超時, 默認true --><property name="blockWhenExhausted" value="false" /></bean><!-- redis集群 --><bean id="jedisCluster" class="redis.clients.jedis.JedisCluster"><constructor-arg index="0"><set><bean class="redis.clients.jedis.HostAndPort"><constructor-arg index="0" value="192.168.1.122"></constructor-arg><constructor-arg index="1" value="7001"></constructor-arg></bean><bean class="redis.clients.jedis.HostAndPort"><constructor-arg index="0" value="192.168.1.122"></constructor-arg><constructor-arg index="1" value="7002"></constructor-arg></bean><bean class="redis.clients.jedis.HostAndPort"><constructor-arg index="0" value="192.168.1.122"></constructor-arg><constructor-arg index="1" value="7003"></constructor-arg></bean><bean class="redis.clients.jedis.HostAndPort"><constructor-arg index="0" value="192.168.1.122"></constructor-arg><constructor-arg index="1" value="7004"></constructor-arg></bean><bean class="redis.clients.jedis.HostAndPort"><constructor-arg index="0" value="192.168.1.122"></constructor-arg><constructor-arg index="1" value="7005"></constructor-arg></bean><bean class="redis.clients.jedis.HostAndPort"><constructor-arg index="0" value="192.168.1.122"></constructor-arg><constructor-arg index="1" value="7006"></constructor-arg></bean></set></constructor-arg><constructor-arg index="1" ref="jedisPoolConfig"></constructor-arg></bean></beans>
Java代碼測試集群:
@Testpublic void testSpringJedisCluster() throws IOException{ApplicationContext ac = new ClassPathXmlApplicationContext("classpath:spring/applicationContext-*.xml");JedisCluster jedisCluster = (JedisCluster)ac.getBean("jedisCluster");String str = jedisCluster.get("key1");System.out.println(str);jedisCluster.close();}
?
九、TomcatRedis的session共享
?
?