2019獨角獸企業重金招聘Python工程師標準>>> 
1. 虛擬主機配置
vim 配置,1.1. 啟用虛擬主機配置:vim /opt/nginx/conf/nginx.conf
刪除server 主機配置文件,增加 include vhost/*.conf;
1.2. 創建虛擬主機配置存放目錄:mkdir /opt/nginx/conf/vhost
1.3. 創建虛擬主機配置:cd !$; vim default.conf
server
{listen 80;      # 監聽的端口server_name localhost;    # 監聽的域名index index.html index.htm index.php; root /opt/www/html;  # 網頁路徑
}
2. Nginx 用戶認證
2.1. 安裝httpyum install -y httpd(用來創建用戶、密碼)
2.2. 創建用戶、密碼htpasswd -c /opt/nginx/conf/htpasswd admin (運行htpasswd創建用戶名、密碼時,不能在用戶名、密碼存放的目錄下運行該命令;這里不能在conf目錄下運行htpasswd)
2.3. 虛擬主機中的配置
location / # 作用整個網站:“/”,作用某個目錄: “/admin/”,作用某個url:"~ admin.php" ~匹配{auth_basic "Auth";auth_basic_user_file /opt/nginx/conf/htpasswd; # 定義用戶認證的用戶名、密碼路徑;}
2.4. 檢查Nginx配置&重新加載Nginx配置
/opt/nginx/sbin/nginx -t   //檢查Nginx配置;
/opt/nginx/sbin/nginx -s reload    //重新加載Nginx;
若之前運行過上述命令,則可按 Ctrl+R 建,直接輸入 -t && -s reload
2.5. 驗證
curl -x127.0.0.1:80 test.com -I 正常會出現401報錯信息,需要指定用戶名、密碼;curl -uadmin:admin -x127.0.0.1:80 test.com -I 正常會出現200 的代碼,這個說明用戶認證已經生效了;
3. Nginx 域名重定向
虛擬主機配置文件,如:test.com.conf
server
{listen 80;server_name test.com test1.com test2.com;        # 指定域名,這里可以指定多個域名index index.html index.htm index.php;root /data/wwwroot/test.com;if ($host != 'test.com' )      # if 在這里是用來重定向的,這里是將所有的域名都重定向到 test.com{rewrite  ^/(.*)$  http://test.com/$1  permanent;# “rewrite” 跳轉,“ ^/(.*)$ ” 以“/”開頭任意結尾;permanent  301跳轉、redirect 302 跳轉;}
}
4. Nginx訪問日志
4.1. 主配置文件nginx.conf中搜索log_format,這個是定義log樣式的;默認日志樣式如下:
log_format combined_realip '$remote_addr $http_x_forwarded_for [$time_local]'' $host "$request_uri" $status'' "$http_referer" "$http_user_agent"';
4.2. 日志參數說明:
combined_realip日志格式名稱,可以自定義;$remote_addr客戶端IP(公網IP);$http_x_forwarded_for代理服務器的IP;$time_local服務器本地時間;$host訪問主機名(域名);$request_uri訪問的url地址;$status狀態碼 (如:404、301、302、200等);$http_referer$http_user_agent
4.3. 虛擬主機日志配置
除了在主配置文件 nginx.conf 里定義日志格式外,還需要在虛擬主機配置文件中增加access_log /tmp/1.log combined_realip;這里的 combined_realip 就是在 nginx.conf 中定義的日志格式名字;
4.4. 檢查配置,重新加載Nginx配置
-t && -s reloadcurl -x127.0.0.1:80 test.com -Icat /tmp/1.log
5. Nginx日志切割
5.1. 自定義shell 腳本,用于日志切割;
vim /usr/local/sbin/nginx_log_rotate.sh//寫入如下內容
#! /bin/bash
## 假設nginx的日志存放路徑為/data/logs/
d=`date -d "-1 day" +%Y%m%d`
logdir="/data/logs"
nginx_pid="/usr/local/nginx/logs/nginx.pid"
cd $logdir
for log in `ls *.log`
domv $log $log-$d
done
/bin/kill -HUP `cat $nginx_pid`
5.2. 任務計劃 (crontab -e)
添加定時任務0 0 * * * /bin/bash /usr/local/sbin/nginx_log_rotate.sh
6. 靜態文件不記錄日志和過期時間
具體配置如下:
location ~ .*\.(gif|jpg|jpeg|png|bmp|swf)${expires      7d;    # 緩存過期時間access_log off;   # 關閉日志記錄}
location ~ .*\.(js|css)${expires      12h;access_log off;}
7. Nginx防盜鏈
配置如下,可以和上面的配置結合起來
location ~* ^.+\.(gif|jpg|png|swf|flv|rar|zip|doc|pdf|gz|bz2|jpeg|bmp|xls)$
{expires 7d;  # 緩存過期時間valid_referers none blocked server_names  *.test.com ;if ($invalid_referer) {return 403;}access_log off;  # 關閉日志記錄
}
8. Nginx 訪問控制
8.1. 需求:訪問/admin/目錄的請求,只允許某幾個IP訪問,配置如下:
location /admin/
{allow 192.168.133.1;allow 127.0.0.1;deny all;
}
- 創建目錄
mkdir /data/wwwroot/test.com/admin/ - 創建網頁
echo “test,test”>/data/wwwroot/test.com/admin/1.html - 檢查&加載配置
-t && -s reload - 測試訪問:
curl -x127.0.0.1:80 test.com/admin/1.html -Icurl -x192.168.133.130:80 test.com/admin/1.html -I
8.2. 可以匹配正則
location ~ .*(abc|image)/.*\.php$
{deny all;
}
8.3. 根據user_agent限制
if ($http_user_agent ~ 'Spider/3.0|YoudaoBot|Tomato')
{return 403;  # “deny all”和“return 403”效果一樣
}
9. Nginx 解析PHP配置
配置如下:
location ~ \.php${include fastcgi_params;fastcgi_pass unix:/tmp/php-fcgi.sock;# fastcgi_pass 127.0.0.1:9000;fastcgi_index index.php;fastcgi_param SCRIPT_FILENAME /opt/www/html$fastcgi_script_name;}
fastcgi_pass 用來指定php-fpm監聽的“地址:端口”或者socket
10. Nginx 代理
10.1. Nginx 代理示意圖:

10.2. Nginx 代理配置:cd /usr/local/nginx/conf/vhostvim proxy.conf //加入如下配置
server
{listen 80;      # 監聽端口server_name ask.apelearn.com;    # 訪問域名location /{proxy_pass      http://121.201.9.155/;     # 代理的網站IP地址proxy_set_header Host   $host;             # 代理的網站域名,Host == server_nameproxy_set_header X-Real-IP      $remote_addr;proxy_set_header X-Forwarded-For $proxy_add_x_forwarded_for;}
}
11. Nginx 負載均衡
負載均衡配置:vim /usr/local/nginx/conf/vhost/load.conf // 寫入如下內容
upstream qq_com    #  “upstream”來指定多個“web server”
{ip_hash;   # 作用:確保同個客戶端訪問在同一個IPserver 61.135.157.156:80;server 125.39.240.113:80;
}
server
{listen 80;server_name www.qq.com;location /{proxy_pass      http://qq_com;proxy_set_header Host   $host;proxy_set_header X-Real-IP      $remote_addr;proxy_set_header X-Forwarded-For $proxy_add_x_forwarded_for;}
}
Nginx 不支持代理 https ;但可以在Nginx代理上設置https 監聽
12. Nginx配置SSL(https 訪問)
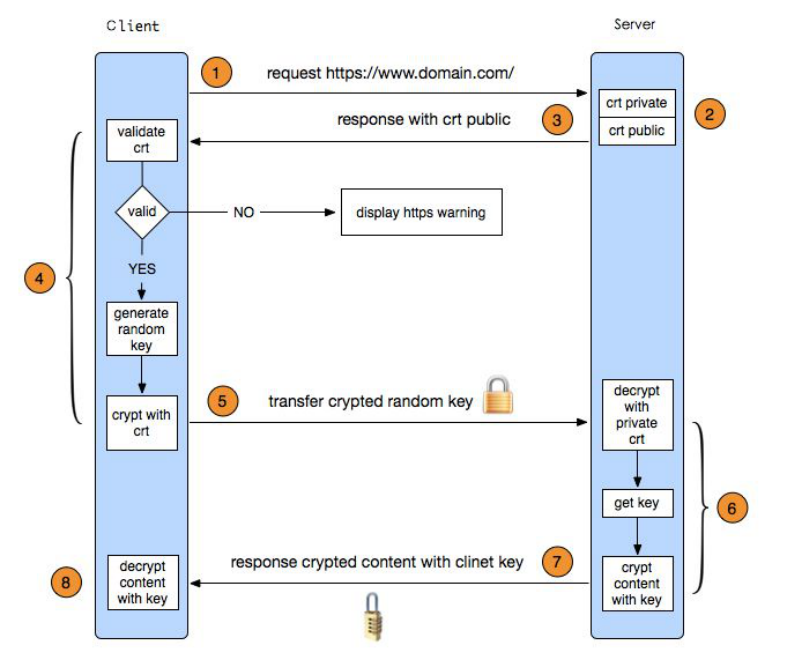
12.1. SSL工作流程
- 瀏覽器發送一個https的請求給服務器;
- 服務器要有一套數字證書,可以自己制作(后面的操作會具體介紹),也可以向組織申請,區別就是自己頒發的證書需要客戶端驗證通過,才可以繼續訪問,而使用受信任的公司申請的證書,則不會彈出>提示頁面,這套證書其實就是一對公鑰和私鑰;
- 服務器會把公鑰傳輸給客戶端;
- 客戶端(瀏覽器)收到公鑰后,會驗證其是否合法有效,無效會有警告提醒,有效則會生成一串隨機數,并用收到的公鑰加密;
- 客戶端把加密后的隨機字符串傳輸給服務器;
- 服務器收到加密隨機字符串后,先用私鑰解密(公鑰加密,私鑰解密),獲取到這一串隨機數后,再用這串隨機字符串加密傳輸的數據(該加密為對稱加密,所謂對稱加密,就是將數據和私鑰也就是這個隨機字符串>通過某種算法混合在一起,這樣除非知道私鑰,否則無法獲取數據內容);
- 服務器把加密后的數據傳輸給客戶端;
- 客戶端收到數據后,再用自己的私鑰也就是那個隨機字符串解密;
12.2 SSL 工作示意圖
12.3. 生成SSL密鑰對
-
進入“conf”目錄
cd /usr/local/nginx/conf -
創建私鑰
openssl genrsa -des3 -out tmp.key 2048//key文件為私鑰 -
轉換key,取消密碼
openssl rsa -in tmp.key -out admin.key//轉換key,取消密碼rm -f tmp.key -
生成證書請求文件
openssl req -new -key admin.key -out admin.csr//生成證書請求文件,需要拿這個文件和私鑰一起生產公鑰文件 -
生成公鑰文件
openssl x509 -req -days 365 -in admin.csr -signkey admin.key -out admin.crt// 這里的admin.crt為公鑰
12.4. Nginx配置 SSL
- 編輯配置:
vim /usr/local/nginx/conf/vhost/ssl.conf//加入如下內容
server
{listen 443;server_name admin.com;index index.html index.php;root /data/wwwroot/admin.com;ssl on;ssl_certificate admin.crt;ssl_certificate_key admin.key;ssl_protocols TLSv1 TLSv1.1 TLSv1.2;
}
-
檢查&加載配置
-t && -s reload//若報錯unknown directive “ssl”,需要重新編譯nginx,加上--with-http_ssl_module -
創建目錄、網頁:
mkdir /data/wwwroot/aming.comecho “ssl test page.”>/data/wwwroot/admin.com/index.html -
Windows測試網頁:
編輯hosts,增加 127.0.0.1 admin.com
瀏覽器訪問:https://admin.com/