關于OAuth2不做介紹了,網絡太多了。
環境:2.2.11.RELEASE + OAuth2 + Redis
redis用來實現token的存儲。
org.springframework.bootspring-boot-starter-data-redisorg.apache.commonscommons-pool2org.springframework.security.oauth.bootspring-security-oauth2-autoconfigure2.2.11.RELEASEorg.springframework.bootspring-boot-starter-data-jpamysqlmysql-connector-javanet.sourceforge.nekohtml nekohtmlorg.springframework.bootspring-boot-starter-thymeleafserver: port: 8208---spring: application: name: oauth-server---spring: redis: host: localhost port: 6379 password: database: 1 lettuce: pool: maxActive: 8 maxIdle: 100 minIdle: 10 maxWait: -1---spring: resources: staticLocations: classpath:/static/,classpath:/templates/,classpath:/pages/ mvc: staticPathPattern: /resources/**---spring: datasource: driverClassName: com.mysql.cj.jdbc.Driver url: jdbc:mysql://localhost:3306/test?serverTimezone=GMT%2B8 username: root password: 123456 type: com.zaxxer.hikari.HikariDataSource hikari: minimumIdle: 10 maximumPoolSize: 200 autoCommit: true idleTimeout: 30000 poolName: MasterDatabookHikariCP maxLifetime: 1800000 connectionTimeout: 30000 connectionTestQuery: SELECT 1 jpa: hibernate: ddlAuto: update showSql: true openInView: true #Open EntityManager in View---spring: thymeleaf: servlet: contentType: text/html; charset=utf-8 cache: false mode: LEGACYHTML5 encoding: UTF-8 enabled: true prefix: classpath:/pages/ suffix: .html---spring: main: allow-bean-definition-overriding: true@Entity@Table(name = "T_APP")public class App implements Serializable {private static final long serialVersionUID = 1L ;@Id @GeneratedValue(generator = "system-uuid") @GenericGenerator(name = "system-uuid", strategy = "uuid")private String id ;/** * 客戶端ID */private String clientId ;/** * 客戶端密鑰 */private String clientSecret ;/** * 跳轉地址 */private String redirectUri ;}該實體用來存在每個應用的信息。@Entity@Table(name = "T_USERS")public class Users implements UserDetails, Serializable {private static final long serialVersionUID = 1L;@Id @GeneratedValue(generator = "system-uuid") @GenericGenerator(name = "system-uuid", strategy = "uuid")private String id ;private String username ;private String password ;}該實體是用戶登錄信息。public interface AppRepository extends JpaRepository, JpaSpecificationExecutor {App findByClientId(String clientId) ;}提供了一個方法,根據clientId獲取客戶端信息。public interface UsersRepository extends JpaRepository, JpaSpecificationExecutor {Users findByUsernameAndPassword(String username, String password) ;}登錄方法重要代碼已經加了注釋說明
@Configuration@EnableAuthorizationServerpublic class OAuthAuthorizationConfig extends AuthorizationServerConfigurerAdapter {@Resourceprivate AppRepository appRepository ;@Resourceprivate RedisConnectionFactory redisConnectionFactory ;@Resource private AuthenticationManager authenticationManager;@Overridepublic void configure(ClientDetailsServiceConfigurer clients) throws Exception {clients.withClientDetails(clientDetailsService());}@Overridepublic void configure(AuthorizationServerSecurityConfigurer security) throws Exception { security.tokenKeyAccess("permitAll()") // isAuthenticated() .checkTokenAccess("permitAll()") // 允許訪問 /oauth/check_token 接口 .allowFormAuthenticationForClients() ; }@Overridepublic void configure(AuthorizationServerEndpointsConfigurer endpoints) throws Exception {// 自定義CODEendpoints.authorizationCodeServices(new InMemoryAuthorizationCodeServices() {@Overridepublic String createAuthorizationCode(OAuth2Authentication authentication) {String code = UUID.randomUUID().toString().replaceAll("-", "") ;store(code, authentication) ;return code;}}) ;endpoints.exceptionTranslator(new DefaultWebResponseExceptionTranslator() {@SuppressWarnings({ "unchecked", "rawtypes" })@Overridepublic ResponseEntity translate(Exception e) throws Exception {ResponseEntity responseEntity = super.translate(e) ;ResponseEntity> customEntity = exceptionProcess(responseEntity);return customEntity ;} }) ;// 要想使用密碼模式這個步驟不能少,否則默認情況下的只支持除密碼模式外的其它4中模式endpoints.authenticationManager(authenticationManager) ;/** * 如果重新定義了TokenServices 那么token有效期等信息需要重新定義 * 這時候在ClientDetailsServiceConfigurer中設置的有效期將會無效 */endpoints.tokenServices(tokenService()) ; // 生成token的服務endpoints.allowedTokenEndpointRequestMethods(HttpMethod.values()) ; // 獲取token 時 允許所有的方法類型 endpoints.accessTokenConverter(defaultTokenConvert()); // token生成方式 endpoints.tokenStore(tokenStore()) ; endpoints.pathMapping("/oauth/error", "/oauth/customerror") ; // endpoints.addInterceptor(new XXXX()) ; // 在這里可以配置攔截器 endpoints.requestValidator(new OAuth2RequestValidator() {@Overridepublic void validateScope(AuthorizationRequest authorizationRequest, ClientDetails client)throws InvalidScopeException {//logger.info("放行...") ;}@Overridepublic void validateScope(TokenRequest tokenRequest, ClientDetails client)throws InvalidScopeException {//logger.info("放行...") ;} }) ; endpoints.approvalStore(new InMemoryApprovalStore()) ;}@Beanpublic ClientDetailsService clientDetailsService() {return (clientId) -> {if (clientId == null) { throw new ClientRegistrationException("未知的客戶端: " + clientId) ; }App app = appRepository.findByClientId(clientId) ;if (app == null) {throw new ClientRegistrationException("未知的客戶端: " + clientId) ;}// 因為每一個客戶端都可以對應多個認證授權類型,跳轉URI等信息,這里為了簡單就為每一個客戶端固定了這些信息OAuthClientDetails clientDetails = new OAuthClientDetails() ; clientDetails.setClientId(clientId) ; clientDetails.setClientSecret(app.getClientSecret()) ; Set registeredRedirectUri = new HashSet<>() ; registeredRedirectUri.add(app.getRedirectUri()) ; clientDetails.setRegisteredRedirectUri(registeredRedirectUri); clientDetails.setScoped(false) ; clientDetails.setSecretRequired(true) ; clientDetails.setScope(new HashSet()); Set authorizedGrantTypes = new HashSet<>() ; authorizedGrantTypes.add("authorization_code") ; authorizedGrantTypes.add("implicit") ; authorizedGrantTypes.add("password") ; authorizedGrantTypes.add("refresh_token") ; authorizedGrantTypes.add("client_credentials") ; clientDetails.setAuthorizedGrantTypes(authorizedGrantTypes); Collection authorities = new ArrayList<>() ; clientDetails.setAuthorities(authorities) ; return clientDetails ;} ;} // 如下Bean可用來增加獲取Token時返回信息(需要在TokenServices中增加) @Bean public TokenEnhancer tokenEnhancer(){ return new TokenEnhancer() { @Override public OAuth2AccessToken enhance(OAuth2AccessToken accessToken, OAuth2Authentication authentication) { System.out.println(authentication) ; if (accessToken instanceof DefaultOAuth2AccessToken){ DefaultOAuth2AccessToken token = (DefaultOAuth2AccessToken) accessToken; Map additionalInformation = new LinkedHashMap(); additionalInformation.put("username", ((Users)authentication.getPrincipal()).getUsername()); additionalInformation.put("create_time", new SimpleDateFormat("yyyy-MM-dd HH:mm:ss").format(new Date())); token.setAdditionalInformation(additionalInformation); } return accessToken; } }; } @Bean @Primary public AuthorizationServerTokenServices tokenService() { DefaultTokenServices tokenService = new DefaultTokenServices() ; tokenService.setSupportRefreshToken(true) ; // 如果不設置返回的token 將不包含refresh_token tokenService.setReuseRefreshToken(true) ; tokenService.setTokenEnhancer(tokenEnhancer()); // 在這里設置JWT才會生效 tokenService.setTokenStore(tokenStore()) ; tokenService.setAccessTokenValiditySeconds(60 * 60 * 24 * 3) ; // token有效期 tokenService.setRefreshTokenValiditySeconds(60 * 60 * 24 * 7) ; // 30 * 24 * 60 * 60;刷新token (必須在token沒有過期前使用) return tokenService ; } @Bean public TokenStore tokenStore() { TokenStore tokenStore = null ; tokenStore = new RedisTokenStore(redisConnectionFactory) ; return tokenStore ; } @Bean public DefaultAccessTokenConverter defaultTokenConvert() { DefaultAccessTokenConverter defaultTokenConvert = new DefaultAccessTokenConverter() ; return defaultTokenConvert ; } private static ResponseEntity> exceptionProcess(ResponseEntity responseEntity) {Map body = new HashMap<>() ;body.put("code", -1) ;OAuth2Exception excep = responseEntity.getBody() ;String errorMessage = excep.getMessage();if (errorMessage != null) {errorMessage = "認證失敗,非法用戶" ;body.put("message", errorMessage) ;} else {String error = excep.getOAuth2ErrorCode();if (error != null) {body.put("message", error) ;} else {body.put("message", "認證服務異常,未知錯誤") ;}}body.put("data", null) ;ResponseEntity> customEntity = new ResponseEntity<>(body, responseEntity.getHeaders(), responseEntity.getStatusCode()) ;return customEntity;} }Spring Authorization Server。密碼模式必須設置對應的AuthenticationManager,所以這里必須暴露出來,否則系統找不到。
@Configurationpublic class WebSecurityConfig extends WebSecurityConfigurerAdapter { @Override @Bean public AuthenticationManager authenticationManagerBean() throws Exception { return super.authenticationManagerBean(); }}該類主要是用在配置類中定義 ClientDetailsService是為了簡化使用的。如下圖:
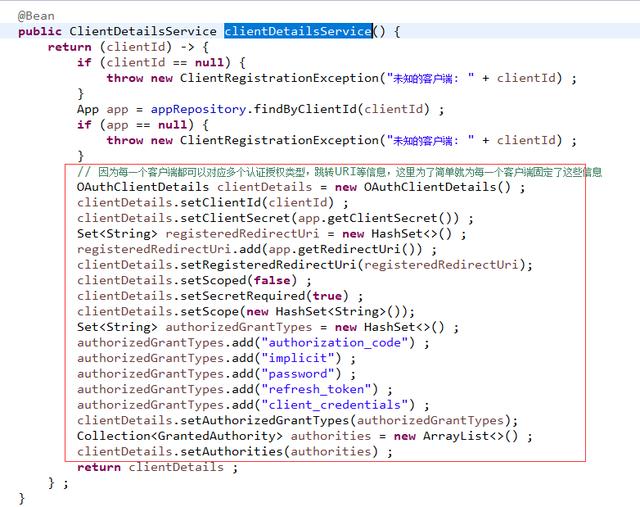
這里就是為了獲取當前客戶端的所有信息使用。
public class OAuthClientDetails implements ClientDetails,Serializable {private static final long serialVersionUID = 1L;private String id ;private String clientId ;private boolean secretRequired ;private String clientSecret ;private boolean scoped ;private Set resourceIds ;private Set scope = new HashSet<>();private Set authorizedGrantTypes = new HashSet<>();private Set registeredRedirectUri = new HashSet<>();private Collection authorities ;private boolean autoApprove ;private Integer accessTokenValiditySeconds ;private Integer refreshTokenValiditySeconds ;}@Componentpublic class LoginAuthenticationProvider implements AuthenticationProvider {@Resourceprivate UsersRepository usersRepository ;@Overridepublic Authentication authenticate(Authentication authentication) throws AuthenticationException {// 登錄用戶名String username = authentication.getName() ;// 憑證(密碼)Object credentials = authentication.getCredentials() ;Users user = null ;try {user = usersRepository.findByUsernameAndPassword(username, (String) credentials) ;if (user == null) {String errorMsg = "錯誤的用戶名或密碼" ;throw new BadCredentialsException(errorMsg) ;}} catch (Exception e) {throw e ;}UsernamePasswordAuthenticationToken result = new UsernamePasswordAuthenticationToken(user, authentication.getCredentials(), Arrays.asList(new SimpleGrantedAuthority("ROLE_USERS"),new SimpleGrantedAuthority("ROLE_ACTUATOR")));result.setDetails(authentication.getDetails());return result;}@Overridepublic boolean supports(Class> authentication) {return (UsernamePasswordAuthenticationToken.class.isAssignableFrom(authentication));}}@Componentpublic class LoginPasswordEncoder implements PasswordEncoder {@Overridepublic String encode(CharSequence rawPassword) {return rawPassword.toString() ;}@Overridepublic boolean matches(CharSequence rawPassword, String encodedPassword) {return this.encode(rawPassword).equals(encodedPassword) ;}}注意:
Users實體類為啥要實現UserDetails?
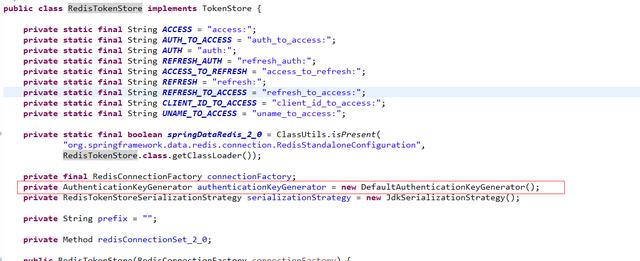
java權限認證框架,應該我們在存儲token相關信息到redis時需要有對應key的生成方式。
RedisTokenStore.java中有個默認的key生成方式:

進入上面的方法中:
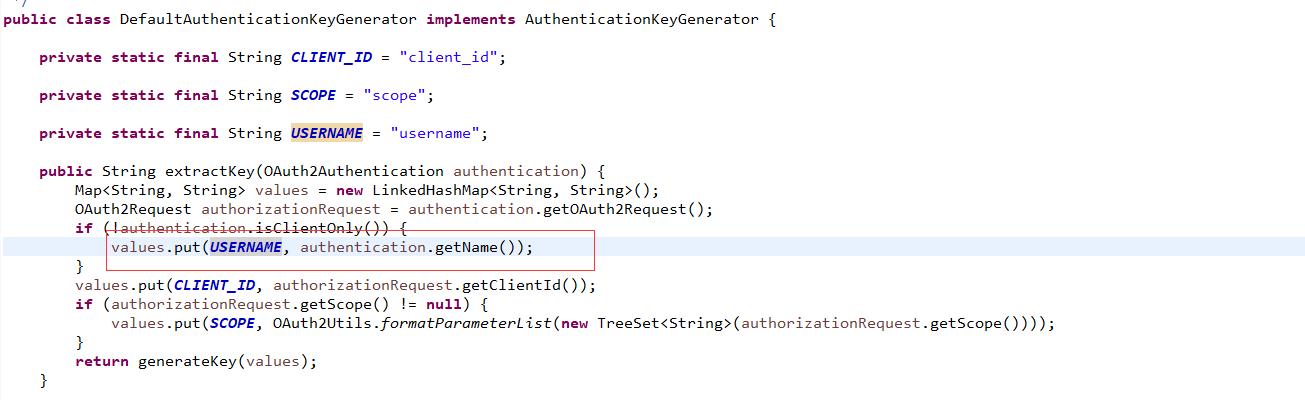
進入getName方法中:

最終它會調用紅色框中的代碼,這樣就出現一個問題,你每次獲取token的時候都會生成一個新的token。所以這里我們的Users實體實現了UserDetails接口。
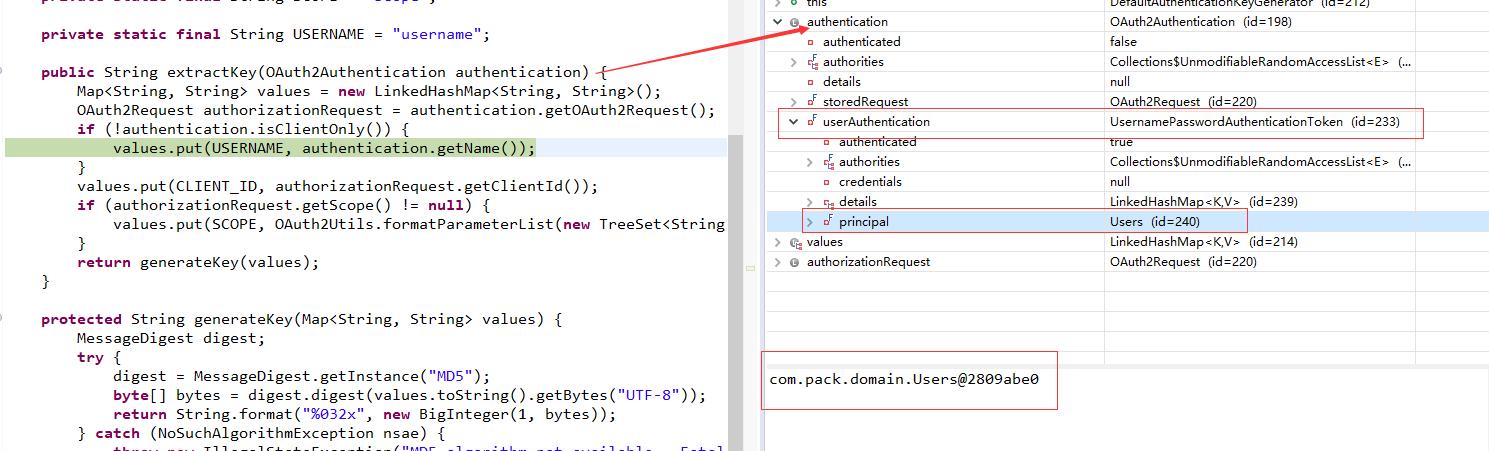
這里是通過debug查看
Spring security。到此整合完畢了!
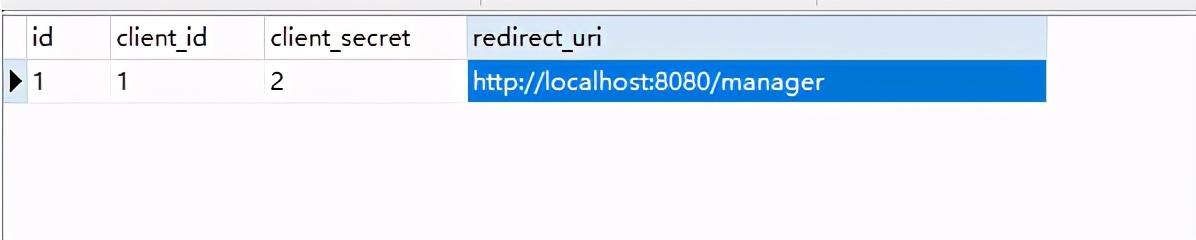
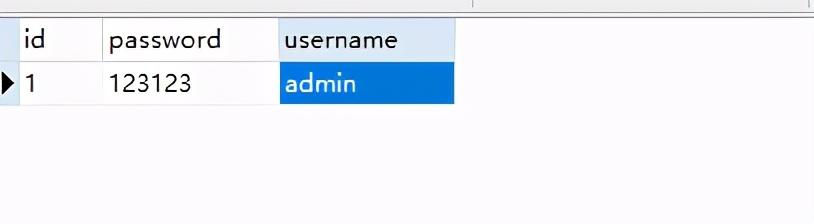
測試:
先造兩條數據:
授權碼模式(authorization code)是功能最完整、流程最嚴密的授權模式。它的特點就是通過客戶端的后臺服務器,與"服務提供商"的認證服務器進行互動。

請求地址
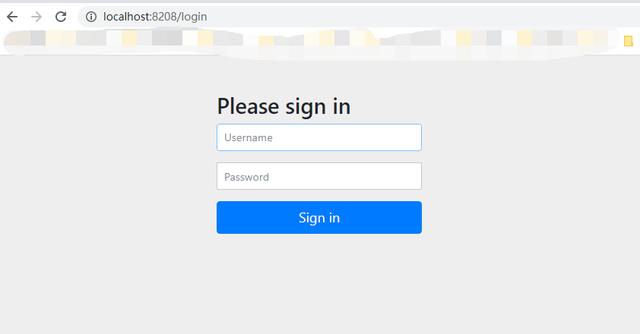
訪問上面地址后跳轉到了登錄頁面
springsecurity詳解。輸入正確的用戶名密碼后:
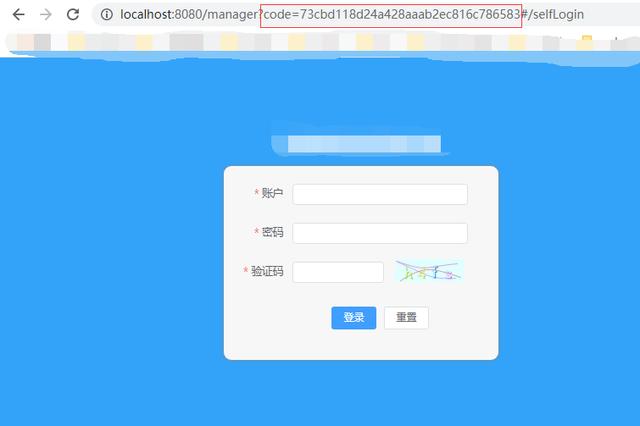
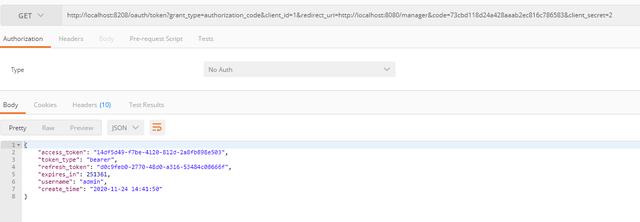
成功后跳到了我們配置的跳轉地址,這時候我們就可以根據地址欄的code獲取token了:
注意:這里的code是一次性的,也就是說如果使用過了就會自動失效。
密碼模式(Resource Owner Password Credentials Grant)中,用戶向客戶端提供自己的用戶名和密碼。客戶端使用這些信息,向"服務商提供商"索要授權。
在這種模式中,用戶必須把自己的密碼給客戶端,但是客戶端不得儲存密碼。這通常用在用戶對客戶端高度信任的情況下,比如客戶端是操作系統的一部分,或者由一個著名公司出品。而認證服務器只有在其他授權模式無法執行的情況下,才能考慮使用這種模式。

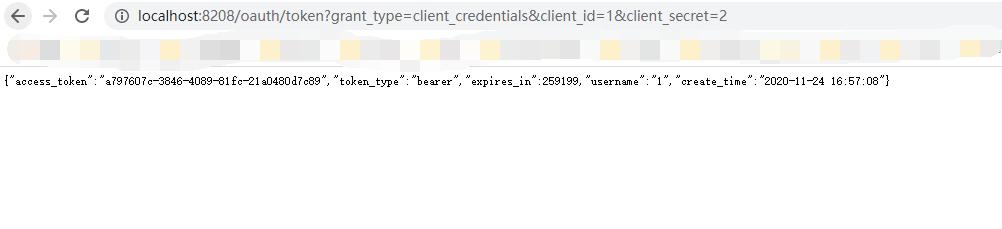
請求地址

spring oauth2教程。客戶端模式(Client Credentials Grant)指客戶端以自己的名義,而不是以用戶的名義,向"服務提供商"進行認證。嚴格地說,客戶端模式并不屬于OAuth框架所要解決的問題。在這種模式中,用戶直接向客戶端注冊,客戶端以自己的名義要求"服務提供商"提供服務,其實不存在授權問題。
簡化模式(implicit grant type)不通過第三方應用程序的服務器,直接在瀏覽器中向認證服務器申請令牌,跳過了"授權碼"這個步驟,因此得名。所有步驟在瀏覽器中完成,令牌對訪問者是可見的,且客戶端不需要認證。

簡化模式的流程,這樣有助于理解
(A)客戶端將用戶導向認證服務器。
(B)用戶決定是否給予客戶端授權。
springoauth2源碼分析、(C)假設用戶給予授權,認證服務器將用戶導向客戶端指定的"重定向URI",并在URI的Hash部分包含了訪問令牌。
(D)瀏覽器向資源服務器發出請求,其中不包括上一步收到的Hash值。
(E)資源服務器返回一個網頁,其中包含的代碼可以獲取Hash值中的令牌。
(F)瀏覽器執行上一步獲得的腳本,提取出令牌。
(G)瀏覽器將令牌發給客戶端。
Springboot框架,如果用戶訪問的時候,客戶端的"訪問令牌"過期前,可以申請一個新的訪問令牌。

這里的refresh_token就是在獲取token的時候返回的。
完畢!!!
給個關注,轉發唄,謝謝!
Springboot接口冪等性基于token實現方案
spring oauth、Spring Cloud Sentinel 流控限流
SpringBoot RabbitMQ消息可靠發送與接收
SpringBoot中使用Cache及JSR107的使用
SpringBoot開發自己的@Enable功能
SpringBoot開發自己的Starter
jwt oauth2?Springboot之Actuator詳解
Tomcat配置連接數說明
版权声明:本站所有资料均为网友推荐收集整理而来,仅供学习和研究交流使用。

工作时间:8:00-18:00
客服电话
电子邮件
admin@qq.com
扫码二维码
获取最新动态